Heryngard - Session 1
I enjoyed my last campaign of Swords & Wizardry Complete (S&W) with Dyson’s Delve, but I wanted to try something based on the lessons I learned then for my next solo campaign.
First, I wanted to break out of playing a megadungeon style game. D&D works incredibly well in a dungeon context, obviously (it’s in the name!) but wilderness adventures, whether a hex crawl or something else, appeal to me a great deal as well. That also allows me to include more and different kinds of dungeons with varied styles, themes, and inhabitants.
But the aesthetic of the setting needed to be different. Rather than “vanilla D&D fantasy,” I want to play up the science fantasy aspects already built into the game. This partly involves monster selection and the like, but also comes from reskinning and interpretation. For this, I’m largely inspired by Jack Vance’s Dying Earth series, but also by the animated series She-Ra and the Princesses of Power.
Rather than build something from scratch, I have decided to start with something fairly vanilla and try reinterpreting it. For that, I’m using the Domain of Heryngard (DoH), also by Matt Finch and Mythmere Games, which was published as part of the second S&W Kickstarter earlier this year. It has a few specific elements that I think lend themselves well to this kind of reinterpretation:
- The setting experienced a massive cosmic cataclysm that set the world back in terms of knowledge and technology. The Ancients possessed great knowledge, much of which has been lost, but some of it is preserved in huge underground ruins.
- Other planes of existence overlap in places with the world, as in different types of fey lands.
- It does not focus overly much on faux-medieval ideas or some partial understanding of feudalism. While those things are present in areas, they’re not the focus.
- Demi-humans mostly are not in the main part of the setting, though they can be. And the dwarves and elves are specifically tied to those other fey overlaps.
So I am interpreting the world of Yrthion (as presented in “Domain of Heryngard”) as a far-future science fantasy setting. “Planes of existence” are actually alternate dimensions (“quantum worlds”), and other types of monsters will be reskinned to reflect this science fantasy setting. Other adventures and modules may be added to the regional map as the campaign progresses.
Character Creation
A few mechanical notes:
- Attributes are determined by rolling 3d6 in order, but any one pair of attributes may be swapped.
- Classes are restricted to Druid, Fighter, Magic-User, and Thief. Other classes may become available later.
- No demihumans at the start of the campaign, though later discoveries may change this.
- Characters start with the maximum HP available to them at level 1.
- Thieves use the d6 Thievery skill from White Box FMAG.
- All listed prices are in silver pieces (sp). Discovered treasure in the form of loose coins is divided by 10 from the original value. Treasure in the form of gems, jewelry, or other valuables is interpreted as the next coin size down (e.g. if the text says it’s worth 100 gp, it’s worth 100 sp).
- Armor purchases are cumulative (i.e. a character must have leather armor before purchasing chainmail).
- Hirelings (e.g. torchbearers, porters, camp guards) can be hired at any level, according to the rates listed in S&W. They are only paid a daily wage. They are not generally used for combat in dungeons, although they may fight in the wilderness and venture into dungeons with the party for logistical purposes.
- Henchmen (e.g. classed retainers) can be hired at level 2 or higher by individual characters. They receive half a share of treasure and experience.
- Encumbrance will be simplified (as suggested in Fantastic Medieval Campaigns by Marcia B. p. 231): Wearing light armor (leather or ring) incurs -3 penalty to movement rate. Wearing heavy armor (chain or plate) incurs -6 penalty to movement rate. Carrying significant treasure or bulky items incurs an additional -3 penalty to movement rate. Strength scores may be taken into account in this evaluation.
Characters
Here are the starting characters for the campaign. All are human and neutrally aligned. I’m rolling on some tables in D30 Sandbox Companion (D30SC) to determine various traits randomly. Ages were determined to be 20 + a random roll (die size depending on their appearance and other factors).
- Aerona the Fighter (she): Wields a battle axe and shield, wears ring armor. Carries two javelins.
- Age 35. Heavy-set. Ruddy complexion. Violet eyes and cropped brown/auburn hair.
- Motivation: Rivalry.
- Personality: Fanciful.
- Talent: Good with horses.
- Eleri the Thief (she): Wields a short sword and light crossbow, wears leather armor. Carries a grappling hook and rope.
- Age 31. Bull-necked. Light golden skin. Green eyes and collar-length chestnut brown hair.
- Motivation: Impress someone.
- Personality: Polite.
- Talent: Lip reading.
- Elgar the Fighter (he): Wields a battle axe and shield, wears leather armor.
- Age 21. Solid build. Dark golden skin. Blue eyes and chin-length curly auburn hair. Poorly-kept goatee.
- Motivation: Duty, group.
- Personality: Glum.
- Talent: tobacco connoisseur.
- Rhiannon the Magic-User (she): Wields a staff and darts, wears no armor. Knows six spells: charm person, detect magic, light, magic missile, read languages, read magic.
- Age 26. Slight frame. Light beige complexion. Blue eyes and long, bushy, dark brown hair.
- Motivation: Duty, general.
- Personality: Calm.
- Talent: Cider making.
- Samlet the Druid (he): Wields a sickle and wooden shield, wears leather armor.
- Age 27. Coltish body. Medium brown skin. Dark green eyes and straight blonde hair to his collar. Clean chin curtain (Amish-style beard).
- Motivation: Duty, group.
- Personality: Meek.
- Talent: Folklore.
Starting the Adventure
Rather than start at the entrance to a dungeon, as I usually do, I decided to start them off in town.
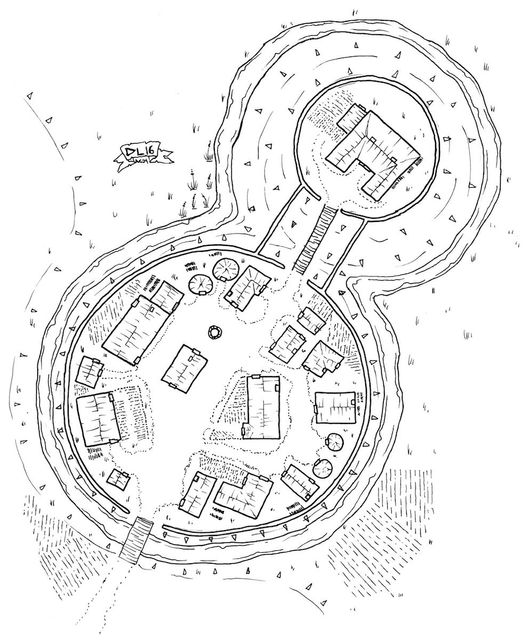
Setting up Caer Morag
From Domain of Heryngard:
Caer Morag is a border fortress of the Domain of Heryngard, and the assumed starting point for characters in the campaign. The castle and the cluster of farmhouses around it are jointly referred to as Caer Morag, with no distinction made between castle and village. Population: 207 villagers plus the castle’s garrison of 46. Captain Enisi Misai (Captain-at-Arms) is the castellan of Caer Morag. She commands a garrison of 40 soldiers of Heryngard, with a Lieutenant-at-Arms (Othbar Nault) and 4 sergeants. Cleric (level 4) Gwaine of Morag.
Captain Misai serves in the role of Protector of Caer Morag, responsible for its peace and security. The cleric, Gwaine, is the reeve, responsible for the collection of taxes and other day-to-day matters within the village. Caer Morag guards a passage through the Yarzu Hills from the Heryn River Valley to the Jalu River Valley as well as the Whisperwood and Forest of Rhoon.
The following traits are derived from the D30SC tables, modified as needed.
- Reaction to outsiders: curious about
- Economic background: generally uncontrolled / fluctuating, exorbitant prices and taxes at the moment
- Settlement issues: minor / contained corruption
- Nearby threats: wolves
I’ll determine vendors and shops later when the characters return from their first adventure. That said, other locations in the region are noted as having an inn or tavern, so the lack of a mention above indicates that, at the moment, none exist here.
Similarly, I will figure out more about the personalities and other traits of NPCs when it becomes relevant.
Preparations
The party is gathered in Caer Morag, preparing to leave for an ancient underground complex known as the Uldra Cthon. They have been hired for a mission related to Dreezindole, a wizard who took an expedition to the Cthon. I pulled out the Tome of Adventure Design (ToAD) to help me flesh out a few details.
- What is the specific mission? (ToAD Table 1-4): Guard / protect
- Who is their patron? (ToAD Table 1-8): Rebel (against criminal organization)
Another magic-user has hired them to find and protect Dreezindole, assuming he is still alive. The two of them are aligned against a cabal of mages using their power for criminal ends. Before they leave for the Cthon, they’ll investigate in town to gather any information they can on Dreezindole’s expedition.
Based on the personalities and motivations, perhaps the group came together out of a sense of duty against that cabal. (Who does Eleri want to impress? The patron?)
Aerona (a fighter / mercenary) speaks with Captain Misai about Dreezindole.
- Reaction roll: 2d6+1 = 9, middling reaction, gives two of three possible bits of information
She tells them that he came through a couple of years ago with a small entourage and a large wagon for their equipment on their way to the Uldra Cthon, but they haven’t been heard from in over a year. He had expertise in earth magic (the kind the Ancients used in the Cthonia complexes). It sounded like he intended to reactivate the pre-cataclysm arcane machinery within the Cthonium.
Whatever has happened to him, then, happened some time ago. If he hasn’t had any contact with the nearby fortress in over a year, that indicates that something bad likely happened.
Meanwhile, Samlet goes out into the village looking to hire some porters for their expedition. The normal rate for such work is 1 sp/day, and they expect this adventure to last about a week (counting travel time, as the complex is about 12 miles away).
- What recruits are available?
- Rolling from D30SC
- HHRR: Recruitment Respondents - normal conditions, d30 = 9 => 2 respondents
- RRXa: Retainer Reactions (to offers): d30+1 = 23 => offer accepted, roll for loyalty
- LMM: Loyalty Morale Modifiers: d30+1 = 6 => -1 to morale
Only two of them are available at the moment; they accept the offer, although their morale is slightly decreased. Perhaps he should have offered more, but as it is, 14 silver is not a small portion of his purse.
Due to the current economic situation, rations are more expensive than normal. Therefore, trail rations cost 1 silver each, and dried rations (useful in the dungeon) cost 1.5 each. They will need 7 trail rations per person, for 35 total, and they decide to take 2 dungeon rations per person (2*7*1.5=21 silver). Supplies will thus cost 56 silver for the entire expedition, or 19 each (rounding to the next highest whole number).
Traveling to Uldra Cthon
The party leaves Caer Morag for the Uldra Cthon, travelling through the hills to the southwest of the little settlement.
- What’s the weather like?
- This is a “warm but not tropical climate” per DoH p. 4.
- Rolling from D30SC
- WTHR: Average Daily Temperature & Precipitation Class by Location and Time of Year - subtropical, early spring, plains => approx. 80 F, precipitation class II
- PREC: Class 2 - d30 = 13, no precipitation event
It’s a warm spring morning with no rain clouds anywhere in the sky as they move through the farms surrounding Caer Morag. With their armor and equipment, the group can make 9 miles per day comfortably. That will get them just up into the hills to the southwest of the village. That gives them a 20% chance of getting lost in the hills, but they navigate successfully.
DoH suggestes one encounter roll per day and one per night in the Yarzu Hills using the Wilderness Encounter Tables from S&W. The dice indicate no encounters on the first day. I’ll subtract one trail ration per person (28 left). At this moment, the expedition leader (me) realizes they miscalculated and should have brought more rations, because they didn’t include the porters in the trail ration purchase. But as long as they don’t get lost, that won’t present a problem, and of course they’ll provide food to their hirelings.
The next day, they continue to navigate the hills without trouble or encounters. Samlet rises in the morning and casts predict weather, drawing on his knowledge of the geography and metereology of the area. He pays attention to the smell of the wind, the patterns of the birds, and the feel of the leaves. Today should be much like the day before, with no inclement weather. Rhiannon studies her arcane manual and memorizes the mental code to manipulate the neural energies of other people (preparing charm person).
And as expected, they find the dungeon during a clear, beautiful afternoon on the second day:
The main (and only known) entrance to the Uldra Cthon is in the Yarzu Hills, a massive alcove carved into the side of a cliff, where three huge doors grant access to the underground complex. Only the central door is accessible at this time, for the two side doors have been sealed by magic.
It’s late in the day, so they decide to make camp and perhaps inspect the entrance. A proper foray into the dungeon will wait for the morning.
You have found the entrance to the legendary subterranean complex known as the Uldra Cthon, a huge alcove cut into the cliff wall with three massive doors leading into the cliff itself. The alcove can be reached by means of a wide, stone bridge across a wide, deep brook.
The adventurers have agreed not to open the doors just yet, but they do cross the bridge. Eleri will peer into the darkness, while the fighters stand guard in case of any dangers. Samlet waits at the bridge, watching behind them, and Rhiannon quietly inspects the two side doors. They are certainly impressive, and she has no idea what might lay beyond them. (I roll a d6 to see if they encounter anything, but not this time.)
The central door lays on the floor inside the complex; at a glance, it seems to have been blasted off of its hinges. There’s a large antechamber on the other side, with no light except that which penetrates through that opening. Even so, the darkness inside seems to swallow the light immediately, as if the sun’s illumination has no power there.
Shaking her head, the thief tells the others they should plan to come back the next day when they are fully prepared.
No encounter occurs that night at their camp outside the dungeon. Again, they’ll expend 1 trail ration per person (21 left).
Exploring Uldra Cthon
The next morning, they make ready to enter the dungeon. They arrange themselves in the following marching order:
- Aerona (8 hp, AC 14) - battle axe (1H), shield
- Porter A (4 hp, AC 10) - torch
- Elgar (8 hp, AC 13) - battle axe (1H), shield
- Eleri (4 hp, AC 13) - light crossbow / short sword
- Rhiannon (4 hp, AC 10) - staff / darts, magic missile
- Samlet (6 hp, AC 13) - sickle / oil, faerie fire
- Porter B (2 hp, AC 10) - torch
Rhiannon and Samlet prepare their spells for the day, one each, in their very different ways. She is concerned about dangerous monsters within the complex, based on their external reconnaissance the previous afternoon, and therefore is prepared for a fight. Samlet draws on his connection to the magic of the earth and the quantum matrix so that he can cause something to glow, whether for guidance or, in a dire situation, to make it easier for others to fight it.
(Note: generally, I won’t note rolls for random encounters. Rather, they’ll occur in the text whenever such a roll succeeds.)
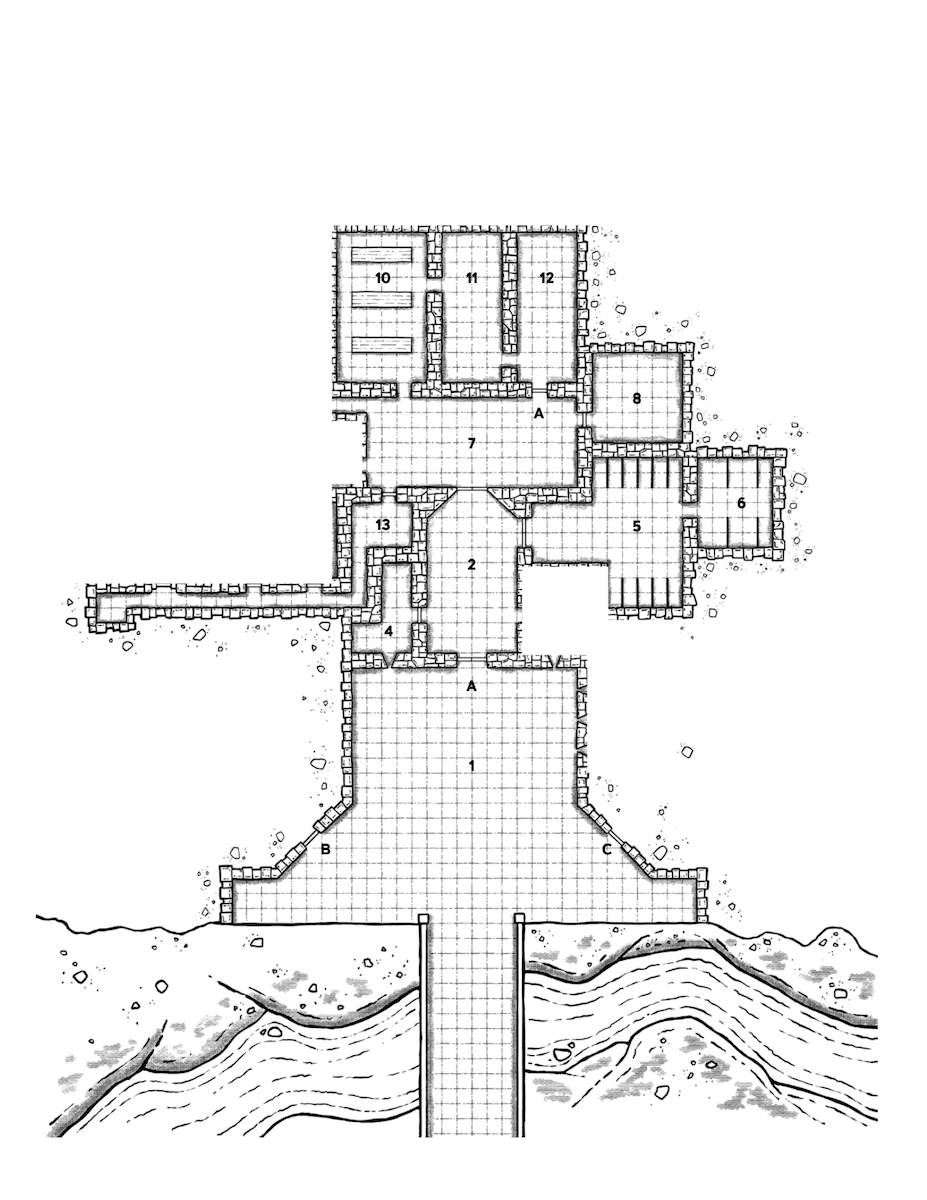 Map of the portion of the Uldra Cthon explored in this session. Cartograpy by Bill Edmunds. (c) Mythmere Games 2024.
Turn 1
The group moves carefully through the entrance landing (Room 1), which they had previously examined the night before. There’s no obvious movement here on the outside of the complex.
As the side doors remain unavailable, the group will proceed through the open main door. As they do so, the porters’ torches are lighted and will burn out by the end of turn 7.
Turn 2
Entering the outer antechamber (Room 2), they notice that the ceiling is 20’ overhead in the center, carved directly into the rock. Double doors stand in the center of the northern wall, with several smaller doors to the east and west.
Immediately they “sense a powerful, brooding presence permeating the stone.” Rhiannon notes that she has been told this is common when first visiting a Cthonium, as human brains are affected by the strange dimensional energies and earth magic. Those same energies are the reason the Ancients built these places in an attempt to harness them.
Turn 3
They see nothing on the floor here beyond some old debris that will serve no use for them. Eleri notices an old pit trap in front of the entrance, but it seems non-functional at the moment. Perhaps later they might try to force it open and see whether it leads anywhere, but for now they’ll stick to the main doors.
Elgar will try to force the door with his crowbar.
- When opening doors, each failure will trigger an extra random encounter check before the next character can try. No individual can check more than once a turn, and the only “help” is to pass the crowbar to someone else to have them try (and potentially incur another random encounter check).
He has trouble, so Samlet lends him a hand. They’re both struggling, and all this makes a good bit of noise.
Turn 4
While Elgar and Samlet are trying to force open the door, Eleri notices a giant rat sniffing in the shadows, attracted by the noise.
- Giant Rat: HD 1d4 (3 hp); AC 12; Atk bite (1d3); Move 12; Save 18; Morale 8; AL N; CL/XP A/5; Special: 5% are diseased.
The rat is 50 feet away, though, giving the party time to react to its immediate hostility.
Round 1: As the group spots the rat, Eleri takes aim with her light crossbow and fires a bolt at it, hitting it but not taking it down. The others all attack it as well, but are unable to damage it. The rat does bite Elgar with a hefty snap, leaving him bleeding slightly from the leg. (Fortunately, the rat is not diseased.)
Round 2: Elgar swings his battle axe and takes the rat’s head off in a single blow.
- Characters can bind 1d6 HP worth of wounds following a battle. The character can only recover HP lost during this particular battle. Recovered HP cannot cause a character to have more hit points than normal. (Taken from White Box FMAG.)
Elgar binds his wound to staunch the bleeding, though he doesn’t recover much in the way of hp. They recover the javelin, bolt, and some of the darts, but only the javelin and two darts are still usable.
Turn 5
They’re still trying to get through that main door, with Elgar assisted by Samlet. Aerona and Eleri continue to keep watch, with Rhiannon between the two sets of adventurers. The porters split between the door-openers and the watchers. The door pops open and they hurry through. Aerona hammers a spike into the door to keep it from closing behind them (9 spikes left).
The adventurers have entered the inner antechamber (Room 7), a long rectangular space with walls lined with empty torch cressets. The room has quite a few doors and passages out of it on all four sides. They notice some writing on the eastern portion of the northern wall.
Rhiannon inspects the writing, which reads, “approximately 80 feet to the north of this wall.” The writing looks relatively modern and is likely from Dreezindole’s expedition or some other recent visitor, rather than from the Ancients who built this place.
They decide to take the easternmost door on the north wall, following the hint.
Turn 6
That door is closed, though, and Elgar will try to open it with Samlet’s help again. As before, Aerona and Eleri will watch for any “guests”, with a porter at each group. Rhiannon will generally be posted between them to support as needed. (This will be their standard door-opening arrangement until noted otherwise.)
Elgar succeeds in forcing it, and Aerona spikes the door open behind them (8 iron spikes left).
This next room has walls lined with shelves. Barrels and burlap sacks are everywhere in what appears to be a kitchen storeroom. The group will spend a turn searching for useful bits.
Turn 7
The sacks are completely rotten and eaten away by vermin, but the barrels seem more or less intact. There are 30 barrels, and each takes a minute to open and inspect. On this turn, one adventurer can inspect 10 barrels. Rhiannon, Eleri, and Samlet will each inspect 10 barrels, with Elgar and Aerona watching for intruders. (At the end of the turn, the porters will discard their torches and light new ones that last until the end of turn 13. Elgar will have 8 torches left.)
Samlet finds a gold bracelet set with three rubies worth 250 silver pieces.
When Rhiannon opens one barrel, the decayed flour dust poofs out, hitting her and Eleri! They both save successfully against the (unknown) magical effects of whatever has affected the flour. After sneezing for a moment, no other effect happens.
Another barrel in Rhiannon’s set has a large shadowy worm, about a yard long. It crawls around the room for the rest of the turn, spooking the porters, but appears not to interact with the actual matter in the room. It crawls through debris and sacks as if they weren’t there, but it doesn’t seem to notice the adventurers.
Finally, Samlet opens a barrel filled with rotted mushrooms that also has a small figure in it: a “tiny, golem-like clay figure” in a roughly human shape.
Turn 8
Before they can talk to the small clay figure, what looks like “bundles of stick and wood” come in from a nearby room - walking directly through the wooden barrels as if they weren’t even there. The bundles are held together with twine and small bits of leather, arranged in a humanoid shape.
- Stick Figure (5): HD 1d6 (6, 4, 5, 5, 1) hp; AC 12; Atk 1 stabby stick (1d3); Move 6; Save 18; Morale 10; AL C; CL/XP B/15; Special: vulnerable to fire, walk through wood.
They’re only 10 feet away when the encounter begins.
Round 1: The little animated stick figures try to poke at the adventurers for a minute, but they aren’t quick enough. However, they are difficult to reach themselves, and only Elgar and Rhiannon make any contact. However, realizing that these things are made of kindling, Samlet and Rhiannon will grab torches from the porters to use as improvised weapons.
Round 2: Despite waving the torches at them, none of the adventurers are able to set them on fire. However, that provides enough distraction that they can smash two of them, getting a third to flee. The remaining two are acting stabby but can’t get to any of their targets.
Round 3: The adventurers finally manage to destroy the last two stick figures, but Rhiannon’s torch goes out from being waved around. Fortunately, none of them took any damage from the little creatures.
That said, what are these things? What is motivating them? Perhaps that little gnome-shaped clay golem will have some answers. They spend the rest of the turn asking him questions. Based on situational and Charisma bonuses, the little guy has a friendly reaction.
He tells them his name is Claymore. He came here accompanying Dreezindole, but he was ordered into hiding when something here began to affect the wizard. If they are searching for his owner, then he can come along (though he is not at all equipped for fighting).
- Claymore: HD 1 (5 hp); AC 13; Atk none; Move 3; Save 18; Morale 8; AL N; CL/XP n/a; Special: explodes when destroyed (3d6 damage in 20’ radius, save for half); immune to sleep and poison.
Rhiannon will pick him up and carry him in her pack; otherwise the group will move very very slowly. Elgar lights another torch and hands it over to the porters.
Turn 9
There’s another exit on the south end of the western wall here, fortunately without a door on it. They go through it to enter the kitchens, with a huge fireplace on the eastern wall and a similar archway on the western wall. They’ll spend the rest of the turn searching; as before, the fighters will watch for intruders rather than engage in active searching.
The pots, forks, and all other metal utensils are still in good shape. They hold some value, but they’re also quite bulky, so they’ll consider grabbing them later if they have the capacity. Carrying them around the rest of the Cthon doesn’t seem practical, though.
The group decides to go through the western archway next.
Turn 10
The next room is slightly larger than the kitchen. It holds three long wooden tables with lots of chairs. The furniture has mostly rotted away, and in fact the middle table has completely collapsed. An archway on the south wall leads back to the inner antechamber.
Samlet will inspect the furniture, while Eleri looks for valuable items and Rhiannon looks for any other hidden exits or niches. Elgar and Aerona will watch for intruders.
The druid notices that the rot is exceptionally advanced, even considering the age of the furniture. He speculates that the corrupting magic of the Cthonium, or other chaotic energies, have affected the wood here. The other two don’t find anything useful.
Turn 11
From here, they’ll proceed carefully through that inner antechamber to the door on the east end of it. Because they’ve already explored this space, they can move a little more quickly, but they aren’t running, either (focused on stealth).
At the door, Eleri listens for a few minutes and hears nothing.
Turn 12
They’ll use their standard door procedure (Elgar and Samlet on the door, others watching or positioned appropriately). Elgar doesn’t have any difficulty this time.
As the others enter the room, they see a wooden desk with a chair in the northeastern corner. Aerona spikes the door open behind them (7 left). There’s no movement, fortunately, so the fighters will watch behind them while the others search the room.
This seems to have been an office for someone, but the contents are so badly rotted and otherwise decayed that there’s no value or even information to be found here.
Turn 13
They passed some doors in the outer antechamber; perhaps they can find more clues to Dreezindole’s whereabouts there. They’ll go back to the outer antechamber to a door on the east wall. That takes a full turn of movement at this stealthy pace, particularly with a few of them in medium armor.
One torch burns out; both are replaced for simplicity of management since the other one was quite low anyway. Elgar has 5 left.
Turn 14
Back at this door, Eleri listens: as with everywhere else, it’s completely silent. Elgar gets to work with his crowbar.
Beyond the door is what appears to have been a stable long ago (Room 5). Aerona spikes the door to ensure they have a clear line of retreat (6 left). Eleri and Samlet will search the room for clues or treasure, while Rhiannon and Claymore watch the archway on the other side of the room.
They find the rotted remains of wooden stalls on the north and south walls. The archway on the other side of the room leads to some other chamber, dark and quiet.
Turn 15
Rhiannon, Samlet, and Eleri go through that archway to the smaller storeroom (Room 6). It also has several stalls built out of badly rotted wooden planks.
Everything in the room is overgrown with fungus, which blooms in a riot of crimson, bright yellow, lavender, and dark purple colors. There are three men sitting completely motionless in the middle of the room, covered in mushrooms and frilly lichens. When the light shines on them, they stir and begin to rise to their feet.
There’s no surprise here. They are 40 feet away from the adventurers.
- Fungus-zombies (3): HD 2 (8, 11, 6 hp); AC 11; Atk strike (1d8); Move 6; Save 16; Morale 12; AL N; CL/XP 2/30; Special: immune to sleep and charm.
The two fighters are another 70 feet behind the explorers, though.
Round 1: Before the explorers can react, the fungus-zombies rise and attack them. Eleri takes a hard hit, and she and the magic-user run back into the stables and out of immediate danger. Samlet and Elgar team up to take down one of the zombies, and Aerona begins hacking away at another. However, after a few moments, a huge spider descends from the ceiling, similarly covered in mushrooms and lichen composed of many different colors, none of which look entirely natural to the humans. The feyfungus spider is 30 feet away from the adventurers (20 feet behind the zombies).
- Feyfungus Spider (1): HD 2 (15 hp); AC 13; Atk 1 bite (1d4 + transforming disease); Move 9; Save 16; Morale 8; AL C; CL/XP 4/120; Special: bite infects victim with disease to become fungus-zombie in 1d4+1 days, save at +4.
Round 2: The back line approaches for missile attacks, and the adventurers are able to take down another zombie. Samlet stands slightly back and begins to cast a spell, pulling together the natural energy of the earth to illuminate the spider that has been transformed by chaotic energy leaking from another dimension.
Round 3: The group coordinates their attacks; Samlet’s faerie fire interacts beautifully with the chaotic energies swirling through the spider, and the rest of the group take it down as well as the zombie. Somehow, the only damage they took was that swipe at their thief.
Eleri recovers her bolt and still has 19 usable.
Turn 16
Eleri will spend this time binding her wounds, catching her breath, and generally recovering back to her maximum of 4 hit points. Elgar stands over her glumly, unhappy that he was out of position for this fight (though in reality the others moved ahead of him). Rhiannon and Samlet search the room carefully, illuminated by the porters with Aerona standing protectively nearby.
In the back of the room, they find the men’s treasure, covered in lichen and mold. They discover three bracelets worth 10 sp each, 30 silver pieces, 43 copper coins, and three well-crafted daggers worth 10 silver each. Aerona will carry the daggers, while the porters will be asked to carry the coins and bracelets.
Turn 17
Just as they are getting moving again to go look at some of the other doors and exits from the antechambers, some of the wooden stalls animate and three more of those horrible little bundles of wood and hay come at them!
- Stick Figures (3): HD 1d6 (1, 4, 5 hp); AC 12; Atk 1 stabby stick (1d3); Move 6; Save 18; Morale 10; AL C; CL/XP B/15; Special: vulnerable to fire, walk through wood.
They’re 40 feet away when this starts.
Round 1: At the start of the fight, Samlet lights a flask of oil (9 left) and tosses it at one of the stick figures, setting it on fire. Eleri also attacks from range but without a hit. Elgar and Aerona team up to take down another one, and Rhiannon tries to light one on fire with her torch (9 left). Instead, the little animated monster stabs her with a stick!
Round 2: The little stick man stabs Rhiannon again as its companion dies in flame, but Elgar and Aerona combine to chop it up.
That was short enough that there’s enough time left for Rhiannon to bind her wounds, recovering d6=5 max hit points. At the same time, Eleri successfully recovers her bolt again.
Turn 18
From here, they’re going across the outer antechamber to a door on the other side. Eleri listens at the door for a moment; nothing can be heard.
As Elgar pries open the door (and Aerona spikes it open behind them, 5 iron spikes left), they enter a wide corridor (Room 4). This defensive outpost is lit from outside by a bit of light coming through an arrow-slit. They notice some writing on the southern wall, consisting of old graffiti. Rhiannon inspects it for a bit, and decides it’s all either pre-Cataclysm garble or typical soldier graffiti.
However, they had suspected that this room might also connect to the inner antechamber; that is not true. They’ll have to go back through to continue their exploration.
Turn 19
It takes them a full turn of movement back into the inner antechamber to the door they thought might connect here, on the southwest side. The torches burn out, and Elgar lights more (3 left).
Turn 20
Eleri puts her ear to the door; as in the rest of this place, only silence greets her. Elgar, the big fighter, has no trouble with the door. However, when Samlet and Aerona peer inside (room 13), they are alarmed at the appearance of a skeleton! It wears leather armor and holds a spear, sitting in a wooden chair (notably, not rotten). This gives them pause, because all the other wood here has been rotted away.
The druid and fighter enter cautiously; as soon as they do, the skeleton animates and cries out, “To arms! Warning!” As if summoned, 1d4 = 1 giant rat noses into the room.
- Skeleton (1): HD 1 (1 hp); AC 11; Atk 1 spear (1d6+1 two-handed); Move 12; Save 17; Morale 12; AL N; CL/XP 1/15; Special: immune to sleep and charm spells.
- Giant Rat (1): HD 1d4 (4hp); AC 12; Atk bite (1d3); Move 12; Save 18; Morale 8; AL N; CL/XP A/5; Special: 5% are diseased.
The skeleton and rat are a full 40’ away at the start of the encounter.
Round 1: Eleri draws her crossbow and fires it in one smooth motion; the bolt smashes through the skeleton and it clatters to the floor. Samlet slices the rat, only wounding it, while the fighters miss their attacks.
Round 2: The rat tries to bite Samlet, but he dodges out of the way and Elgar finishes it off.
Both the bolt and the javelin are broken. There’s a passageway on the other side of the room; that’s where they will go next.
Turn 21
That passageway turns out to be a long corridor with multiple doors on the right (north) side of it. They’ll try the first one; Eleri listens and hears more scuttling similar to the rats they heard before.
As Elgar and Samlet try to force the door open, what look like bat-winged anteaters come flapping down out of the darkness!
- Stirges (4): HD 1+1 (4, 8, 9, 8 hp); AC 12; Atk proboscis sting (1d3 + blood drain); Move 3 (fly 18); Save 17; Morale 9; AL N; CL/XP 2/30; Special: +2 to-hit bonus, blood drain (automatic 1d4 after hit).
When the encounter starts, the stirges are 30 feet away.
Round 1: The stirges swoop in, and one attaches itself to Samlet. The stirge attacking Rhiannon is killed, and one of the porters (attacked by these little blood-sucking monsters) whacks another with their fist.
Round 2: Not only are they unable to get the stirge off of Samlet, two others attack Aerona and one attaches itself to her! The porter continues to flail away at the stirge in front of them, while the other cowers but holds the torch up.
Round 3: Before the adventurers can do anything else, one of the stirges completely drains Samlet of blood, leaving his lifeless body on the cold stone floor. Before they even realize what has happened, the others are able to take down two of the remaining stirges, although Rhiannon is in bad shape.
Round 4: The remaining stirge lifts off from Samlet’s corpse and flies at Aerona, though it’s unable to get its proboscis into her. Eleri and Elgar do some damage to it, but they’re unable to kill it.
Round 5: Before Eleri can kill it, the last remaining stirge bites Rhiannon and she also falls to the floor dead.
The stirges that were alarmed by Samlet’s prying on the door are dead, but they have taken two members of the party to the grave with them. Claymore is distraught, but the two porters even more so at the death of their patron. In grief and shock, they flee back to the entrance, and the remaining three adventurers go with them (bringing the bodies of their fallen comrades).
Turn 22
They can move 360 feet per turn while running (no stealth). On reviewing my logs, I notice that Aerona did not spike the door to Room 13 (where they just killed the skeleton and rat)! Fortunately, it hasn’t closed back yet, so they can all get back outside without further encounters or trouble.
Back Outside
The porters are unwilling to go back inside after those horrible experiences. While the group had not spent a great deal of time together, they can’t help but be affected by the loss of their druid and magic-user. They had both come here out of a sense of duty.
They are buried in the soft earth overlooking the complex, across the brook. Most of their supplies will stay with the group, particularly Rhiannon’s tent and torches as well as Samlet’s bedroll and rope. (They do not take the existing money of their dead comrades for themselves; it will go back to the families and generally be forgotten for game purposes.)
Experience and Rewards
I’m continuing to use the Feats of Exploration system from 3d6 Down The Line.
- Monsters: 5 giant rats, 8 stick figures, 3 fungus-zombies, 1 feyfungus spider, 1 skeleton, 4 stirges. Total of 415 XP before bonuses.
- Treasure: gold bracelet (250 sp), 3x bracelets (10 sp each), 30 sp, 43 cp, and 3x well-crafted daggers (10 sp each). Treasure XP is not awarded until they get it back to a place of safety, however.
- Feats of Exploration: Explored 11 rooms, so 2 feats (1 per whole set of 5 rooms). Minor feats are currently worth 195 XP each (2% of their TXP of 9750), for 390 XP total.
Therefore, before they return the treasure to town, they have earled 805 XP among the three survivors, and treasure worth a total of about 344 silver pieces.
Conclusion
I’d forgotten how tough stirges can be! Also, I have a separate, more detailed log for mechanical bits, most of which I excised here for publication purposes.
Next time, I think it’s likely they’ll need to go back to town and find another couple of party members. Supplies aren’t an issue, but sending a party less than half the original size into the deeper parts of the dungeon likely will not lead to success.
I also hope to get Claymore involved a bit more and explore some of the characters’ motivations and backstories, though not too much. At level 1, they’re still incredibly fragile!
Some of the links above are affiliate links, which don’t cost you anything extra but help me buy even more supplements to use in these posts. I don’t have any other affiliation with these publishers or designers.