Heryngard - Session 2
Last session was very long; in fact, I think it was one of the longest I’ve done on this blog. This session is much shorter, but represents a very different approach (although still in the same system and world.)
Heading Back
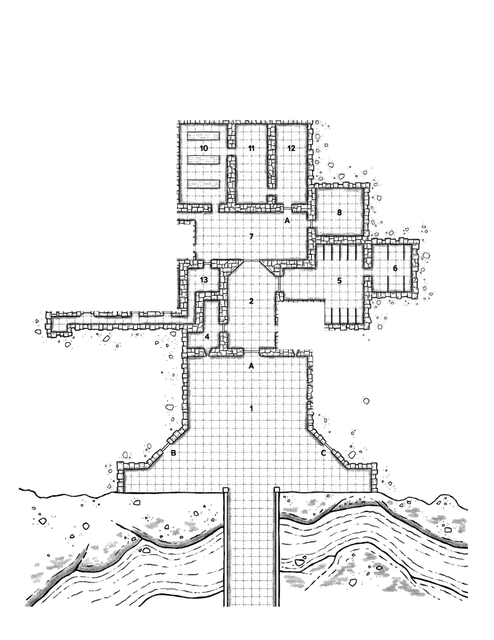
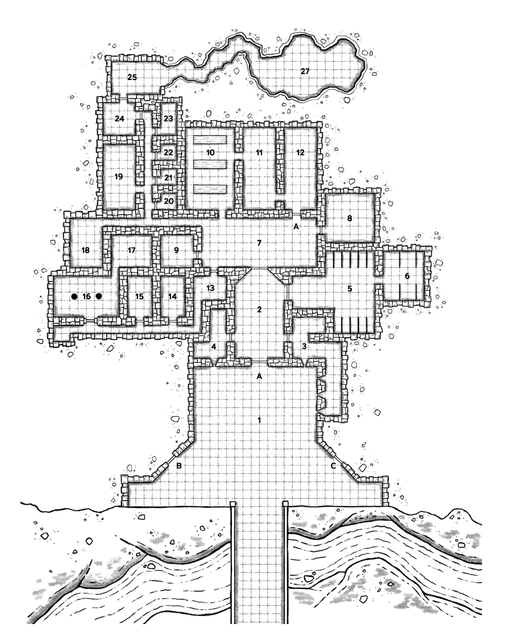
Having lost two of their five adventurers, and with the porters also leaving, the remaining party will travel back from Uldra Cthon to Caer Morag. This is enough to convince the porters at least to travel with them, as they’re more likely to survive together.
At this point, I realize that I need some sort of calendar, because things like weather conditions and supply usage are important to this campaign. Rather than go find (or invent) a “fantasy world” calendar, I decide to use more or less our current-day calendar. I’ll simply use it to track the time of year and how long things take, not necessarily to engage in detailed world building.
Assuming the campaign started on March 1st as the first day of meteorological spring:
- March 1st: Investigation in Caer Morag and Recruitment (start of campaign)
- March 2nd: Travel to Uldra Cthon
- March 3rd: Reach Uldra Cthon
- March 4th: Exploration of Uldra Cthon
- March 5th: Begin return to Caer Morag (where this session begins)
March 5th: Returning to Caer Morag
As it’s already late in the day, they decide to break camp in the morning to return. Nothing disturbs them during the night.
I’m not going to show rolls for encounters, but I will describe them if they happen. Similarly, I’ll only mention the rations here if they have some importance to the events.
In the morning, they gather together their equipment and supplies (including some of those from Rhiannon and Samlet). Aerona, who tends towards a more “fanciful” personality, carries Claymore and starts to make friends with the little creature.
Given their encumbrance and the hilly terrain, it will take 2 days to journey back. They have a brief rain shower in the morning, but it’s not very intense and they are able to keep moving through the comfortable spring day without running into anyone else.
March 6th: Reaching Caer Morag
The night passes uneventfully, and the next day is clear and comfortable. The group returns to Caer Morag and dismisses the porters, who are grateful to have returned successfully. They will pass the word that they were well-treated but saw terrible things (which may affect future recruitment efforts by the adventurers).
Given their mission (quest), the three adventurers (Eleri, Elgar, and Aerona) are allowed to stay at the fortress for the night. That evening, they discuss their next steps together with Claymore. Claymore has told them that he wants to find Dreezindole for his own reasons. He’s friendly enough and seems helpful. He could potentially provide some information on the layout of the site, though not on the creatures that may inhabit it. Aerona thinks he’s a “funky little guy” and is happy to have him along as her responsibility.
Before they return, they’d like to find one or two additional adventurers. They’d also like to hire another couple of porters, but the adventurers are the first priority. In the morning, they can talk to the Protector and the Reeve about their plans, and perhaps pass the word around the village.
March 7th: Recruitment and Resupply
Selling treasure nets a total of 250 + 30 + 30 + 4 + 30 = 344 sp. This is divided among the three characters that returned from that run, so they each get 114 sp (and XP).
New characters
Regular recruitment rules don’t apply for “player characters”, unlike those for henchmen and hirelings. Thus no recruitment rolls are needed for this process.
- Eptan the Thief (he): Wields a short bow and short word, wears leather armor. Carries oil, rope, and a grappling hook.
- Age 38. Taut and wiry. Rosy complexion, green eyes, straight auburn hair. Stubby Van Dyke beard.
- Motivation: Earn reputation.
- Personality: Meek.
- Talent: Flower arranging.
- Hraegosh the Magic-User (he): Wields a staff and darts.
- Age 40. Well built. Light brown skin, dark blue eyes, bushy cropped brown hair. Clean shaven.
- Motivation: Redemption.
- Personality: Jovial.
- Talent: Good at games.
I didn’t mean to have three characters whose names start with “E”, but likely not all of them will survive to the next level, much less the end of the campaign.
Aerona goes out with Claymore, offering a 5 sp “signing bonus” plus 2 silver per day for an expected week-long expedition, plus rations. Out of the five available people, three are willing to join. We’ll call them “Agnes,” “Bran,” and “Clovis.” Should the expedition last past March 15th for whatever reason, they will be paid the rest at 2sp/day on their return to Caer Morag. If they return early, however, they can keep the balance as a bonus for the dangerous work.
Eleri resupplies the rations for everyone. They have 11 left, but they need enough for 7 people for a week (49 total), so they need 38 more. This costs 19 silver. Elgar has another 14 dried rations to take into the dungeon, in case those become necessary for whatever reason. (Eating in such places is usually a bad idea, given how the interdimensional energies warp reality.)
March 8th: Setting Out for Uldra Cthon
Thus resupplied and reinforced, they leave in the morning for the ruins of Uldra Cthon.
It’s a clear day in the Yarzu Hills as the group leaves Caer Morag. However, as they come around a bend in the trail, they can see a large party of over three dozen people about 400 feet away. After a few minutes of observation, though, the adventurers realize that these other people have hyena-like heads (“gnolls”). These groups, descended from the strange experiments of the Ancients and further altered by the chaotic quantum effects of the cataclyms, raid settlements on the outskirts of Heryngard. The soldiers back in Caer Morag are far better equipped to handle this, though the villagers around the actual fortress certainly are not.
- Surprise check: I decide the party cannot be surprised by a group of this size under these conditions. The gnolls are surprised, giving the party the opportunity to leave before they are noticed.
Should they go back to the settlement and warn them so that the villagers and farmers can be brought into safety? Yes, Hraegosh is motivated by “redemption” and Elgar by “duty”, so they’ll return to town to warn Captain Misai. It should be no trouble for them to move more quickly than the raiding party, allowing the Protector to gather in the civilians.
The gnolls attack that same night.
This seems like a good opportunity for a mass combat scenario. I will use the mass combat rules from the S&W Complete Rulebook for this. Note that these are not based on Chainmail, but still use the d20 system with modifications for mass combat.
Night Raid on Caer Morag
With 40 gnolls and 40 soldiers (plus commanders), this is far too large for a regular combat. I’ll break each side up into 4 units of 10 fighters each. Per the rules on p. 88, this means the combat rounds will be 10 minutes long. To customize their armor and weapon loadouts, the soldiers have ring armor and either polearms or heavy crossbows. Additionally, with the presence of sergeants beyond the 10 soldiers per unit, I will give them a reroll on morale checks (which do not use the regular morale rules) unless they are broken, during which they’ll roll normally.
- Foot Soldiers (2 units): HD 1 (48, 56 hp); AC 13; Atk polearms (1d8+1); Move 12; Save 17; Special: reroll morale checks when not broken
- Crossbowmen (2 units): HD 1 (49, 48 hp); AC 13; Atk heavy crossbows (1d8) range 240 ft; Move 12; Save 17; Special: reroll morale checks when not broken
- Gnolls (4 units): HD 2 (80, 106, 102, 88 hp); AC 14; Atk bite (2d4); Move 9; Save 16
I’m using the Hrangveld map by Dyson Logos for this encounter.
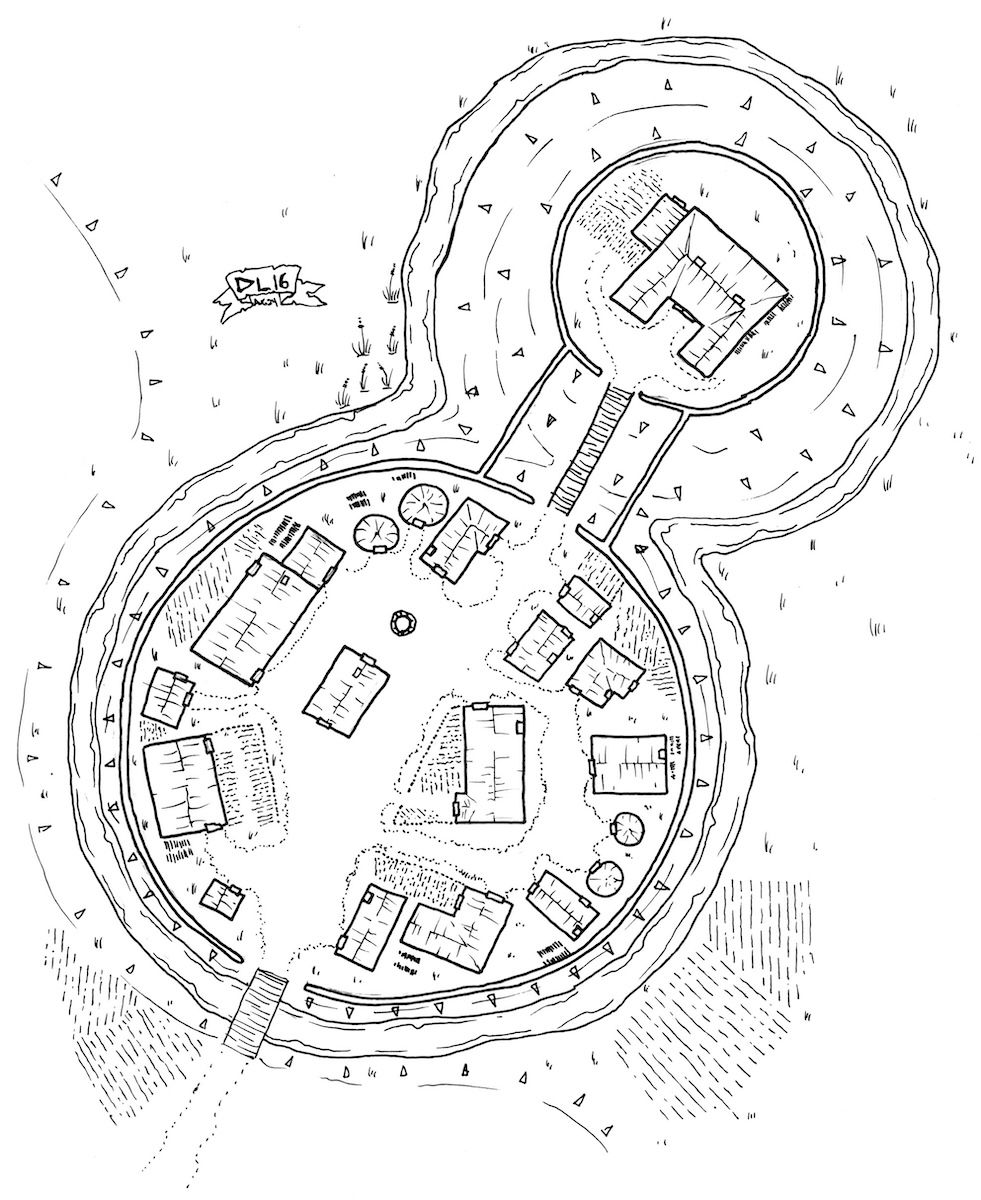 Cartography by Dyson Logos (c) 2016, CC-BY-4.0
Generally, the soldiers are positioned as follows:
- Foot Soldiers 1 at the gate
- Foot Soldiers 2 in the courtyard
- Crossbowmen 1 on the walls at the gate
- Crossbowmen 2 on the roofs
The adventurers are the reserve at the keep to protect the reeve and the villagers, although the reeve is in command should the gnolls reach that far. The gnolls, however, simply want to raid the village and are not likely to press the attack on the keep unless they have completely routed the defenders.
Round 1
I’m continuing here with the narrative of the battle report rather than showing each detail of the combat.
The soldiers spot the gnolls when they are about 200 feet away. The gnolls are not particularly stealthy, so the soldiers have a chance to prepare.
As the gnolls approach, the crossbowmen fire down on the lead “squad” of gnolls, but the raiders keep coming with minimal losses. The soldiers at the gate receive the charge and turn back this first squad. A rough cheer goes up from the defenders, but there are another 30 gnolls behind them.
Another set of gnolls is laying down a bridge over the moat to the side with ladders, apparently looking to scale the palisade. More gnolls keep coming at the gate, and a general melee ensues without either side making much headway.
Round 2
Some of the crossbowmen volley against the gnolls crossing the moat, but the gnolls are undeterred despite their (admittedly minimal) losses. Another set of crossbowmen fire at the gnolls at the gate and inflict heavy losses on the raiders.
The gnolls at the gate continue fighting, but the defenders are bravely weathering the assault for now, taking more casualties than they really can sustain. More foot soldiers come up behind the gate to reinforce the front line. Unfortunately, one of the squads of gnolls that had previously been driven back has rallied, and their morale is restored.
Round 3
The crossbowmen fire another volley at the gnolls on the walls, which weakens them but not enough to turn them back. They also pepper the raiders at the gate itself in support of the soldiers at the front line.
In the melee, the gnolls are starting to get the upper hand. The defenders are taking heavy losses, and the first set of soldiers has fallen. The reinforcements approach the gate, but the fact is that they are outnumbered nearly 2 to 1 against intruders who are heavier and stronger.
Round 4
Before the crossbowmen on the walls fall back, they fire one last volley at the gnolls coming over the walls, but without noticeable effect. The others on the roofs drop quite a few of the gnolls in the gate area, but that doesn’t seem to deter these raiders.
The reinforcing soldiers charge the gnolls trying to come through gate and hold the line, but they can’t drive them back. There are just too many of them!
Round 5
With some raiders now on the walls, the crossbowmen fire from their positions on the village roofs without the height advantage they had before. This has little effect on the gnolls, who leap onto the roofs. But the crossbowmen are able to retreat down into the courtyard first.
At the gate, the defenders are able to drive back some of the gnolls, but those who had rallied and returned are now approaching the gate. Things are looking up for Caer Morag, despite the losses.
Round 6
Rather than immediately engage in melee against raiders who have the high ground (on the roofs), the crossbowmen fall back to the inner gate in good order. The foot soldiers at the outer gate are able to drive back the gnolls there, but the gnolls who had come over the roofs are now in the courtyard and looking to do some damage.
Round 7
The crossbowmen now have a clear shot at the gnolls in the courtyard, and they fire at them. Despite the hits, this doesn’t drive them back. The gnolls in the courtyard run into the village buildings to rampage and destroy.
But when the foot soldiers pursue them, this turns into an absolute slaughter of the defenders. The gnolls tear them apart, the screams and barks echoing through the night.
Round 8
While the gnolls are destroying the village buildings, the crossbowmen have no targets. They prepare for a counter-assault and draw their short swords as the last line of defense for the villagers who are safe (for now) in the keep.
Round 9
The counter-assault begins as the crossbowmen charge into the village for a melee. The gnolls fight back, however, and the soldiers find themselves fighting hand to hand against these larger foes.
Round 10
After over an hour and a half of combat, the gnolls are destroyed. Sadly, so are many of the village buildings and half of the guard force. The adventurers and villagers spend the rest of the night trying to put out fires and attend to the wounded.
Aftermath
The next morning, the humans here bury their dead and pray for them. Captain Misai sends a messenger back to Heryngard requesting reinforcements, as they simply cannot protect against another raid of that scale right now. With this tragedy, the adventurers postpone their expedition for a bit, and the villagers are grateful for their help.
Conclusion
This session didn’t cover much of what I had planned, but I really enjoyed the mass combat rules from S&W. I’d like to use them again when the opportunity arises. This still advanced the narrative within the world and gave me a chance to think more about the setting itself. I’m reminded of how many people have pointed out that the implied setting of D&D and the original game itself takes more than a little inspiration from the genre of Westerns. I’m still thinking through the implications of that and looking to see how to make this distinct from the horrors of the real life past that that genre often ignores or even glorifies.
More prosaically, perhaps the adventurers or the Reeve (who is a 4th-level Cleric) should have intervened in the battle. I got so excited to try out these rules that I really just sort of forgot about the possibility of, say, attempting to cast sleep on the gnolls or having the Reeve cast bless on some of the soldiers, which might have altered the outcome somewhat (and not incidentally earned some XP for the adventurers).