Heryngard - Session 3
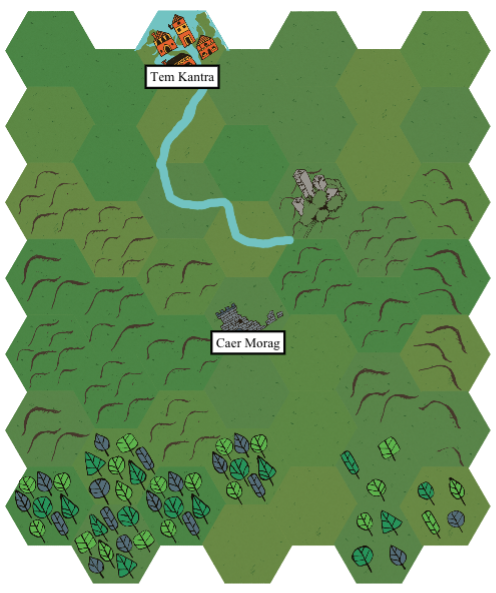
Let’s flesh out the village of Caer Morag and the surrounding area while the group spends a few more days here. Then they’ll head back to the Uldra Cthon to finish exploring the ruins. This will include major spoilers for that dungeon, so if you expect to play through it, maybe skip past the dungeon itself.
March 9th: Recovery
They day is clear with only a few clouds. The village will be trying to rebuild the next day after the gnoll raid the night before.
- What vendors are present in the settlement?
- Per D30 Sandbox Companion (affiliate link), this is a “small town” in the 180-760 population range.
- Rolling on “Settlement Suppliers by Size of Settlement” (p. 34):
- Fletcher
- Horses
- Leathercrafter
- Provisions (2x)
- Resale items (2x)
- Smith (2x)
- Tailor
- Tools (2x)
- Weaponsmith
The village normally has trouble with corruption, but for today at least, they are putting that behind them. This is a question of survival, not profit. Whatever the source of the corruption, they’re likely using this as an opportunity for future plotting. Regardless, that isn’t going to be the focus for now.
The adventurers aren’t necessarily construction workers; the party consists of 2 Fighters, 2 Thieves, and a Magic-User. They can help with cleanup, though.
During the day, while helping with the general effort, they spend some time talking to the Protector, Captain Misai. She is grateful for their warning; this could have been much worse had the adventurers not brought word of the gnolls. She asks them to undertake a patrol the next day to look for any other dangers in the area. Lately, the largest problem has been wolves, but there could be other threats as well.
March 10th: Patrol
They spend a much cooler day in the pass, looking for anything moving at all, but nothing seems to be out of the ordinary (despite the increased chance of an encounter, since they’re specifically out hunting for one). They return to the village in the evening, glad to report that all is clear.
March 11th: Patrol
During their patrol on a much warmer day, they encounter a single individual belonging to one of the monutain tribes in the Yarzu Hills. The tribes have generally good relations with Heryngard, as the city is mostly occupied with trying to continue to rebuild since the Cataclysm.
Aerona takes the lead in the interaction and approaches the woman, recognizing her affiliation with the Zayos clan (name from a Horizon Forbidden West tribe name generator) based on her clothing and jewelry. The two women discuss the recent raid; the scout (named Diana) has not heard of any gnoll activity in the area. She’s grateful for the warning, though, so that she can inform her community and they can take additional precautions. Should the adventurers head that way later, perhaps they will find a friendly reception.
The adventurers return to Caer Morag in the evening and report on their contact with the tribal scout.
- 1 minor Feat of Exploration
March 12th: Rest
It’s been a hard week overall, so they spend this day resting at the keep. The next day, they’ll depart once more for the Uldra Cthon. They do procure another 16 rations (for a total of 57), but these are provided by the village as a small token of gratitude for their help.
March 13th: Setting Back Out
It’s slightly warmer today as the eight of them set out. They make good time through the hills and, fortunately, don’t run into any problems.
They camp for the night without incident.
March 14th: Reaching the Uldra Cthon Again
The day dawns warm, with a few clouds but nothing to be concerned about. They reach the ruins of Uldra Cthon late in the day and set up camp. The night passes quietly.
March 15th: Back into the Ruins
The spring day is clear and warm as they prepare to enter the ruins once more. They have some idea of the challenges within this time, and their marching order is as follows:
- Aerona, Fighter (8 hp, AC 14) (carrying Claymore)
- Elgar, Fighter (8 hp, AC 13)
- Agnes, Torchbearer (4 hp, AC 10)
- Eleri, Thief (4 hp, AC 13)
- Hraegosh, Magic-User (3 hp, AC 10)
- Bran, Torchbearer (4 hp, AC 10)
- Eptan, Thief (5 hp, AC 13)
- Clovis, Torchbearer (3 hp, AC 10)
Hraegosh spends time with his arcane schematics, loading in the weird chaotic energies that allow him to affect the mind and consciousness of other people, preparing the sleep spell.
Mechanical Notes
Last time, I used an alternate random encounter frequency of 1 in 6 every three turns, rather than 1 in 20 every turn. I realized that that changes things significantly when considering the fact that I roll for random encounters when the party fails to open a door or otherwise makes too much noise. That certainly affected the outcome last time!
Additionally, I have adjusted the death rules. Characters can go down to their level in negative HP; past that, they are likely to die. So a first-level character can go to -1 HP, but they will be effectively out of action until they can recover back to positive HP. To do so, they can recover 1 HP per day of rest camping in the wilderness or d6 HP per day in civilization.
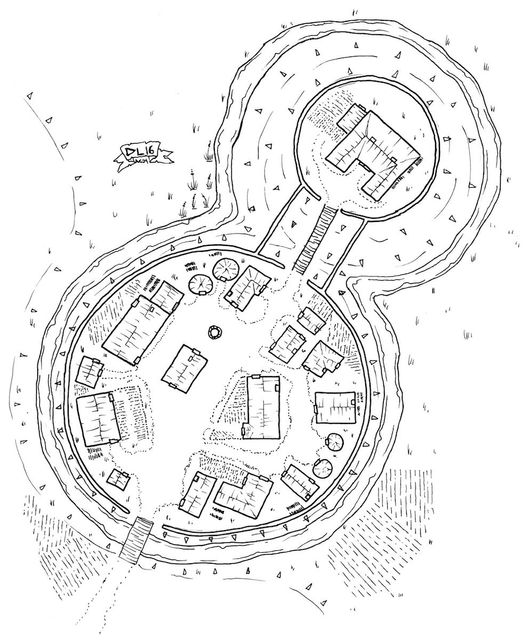
 Cartograpy by Bill Edmunds. (c) Mythmere Games 2024.
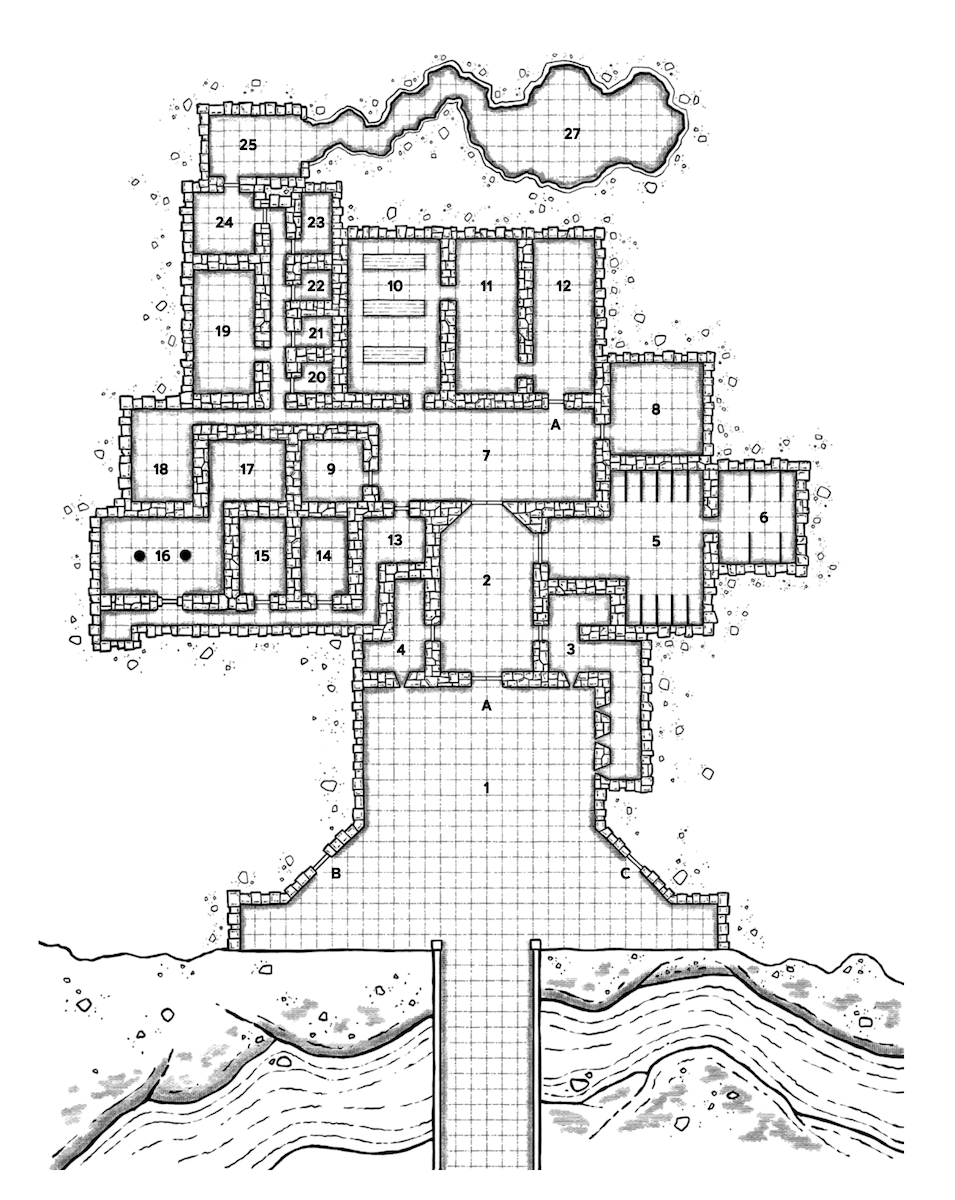
Dungeon Turn 1
The group crosses the bridge into the exterior alcove. All three torchbearers light their torches (which will last until the end of Turn 6). It’s quiet as they reach the large central door, which is still on the floor in front of them from whatever had blasted it open. Claymore notes that Dreezindole is responsible for that, as he was impatient with the intricacies of the magical wards.
Dungeon Turn 2
Once again, they feel the “brooding presence” of this place, the result of quantum energies fluctuating from whatever arcane engines the Ancients built underneath this place. The new adventurers take a moment to adjust, with their hairs standing on end for a moment.
Aerona notes that there’s a door on their right that they didn’t check before, but it’s unlikely to be anything other than another defensive outpost like the one on the left, and they keep going.
Dungeon Turn 3
They’re not far now from the passageway where they encountered the stirges that killed their previous companions. Everyone shifts their weight slightly, peering into the darkness for any sign of danger. Before going back through that area, though, there’s another door here on the west side of the room.
Eleri and Eptan both will listen at the door. Assuming they don’t hear anything, Elgar will open it (with Aerona’s assistance if needed). Hraegosh has a dart in one hand and his staff in the other.
With Aerona’s help, they get the door open.
Dungeon Turn 4
Inside this square chamber (Room 9), they find a long bench of rotted wood along the west wall - the privies. The place has been abandoned long enough that the smell abated long ago. Aerona hammers an iron spike into the door to keep it open, leaving her with four more spikes.
Claymore doesn’t have any real information to offer, as these sorts of functions are unnecessary for the little construct. They move on, back to the passageway where they encountered the stirges.
Dungeon Turn 5
The wooden chair that once held a skeleton is still here, along with the dusty remains of the skeleton that had previously animated. The rat carcass is nowhere to be seen, likely dragged off and consumed by whatever other scavengers still live in the ruins. The party moves into the passageway on the south side of the room.
Dungeon Turn 6
Eleri will listen outside the same door where she’d heard skittering before, while Eptan listens at the next door to the west. Elgar will open whichever door has no sound in it, preferring the second one if both are silent.
With the sounds of rats coming from the first door, Elgar and Aerona try to open the second door. Unfortunately, just like the last time they were in this passageway, the door does not cooperate. They’ll keep working at it, while the others keep watch for any other dangers.
At the end of this turn, the torches burn out and they relight two more, which will last until the end of Turn 12. Elgar still has 9 more torches. (If needed, Eptan has a lantern for later. Perhaps they should have bought more torches!)
Dungeon Turn 7
The two strong fighters work at the door, but as they do, the door next to them opens on its own and half a dozen giant rats poke their noses out. Seeing the flickering torches and large humans, they pull back into their room and the door closes before anyone can react. Rather than try to go in there after them, the group decides to keep working on the door they were already trying to open.
Dungeon Turn 8
It takes three of them working together, but eventually they get the door open. Eptan looks through first into a room covered with bits of wood (Room 15). Logs are piled on the other side of the room. As they enter, they can see the logs and debris self-assembling into a sort of wooden humanoid, like the stick figures they previously encountered.
- Stick Figure: HD 1d6 (3 hp); AC 12; Atk 1 stabby stick (d3); Move 6; Save 18; Morale 10; AL C; CL/XP B/15; Special: vulnerable to fire, walk through wood
As it’s all the way on the other side of the room, it’s 50 feet away, but it’s not surprised of course.
Round 1: The stick figure shuffles towards the party. As it does so, Hraegosh lights a flask of oil and tosses it, but the oil splashes on the floor next to the figure and doesn’t burn it (he has 9 pints left). The figure and Eptan both poke at each other to no effect.
Round 2: Having picked themselves up from opening the door, Aerona and Elgar join in the attack. Aerona clips it a bit, but it’s still standing.
Round 3: Elgar makes short work of the thing.
The party has taken no damage during the fight. Afterwards, Eleri takes a torch for a moment and sets fire to the wood it came from, just to be sure. The smoke exits through a few vents in the ceiling and doesn’t cause problems for them breathing.
Dungeon Turn 9
Back out in the passageway, Eleri listens at the door further down the hall but hears nothing. Elgar opens it up easily.
Inside, they see two stone pillars in a storehouse (Room 16). Despite the extensive shelving, there’s nothing valuable here as it’s been looted long ago. There is another archway to the north, leading to a room shrouded in darkness.
Aerona checks to ensure Claymore is well-secured inside her armor before they explore that next room.
Dungeon Turn 10
This room has some of the smoke from the fire they previously set burning here, so anything that was in here has left for now. There are plenty of clay amphorae on the floor, set into holes, and they all look intact.
The thieves will each check the amphorae for anything that they might contain or hide. The fighters will keep watch for any other dangers. Hraegosh will inspect the outside of the pots for any markings.
In fact, not only do the amphorae contain coins that no one has previously taken, they conceal a +1 shield that Aerona will use! Besides this, they find 42 gold pieces, 63 silver pieces, and 24 copper pieces. Agnes will carry the coins for now.
Dungeon Turn 11
From here, they’ll go back out through the passageway, moving a bit more quickly as they’ve already mapped this part of the complex. There’s another hallway on the northwest corner of this room, and this hopefully will lead them to discover the whereabouts of Dreezindole.
Dungeon Turn 12
About halfway down the hallway, a side passage opens up on the right (north). They’ll come back to that, but at the end of the hallway is a large, empty chamber (Room 18). The west wall is much smoother than anything else they’ve seen in the Uldra Cthon, while the north and south walls are made of regular stone masonry.
Hraegosh suspects some sort of magical effect, but it’s beyond his understanding.
The torches are starting to sputter, so Elgar lights another pair (7 left) and hands them to the torchbearers.
Dungeon Turn 13
As they carefully move back through the hallway, they come across a pair of stirges hanging on the wall. Realizing the danger these monsters present, the party attacks them quickly before they can try to suck them dry.
- Stirges (2): HD 1+1 (4, 4 hp); AC 12; Atk proboscis sting (1d3 + blood drain); Move 3 (fly 18); Save 17; Morale 9; AL N; CL/XP 2/30; Special: +2 to-hit bonus, blood drain (automatic 1d4 after hit).
The plan is to attack them from range, then kill whatever’s left before they can move.
Round 1: The two thieves immediately fire missile weapons at one of the stirges, killing it. Aerona gashes the other with her axe, but it’s not dead yet.
Round 2: Aerona finishes off the stirge before it can take off and attack them.
Again, they’re able to defeat the monsters before anyone else can be hurt.
Dungeon Turn 14
They go through an archway before opening any of the doors here in the hallway. Inside (room 19), there are several closely-spaced wooden beds. Hanging from the rafters are two more stirges, who have been driven here by the smoke in the areas where they’d normally roost.
- Stirges (2): HD 1+1 (8, 9 hp); AC 12; Atk proboscis sting (1d3 + blood drain); Move 3 (fly 18); Save 17; Morale 9; AL N; CL/XP 2/30; Special: +2 to-hit bonus, blood drain (automatic 1d4 after hit).
The party decides to attack quickly; these things are too dangerous to be left behind them. They’ll use the same ambush tactics as before.
The stirges are dispatched with missile weapons before they can attack.
Nothing else interesting is in this room, unfortunately. Perhaps they’ll find the wizard deeper in this complex.
Dungeon Turn 15
Back in the passageway, they see four doors on the right and one on the left at the very end. Eleri and Eptan will listen at the first two doors on the right, and as before they’ll plan to open the first door with no noise in it.
Neither of them hear anything, so Elgar immediately opens the first door.
Dungeon Turn 16
There’s a small chamber with the rotted remnants of a bed and small wooden chest. Besides whatever is left of the clothing of the Ancient who must have once resided here, there are 5 copper pieces and a necklace with a sapphire worth 50 silver.
Elgar and Aerona open the next door.
Dungeon Turn 17
This room is much the same as the last, with a bed and chest but nothing of value.
Dungeon Turn 18
The thieves do not hear anything at the next two doors on the right, so Elgar jams his crowbar into the next room (Room 22) and forces it open. (Aerona hasn’t bothered spiking the doors to any of these small rooms.)
It’s time to relight the torches; Elgar has 5 remaining. These will last until the end of Turn 24.
Dungeon Turn 19
The small chamber looks almost the same as the last two, with the exception of a bas-relief carving of a face in the stone wall opposite the door. Hraegosh looks at it for a moment, realizing that the face actually does track his movements, occasionally even snarling silently.
Eleri inspects the remains of the chest, seeing something glinting inside. As soon as she reaches into it, thoough, the face on the wall opens its mouth and a huge leech crawls out!
- Giant Freshwater Leech: HD 2 (9 hp); AC 10; Atk 1 bite (1d4); Move 3; Save 16; Morale 12; AL N; CL/XP 3/60; Special: Sucks blood (2hp/round).
Hraegosh was watching this carved face closely, so there’s no chance of surprise. He is the closest to it, though.
Eptan’s arrow strikes true, and Hraegosh finishes it off with a swing of his staff before anyone else can move. Eleri pockets a small pearl from the chest (also worth 50 silver) and they move on.
Dungeon Turn 20
Back in the hallway, Eleri listens at the next door and hears nothing, so Elgar opens it. This one has a bed and chest, but also a writing desk and a chair with a faded green cushion. They’re all in bad shape, but the scrolls contain records of the Cthonium’s visitors. The writing is difficult to understand, dating back to the pre-Cataclysm days, so Hraegosh stores it away for later study. One of the scrolls is different, though: a scroll of web. That’s particularly useful to him, as it’s more advanced than anything he knows at the moment, and he will examine it in greater detail later.
Dungeon Turn 21
The door at the end of the hallway, on the left side, doesn’t seem to have any noise behind it, so Elgar forces it open to reveal a slightly larger chamber (Room 24). In addition to the very old desk, chest, and wooden chairs, there’s a fairly new comfortable armchair that is clearly in good shape. The chair is extremely comfortable - enchantingly so, in fact. If they can take it back to town, it’ll fetch a nice price. They’ll leave it here for now, though, until they finish their exploration. (Claymore remarks that Dreezindole did indeed prefer comfortable places to sit and work.) Aerona spikes the door open, so they have a route to retreat if needed.
Dungeon Turn 22
Eleri doesn’t hear anything on the other side of the door on the north side of this room. However, they’re unable to get it open easily and will have to keep working at it.
Dungeon Turn 23
Elgar manages to get it open after several more minutes of effort. On the other side of the door (which Aerona also spikes open), they see what looks like a statue of a four-poster bed, with the curtains drawn closed. A simple archway leads east, with writing on the wall nearby that reads, “roughly 70-80 feet due east.”
Claymore speaks up in a tiny, squeaky voice, telling them he knows how to “open” the bed. At first glance, the bed seems to be a solid block of stone with four carved legs, having only the appearance of a bed. But there are two indentations on one of the posts, both of handprints. One is large and about four feet off the ground, but the other is small and about one foot off the ground. When he presses his little hand into the lower indentation, the stone transmutes to the natural material of a bed (wood with cloth curtains). In fact, the bed can be commanded by Claymore to activate and move with stiff, mechanical motions at a normal human walking pace. It can even squeeze through doors, though that process takes a few minutes.
Inside the bed, Claymore points out Dreezindole’s traveling spellbook (not his full tome that he left back at his tower). There is a small bag of gemstones here as well. That said, the little construct isn’t interested in helping them steal these things from his friend. Perhaps if they can find Dreezindole, the wizard will give them something as a reward.
Dungeon Turn 24
The archway leads to a tunnel through smooth, native rock, unlike the mortared stone found in the rest of the Uldra Cthon. The feeling of power increases as the group moves through it. The tunnel opens up into a larger cavern with a strange, green light floating in the center. There’s an unlit lantern on the floor near it. The shadows in this cavern, cast by that green light, don’t look right.
Hraegosh looks closely at the shadows, and realizes that they are reversed: that is, where a shadow should be, the wall is actually lighter, rather than darker.
Meanwhile, Eleri looks at the light source and realizes it’s some sort of Ancient energy node, unlike anything she’s seen before.
Eptan is examining the lantern, which has a dial on the side with two settings indicated by a pair of open eyes and a pair of closed eyes. It’s currently set on the open eyes, though it doesn’t seem to be emitting any light.
Elgar and Aerona are looking around the room for any other exits or dangers, inspecting those weird shadows. As they are moving around, one of the shadows detaches itself from the wall and attacks! Claymore immediately cries out that it has the silhouette of his old friend! In fact, it’s not a shadow per se, but the transformed remnant of Dreezindole: not undead, but elongated and no longer truly human.
- Shadow of Dreezindole: HD 3 (20 hp); AC 17; Atk 1 touch (1d4); Move 12; Save 14; Morale 12; AL C; CL/XP 5/240; Special: Immune to non-magical missile weapons, aura of fear.
The adventurers are not taken by surprise, and the shadow is 20 feet from Elgar when it attacks.
Round 1: The shadow immediately attacks Elgar, doing 4 points of damage with its unnaturally cold touch. Elgar swings through it with his battle axe, finding that the thing does in fact have substance, and it cries out in pain. Aerona rushes into the melee, but the fear aura paralyzes her momentarily. The thieves try to backstab it, and Eptan does in fact stab into it with his short sword. Hraegosh is uncertain if his spell can affect it, but begins to cast sleep in the hopes that it will.
Round 2: The shadow turns its attention to Aerona, but she dodges its cold touch. Eleri and Eptan both try to backstab it, but it is too quick and ethereal for them. Unfortunately, both fighters succumb to the fear aura for a minute and cannot move, and indeed Hraegosh’s spell has no effect on this magically altered wizard. Claymore cries in disbelief at the fate that has befallen his friend.
Round 3: This time, Eleri and Hraegosh fall under the effects of the fear aura, but Elgar and Eptan slash at it in the melee and bring it down to 1 hit point. The shadow is barely hanging on, but it’s still dangerous enough to swipe at Hraegosh and take him to 2 hp.
Round 4: Whatever magical aura of fear is cast by the shadowy remnant of Dreezindole is enough to prevent all of the adventurers from acting except for Aerona, who is struck by the shadow’s cold touch and is reduced to 4 hp. She’s unable to hit it herself.
Round 5: The Shadow swipes at Hraegosh, who falls to the ground unconscious. Eptan, however, is able to backstab it and destroy the fell creature.
Hraegosh will recover, but he will be out of action for a bit in order to do so. Eleri takes two more torches from Elgar for the porters while he and Aerona catch their breath.
- HP recovery: Elgar d6 = 1, up to 5 hp; Aerona d6 = 2, up to 6 hp.
- Hraegosh will recover 1 hp per day resting in the wilderness, d6 hp per day in civilization.
Dungeon Turn 25
Claymore grieves for what has become of his friend, but recognizes that Dreezindole as such perished long ago. The group merely put his shade to rest. He allows them to gather the travelling spellbook and the gemstones, the latter of which are worth 200 silver total.
The group needs to exit the complex safely, however. They’ll carefully place Hraegosh on the bed; Claymore will stay on it and command it to move back to the entrance. This gets them into room 24, the sitting chamber.
Dungeon Turn 26
The bed has to continue to compress itself to move out to the hallway, so they’re only able to get halfway down that passage.
Dungeon Turn 27
From here, there are no more actual doors, although there are some archways that require careful maneuvering. They’re able to reach the inner antechamber.
Dungeon Turn 28
The doors leading to the outside are all double doors, so the magic bed can move without any obstruction. The entire adventuring party is able to exit without trouble.
Returning to the Surface Camp
They get the bed carrying Hraegosh and Claymore back to the surface camp. It will take him a day or two of rest out here to recover enough to travel safely.
March 16th: Resting in Camp
While they’re resting in camp, a huge shadow passes over the camp as a giant eagle soars through the sky, far overhead. It doesn’t appear to notice them, fortunately, and they’re able to get under cover so as to escape its notice entirely. Likely it would not have actually posed a threat, but something that large and dangerous is best avoided.
- Hraegoash recovers 1 hp, up to 0 hp
March 17th: Another Day of Rest
The next day remains fairly warm. The fighters keep watch while Hraegosh rests, and no trouble visits them.
March 18th: Returning to Caer Morag
The weather remains comfortable, and Hraegosh has recovered enough to travel safely. He’ll stay in the bed, however, while Claymore “pilots” it. The trip that day is uneventful, and they make camp that night without incident.
March 19th: Safe Returns
They reach the border fortress of Caer Morag safely, though some of the guards goggle a bit at the sight of a walking bed carrying the injured magic user.
Experience and Rewards
Total XP Needed (TXP) to level is 2x1250 + 2500 + 2x2000 = 9000 XP. Therefore a minor feat of exploration @ 2% is worth 180 XP and a major feat of exploration @ 5% is worth 450 XP.
- Monsters:
- Stick Figure: 15 XP
- Stirges: 2x30 XP
- Giant Leech: 60 XP
- Shadow of Dreezindole: 240 XP
- Subtotal: 375 XP
- Treasure:
- Coins: 42 gp, 63 sp, 24 cp (worth 484 XP)
- Necklace: 50 sp (worth 50 XP)
- Pearl: 50 sp (worth 50 XP)
- scroll of web
- spellbook
- Emeralds: 4x50 sp (worth 200 XP)
- Subtotal: 784 XP
- Feats of Exploration:
- 3 minor (tribal scout, 2x five rooms)
- 1 major (find Dreezindole)
- Subtotal: 990 XP
The total XP gained by the party will thus come to 375 + 784 + 990 = 2149 XP, divided by 5 is 430 XP per character before bonuses.
No one reaches 2nd level, but there’s plenty more adventure to come.
Wrapping Up
I think perhaps I’ve finally tweaked the damage and death rules to a place where I’m happy with them. And unlike the Dyson’s Delve campaign, this has enough other activity to keep things varied and interesting for me.
Next up, the group will take care of some logistical matters in Caer Morag and undertake some more wilderness adventures.