5 Parsecs From Home - Campaign Turn 12
It’s time to get the hell off Elyria and find what Swales has been looking for. That said: Easy Mode is over. No more bonuses to XP, credits, and the like for us!
Travel Steps
No invasion is happening, at least not yet; the Acidic Angel is just leaving the planet. Swales spends 5 credits in fuels and other travel costs to get to the next world, Noth V58.
As they’re leaving, they find a debris field in their path, whether from a recent collision or perhaps even from a battle (since we know the Unity government has been operating in the area). She can’t get around it, so she has to go through it. That means we need to make three piloting rolls; she succeeds on two of them, so the ship takes 1D6 (1) Hull Point damage! That’ll require some repairs on the next world for this hull that’s really just a collection of bits of salvaged ships bolted together.
Two rivals have followed the Weekenders: the cultists and the Brat Gang. The latter are less surprising, since they fought the crew earlier on one of the truth-seeking quest missions. We’ll have to deal with them at some point, I expect.
No Freelancer License is required here on Noth V58, fortunately. This is a barren world, with no plants anywhere on the surface; however, “the natives have extremely close bonds with the local fauna” (rolled from Stars Without Number). Some of the enemies here could include “the half-feral warlord of a beast swarm, a coldly inhuman scientist, [or] an altered beast with human intellect and furious malice.”Potential places to visit include a park designed as a comfortable home for beasts, a public plaza designed to accommodate animal companions, [or] a factory full of animal workers”. What kinds of creatures live on a barren world with no vegetation? Likely genetically engineered ones.
World Steps
Our crew needs 1 credit for upkeep; the hull damage is minor enough that a few hours of work will fix it without additional expenditure.
Previously, the crew had acquired some quality food and booze, which they can now use to throw a recruitment event and get a free crew member without spending a crew task on it. The dice initially indicate a bot recruit, but that doesn’t make sense given the fiction here, so I’ll reroll without spending a story point (not that I’m short on them). The result is a baseline human, like everybody else on the crew. As before, I’m going to roll on the background table (despite the injunction in the text), but not use the equipment or bonuses. This just informs the narrative around the character.
So we have Robert Shelby, from a comfortable megacity class (albeit a bit primitive) who seeks fame. He shows up with a handgun and blade, but we have a Blast Rifle for him to use instead of the handgun.
Crew Tasks
The trade goods from Kothea 4 are worth 3 credits here; Swales decides to go ahead and sell them now.
- Ellen Swales: Repair
- There’s still that old Time Distorter sitting in the ship stash.
- Unfortunately, it’s too complex to be fixed this time around. Maybe when she gets more time in the future.
- Reyna Crowder: Explore
- Someone wants a package delivered to a new world. If she’s still in the crew, there are some benefits (and risks) for it.
- Shurl Reeves: Trade
- She finds some Spare Parts that Swales can use next time she tries to fix the Time Distorter.
- Thornton Darby: Trade
- He makes a deal to get some ordnance: two Frakk (frag) grenades and one Dazzle (stun) grenade.
- All of them will stay with him.
- Saige Alden: Decoy
- As before, she’ll try to keep their enemies from tracking them down while they’re doing other things.
- Robert Shelby: Decoy
- He’ll support Alden in this, particularly since he is likely unknown to their rivals.
Equipment
As noted, Shelby gets the Blast Rifle. Darby takes the Boarding Saber that Notley previously wielded; it’s interesting that one of the crew members who’s most skeptical about the value of violence is so well-armed. Notley’s old Combat Armor goes to Reeves.
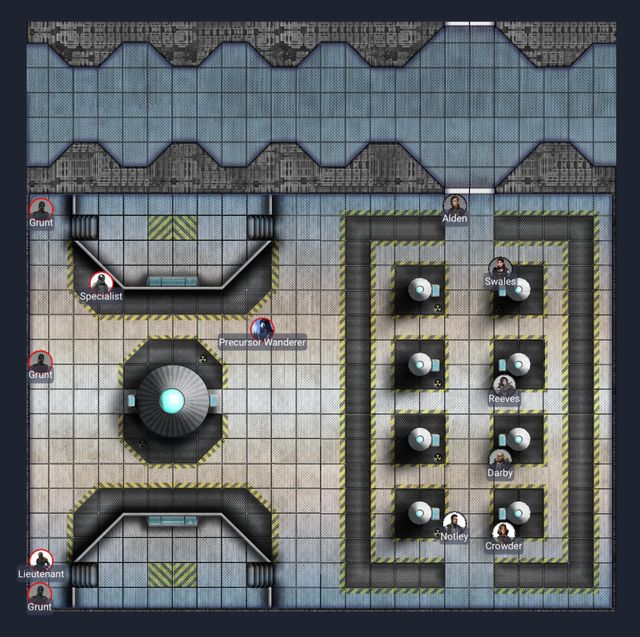
Battle Setup
There’s no chance of rival interference this time due to the decoy work by Alden and Shelby (I’d just need to roll above a 0 on a D6).
Instead, we’re taking the quest finale for the truth-seeking quest. That means the objective will be a Straight-Up Fight, with an extra enemy and the entire opposition is Fearless (they will never bail), but no other modifications.
- Deployment Conditions: Surprise encounter (the enemy can’t act in the first round).
- Notable Sights: Loot cache
- There will be a Motion Tracker available 8” northwest of the center of the battlefield.
- Objective: Showdown
- It’s just a fight, but they’re not going to run.
- Enemy: Hired Muscle
- Decreased chance of Seizing the Initiative.
- Enforcers: While this term usually refers to Unity law enforcement, in Fringe Space is tends to mean any organized troops keeping the peace.
- I really hope we don’t pick them up as rivals, because that will affect future patrons.
- Total of 5 enemies plus one Unique Individual
This Unique Individual is a Hakshan Investigator, who are “odd, suited aliens that trek the galaxy in search of something vitally important to their species.” (Sounds like the quarians from Mass Effect.)
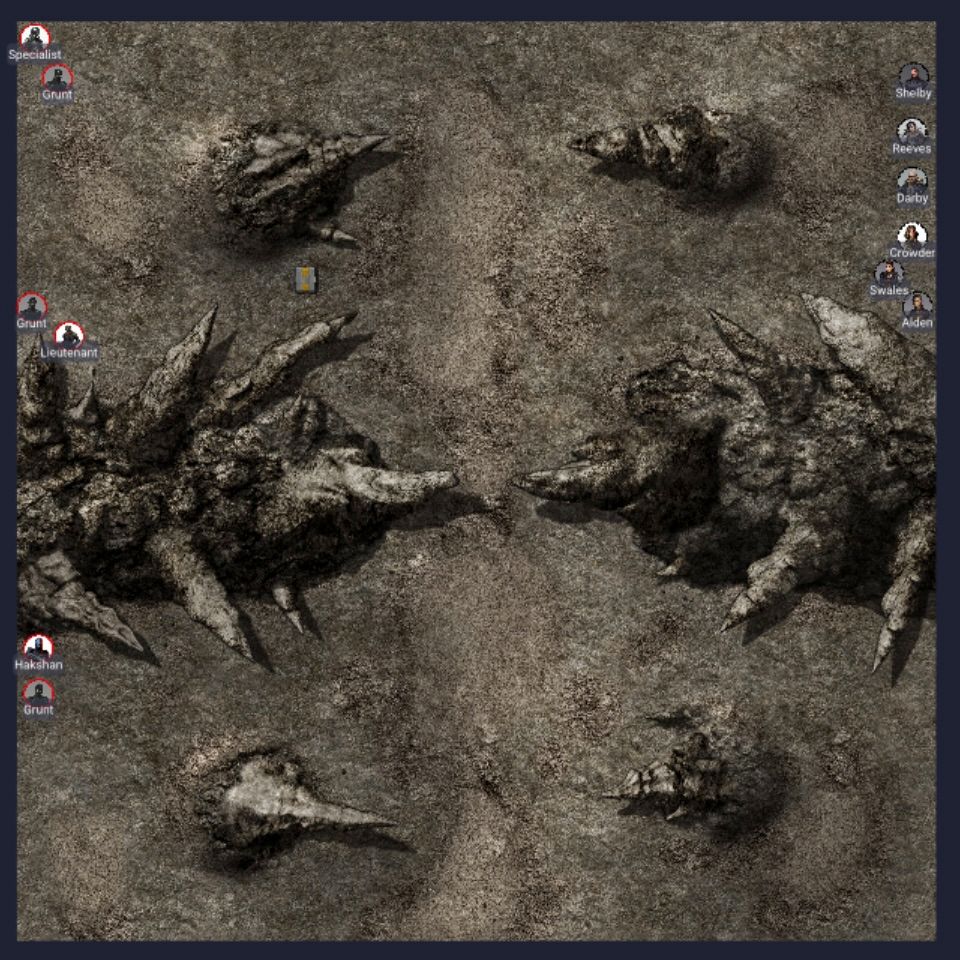
Now that the crew is on a world with a solid surface, I can try some other maps. For this fight, I’m using the Devil’s Gate map from Gabriel Pickard’s Quick Encounters: Jagged Wastes set. I set it as 2.5’ x 2.5’. The crew will enter from the eastern edge again.
Rules of Engagement
There’s no special condition here after round 1.
- Tactical enemies will advance at half speed, always retaining Cover where possible. They will cross open ground at full speed, if needed.
- They will attempt to close to within 12” of their opponents, then will move to outflank and get clear Line of Sight where possible.
- If within one move and possessing a higher combat skill, they will enter a brawl; otherwise they will fire.
- If they have a clear shot and are in Cover, they will remain in place to Aim.
- Tactical enemies will attempt to remain within 3” of a friendly figure whenever possible.
- Defensive enemies will advance to weapons range, but will remain in their initial half of the table, and will remain in Cover or behind terrain whenever possible.
- Once in position, they will fire from those positions, standing still to Aim, and will move to Brawl if opponents enter their terrain features and they have equal or better Combat Skill.
- If a terrain feature with friendlies has been entered by the player’s forces, those within adjacent features will move to reinforce.
- Lieutenant (1): Speed 4”, Combat +2, Toughness 4, AI Tactical, Hand Laser + Blade
- While watching another playthrough, I saw the instruction that Lieutenants should roll separately for their weaponry.
- Specialist (1): Speed 4”, Combat +1, Toughness 4, AI Tactical, Cling Fire Pistol
- Enforcer (3): Speed 4”, Combat +1, Toughness 4, AI Tactical, Military Rifle
- Hakshan Investigator (1): Speed 5”, Combat +0, Toughness 4, AI Defensive, Plasma Rifle
Round 1
The crew is able to Seize the Initiative, and therefore they all get a free Move action.
In addition, due to the Surprise Encounter, the enemy doesn’t move at all in this round. Reeves will climb up to the top of a spire, giving her a bit of cover and a good vantage point for her Colony Rifle and Bipod. Shelby just climbs onto the base of the spire, in better cover while wielding his Blast Rifle, and Darby acts similarly. Crowder scrambles on top of the center feature (which forms part of the gate) with her Needle Rifle. Alden and Swales both crouch at the northern edge of the same gate piece.
Round 2
In the Quick Actions phase, Crowder crawls a bit higher on the gate. Reeves opts not to act, instead waiting for the enemy to move and thus use snap fire. (This is a rule I didn’t realize even existed until recently!)
For the enemy, first the Hakshan Investigator moves to cover behind a jagged protrusion from part of the gate, and they don’t yet have line of sight on Crowder. As the Lieutenant tries to take cover, Reeves takes aim and fires, dropping them immediately. The Specialist and two Enforcers move behind a large spire, while the last Enforcer stands next to the Hakshan behind that large protrusion.
Now in the Slow Actions phase, Swales climbs up a little bit and shoots her Fury Rifle at an Enforcer next to the Specialist, taking them out. Alden does the same, firing a Military Rifle at the Specialist but missing. Darby and Shelby can’t get a clear shot, so they hold until the next round rather than run into open ground.
Round 3
Reeves and Crowder hold their action for snap fire, waiting for enemies to enter their fields of fire.
The Hakshan Investigator leaps over the jagged spire into cover, but that’s when Crowder takes her shot, stunning them. That clears the way for the Enforcer to move into cover as well without getting their head blown off. On the northern side of the battlefield, an Enforcer advances slowly around cover, but Reeves is waiting for this and fires, stunning the enemy. Finally, the Specialist moves to where the Enforcer had been, knowing Reeves doesn’t have another shot right now. Shelby is nearby but out of range of the Specialist’s Cling Fire Pistol.
And on that note, Shelby fires from cover, taking out the Specialist. Swales takes a careful shot at an Enforcer in cover, which also takes them down. Darby drops out of cover to have an angle on the Enforcer that Reeves stunned, killing them. Alden falls back very slightly to a more secure position, waiting to see where the Hakshan will go.
Round 4
None of the crew goes in the Quick Actions phase, so the Hakshan Investigator fires their Plasma Rifle at Crowder and splinters of rock go flying as the shot misses her.
Crowder returns fire, but her Needle Rifle misses. Alden crawls over the gate somewhat and the crack of a Military Rifle shot rings out, hitting nothing. Swales also has to move to get a shot (therefore not able to aim), hitting despite the difficulty of moving and shooting a heavy weapon (her Fury Rifle) in the same round. This is enough, and the Hakshan Investigator falls.
The Weekenders have won the day and Swales can finally get her answers.
Post-Battle Sequence
These enforcers don’t become rivals; perhaps they were acting outside of their official duties. Instead, the crew gets 4 credits in salvage, plus they find a Motion Tracker (which helps when attempting to Seize the Initiative), a Stim-pack, another Bipod, Ship Parts worth 3 credits (only usable when installing a new Starship Part), and a Cargo Crate worth another 4 credits. (I’ll talk about the quest results below.)
Everyone gets 3 XP, and Reeves gets the extra 1 XP for the first kill. Crowder and Reeves each spend XP on +1 Toughness (Reeves is maxed at 6 now), and Darby gets another +1 Combat.
The Captain opts to invest 3 credits in some new gear and comes up with a shiny new Nano-doc for the ship (which will prevent one future roll on the Injury table). While she’s at it, a shady character offers her a deal, and trades out the handgun that Shelby had for a Frag Vest (6+ Armor saving throw), which Shelby takes. It’s only fair, obviously, since that was his gun. Reeves earns a little on the side, likely from selling some info on that Hakshan Investigator, and the Weekenders gain another 2 credits.
Thinking about that quest, I roll up a Descriptor and Focus on the Starforged oracles, and I get “Moving Illusion”. To me, this means that she learns it wasn’t what her crew carried; they were a decoy for someone else’s operation, and in fact even the commendation was part of the ruse. That relieves her conscience a bit, as she’d started to think they were carrying some bio-weapon or other horrible thing.
From here, I think I’m going to take a brief interlude from this campaign, as I’ve been playing it nearly daily for a few weeks. It’ll be back very soon, though, and I’ll have a few more thoughts about the system when I do.