5 Parsecs From Home - Campaign Turn 11
Hopefully this is the last turn in which ships are not allowed to leave this planet. And it might even represent the end of Captain Swales’ truth-seeking quest.
World Steps
Prudent financial management has kept overhead low, so upkeep is still just 1 credit and there aren’t any additional expenses to cover at this time, nor crew members in the Medical Bay.
Crew Tasks
- Ellen Swales: Repair
- As before, she’d like to try to repair some of the crew’s gear, this time a weird bit of kit called a Time Distorter.
- No success this time but she can give it a try again later.
- Reyna Crowder: Explore
- The Captain would like to focus on her investigation so no need for the usual hitting up patrons for jobs.
- Instead, she gets in a fight! She’s fine, but we have another Rival now. I think that gets us to five total on this world.
- Shurl Reeves: Trade
- This time she manages to wrangle some medical supplies, in particular another Stim-pack.
- Thornton Darby: Trade
- He just finds a worthless trinket this time. It doesn’t even have a good story behind it.
- Mark Notley: Decoy
- As before, the crew is focused on something else. Given his recent make-over, he’ll be trying to deflect attention from the crew.
- Saige Alden: Decoy
- She’s demonstrated some ability in this so she’ll help Notley.
The only real equipment change to be made is to give Darby the Needle Rifle we bought last campaign turn. Again, Notley and Alden’s good work keeps our rivals off our backs and the crew can focus on its own business.
Battle Setup
- Deployment Conditions: Poor visibility: Maximum visibility is 1D6+8”. Reroll at the start of each round.
- Notable Sights: Priority Target: Select a random enemy. Add +1 to their Toughness. If they are slain, gain 1D3 credits.
- Objective: Search
- Each Medium or Large terrain feature has a 1 in 3 chance to find the item.
- If it’s not here, the mission cannot be won.
- Enemy: Interested Parties
- Increased chance of Unique Individuals and more enemies
- Renegade Soldiers: Deserters, mutineers, and other scoundrels. These groups often declare themselves local warlords and overlords.
- Panic 1-2, Speed 4”, Combat +1, Toughness 5, AI Tactical, Weapons 2B
- Total of 5 enemies plus a Unique Individual
I spent a story point because the Unique Individual was boring (a large lizard) and instead got a Precursor Wanderer, “an alien mystic, brimming with psionic energies”. The dice have worked with me, since (at 6 Quest Rumors) it’s highly likely this is the last regular phase of the quest.
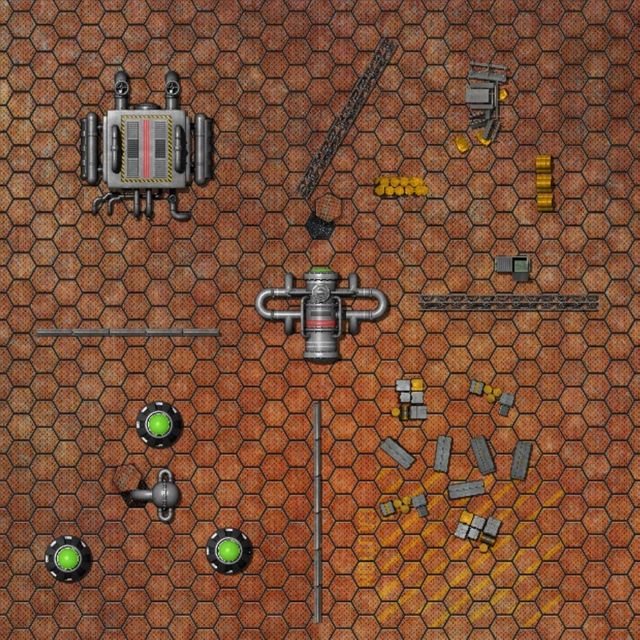
For this fight, I’m using the Engineering map with no additional decor. Any of the reactors, or more accurately their control panels, can be the features to be searched.
Rules of Engagement
As before, I will track the enemy stats here rather than on a physical page.
- All Laser, Beam, or Blast weapons are -1 to Hit at ranges exceeding 9”.
- Maximum visibility is 1D6+8” set at the start of each round.
- Tactical enemies will advance at half speed, always retaining Cover where possible. They will cross open ground at full speed, if needed.
- They will attempt to close to within 12” of their opponents, then will move to outflank and get clear Line of Sight where possible.
- If within one move and possessing a higher combat skill, they will enter a brawl; otherwise they will fire.
- If they have a clear shot and are in Cover, they will remain in place to Aim.
- Tactical enemies will attempt to remain within 3” of a friendly figure whenever possible.
- Note that the Precursor Wanderer has Aggressive AI rather than Tactical and will act differently, attempting to get into a brawl as with previous recent combats.
- Lieutenant (1): Panic 0, Speed 4”, Combat +2, Toughness 5, Hand Laser and Blade.
- Specialist (1): Panic 1-2, Speed 4”, Combat +1, Toughness 5, Rattle Gun. This is the priority target.
- Soldiers (3): Panic 1-2, Speed 4”, Combat +1, Toughness 5, Hand Laser
- Precursor Wanderer: Panic 0, Speed 7”, Combat +2, Toughness 4, Luck 1, Infantry Laser and Glare Sword, 6+ Saving Throw
- One with the Flow: Moves before the Quick Actions phase.
- All of these lasers have a bonus to hit within 6”.
- The Glare Sword is an “elegant fencing weapon. The blade is encased in a disruptive energy field, allowing it to cut with great precision”. It ignores armor and can reroll the attack die.
I don’t think we’ll be intentionally trying to hold the field this time; if we need to fight, we’ll prefer to fight at range, but that Precursor Wanderer is going to be a problem when they get up close.
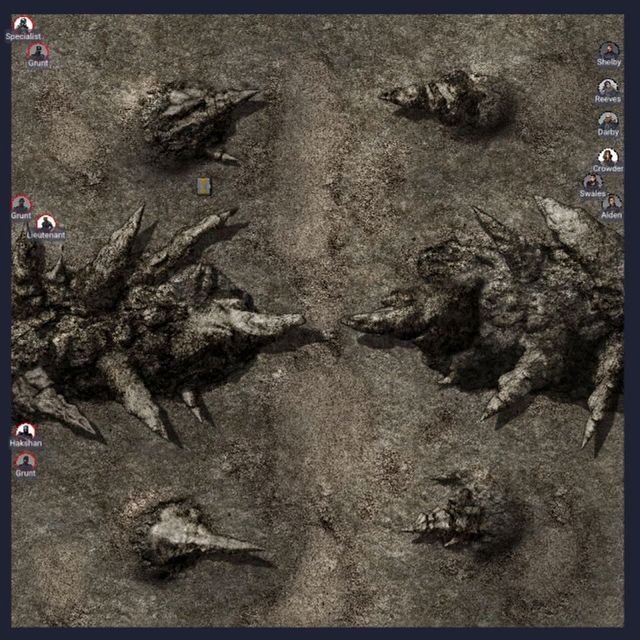
The crew will come in on the east side (determined by a die roll, as always!) and the enemy on the west. Despite our deployment area, we can only leave through the corridor on the northern side. Our goal will be to get down into the engineering room and do our business in there with minimal casualties on our side.

Round 1
As we start, the visibility is 12” due to the exhaust from the reactors. The crew will first try to Seize the Initiative, and we succeed! Hopefully this initial move will get us in a position to find the data we’re seeking and exfiltrate safely.
So the six of them get to the control panels, but before anything else happens, the Precursor Wanderer (who is too far away to see anything through the billowing clouds of vapor and exhaust) activates and dashes towards Alden, the nearest crew member.
Three crew members activate in the Quick Actions phase. Darby goes first and spends his action searching the nearby control panel: no luck. Nearby, Notley finds the data! He secures it on his person, but that’s all he can do for now. The next priority is to get out of here, but also to keep the Precursor Wanderer from blocking our exit. Alden moves to the exit door (which is closed until someone opens it) and then takes a shot at the Precursor Wanderer, missing.
Now the rest of the enemies activate. The Specialist moves into cover, but the reduced visibility keeps them from being able to do anything from here. The Soldiers similarly move to cover, unable to do anything more. Finally, the Lieutenant dashes out across open ground, but far enough away that they cannot get a line of sight to any of the crew.
In the Slow Actions phase, Swales moves up to the door and spends her action opening it. Reeves gets to cover and has a shot on the Precursor Wanderer, stunning them. Crowder cautiously gets to a different bit of cover before firing her Needle Rifle at the Precursor Wanderer, getting 2 Critical Hits! The alien’s armor doesn’t save them from any of these, and they take 3 Hits. I decide that Luck (which allows them to avoid becoming a casualty once per battle) negates all the damage from a single attack, as it were, so they dive 2” to the northwest and stay in the fight.
Round 2
The visibility is down to 9” for this round as the vapor becomes even thicker. Before any of the crew can act, the Precursor Wanderer runs towards Reeves and shoots its Infantry Laser at her in a snap shot, unable to miss at this range. Fortunately, this only stuns her.
Now we can get to the Quick Actions phase, when one crew member can activate. Crowder gets to cover next to Reeves and fires her Needle Rifle again, getting only 2 regular hits. This does drop the Precursor Wanderer, though!
All the Renegade Soldiers stay in cover and converge towards the crew, except one who doesn’t visibility to anyone and just has to run across open ground.
The rest of the crew can activate now. Notley advances at regular speed and fires at the Soldier in the open with a Shotgun, stunning them and knocking them back. Darby dashes around back, staying clear of any potential enemy fire. Reeves recovers from being stunned and moves into the corridor, though isn’t able to get fully out, and Alden gets to the exit but will leave in the next round, followed closely by Swales.
At the end of the round, one of the enemy Soldiers panics and bails.
Round 3
The vapor clouds clear a little and visibility is up to 13”. Only one of the crew activates this round, and so Notley (who has the best chance and cleanest shot) blasts away at the Specialist, but misses.
The Soldier in open ground gets to a little bit of cover, and the Specialist returns fire at Notley with their Rattle Gun, but his armor absorbs most of the hit and only leaves him stunned. The remaining Soldier and the Lieutenant both move cautiously towards the crew.
Swales and Alden both exit the area and Reeves gets to the exit. Darby could get into the corridor, but instead he takes cover in the doorway that Swales opened earlier and takes a shot on a Soldier, putting two stuns on them. Crowder gets into the doorway as well and shoots at the Lieutenant but misses.
Round 4
Visibility has climbed to the maximum 14” this round. None of the crew can activate during the Quick Actions round. The stunned Soldier clears one stun and moves to cover. The Lieutenant fires their Hand Laser at Darby but misses as sparks fly from the wall next to him. As the clouds clear, a second Soldier turns their Hand Laser on Notley, taking him down! Finally, the Specialist gets to a wall and dashes along it, trying to get to Darby and Crowder.
The rest of the crew gets out of the facility and off the map. The mission is a success, but at a cost.
Post-Battle Sequence
We didn’t hold the field, so the enemy won’t become a rival. This is the conclusion of the quest - the next time we do a Quest mission, it will be a finale. It will be on another world, though, and so the Acidic Angel will need to leave Elyria for Captain Swales to get the answers she’s looking for.
We earn 4 credits in bounties, although we didn’t take down the priority target, and we loot 2 doses of Rage out (which gives a temporary bonus to speed and brawling). These enemies aren’t an invasion threat, fortunately.
Notley is in bad shape - he’ll survive, but is permanently injured and will leave the crew. He got Swales some of the answers, but this fighting has proved too much for him and he’s going to stay on Elyria, possibly working with Stroud Ogden for a while. (I considered using a Story Point to reroll this, but Notley already had been considering leaving since Campaign Turn 6 so it makes narrative sense.)
The rest of the crew earns 4 XP each, with 1 more for Crowder for taking down the Precursor Wanderer. In the process, Swales, Crowder, and Alden each get +1 Combat, while Reeves takes another point of Toughness. With Notley leaving, we have some extra gear for whenever Swales finds a new recruit, so no purchases this time.
Onboard the Angel, the crew has a farewell party for Notley, who’s been looking over his shoulder and finally found a place he’d like to stay for a while. That gives us another story point, which I spend rerolling the character event: Darby spends some extra time exercising on the ship and gets +2 XP. He’ll miss Notley, particularly since he was the first one considering retiring from this violent life.