5 Parsecs From Home - Campaign Turn 10
Our plans to leave Elyria were put on hold by the government that has temporarily barred all ships from leaving due to military operations. The Acidic Angel is stuck here in a relatively hot situation, with lots of scummy types out looking for our blood and the government stomping on people’s necks.
World Steps
As before, we need to spend 1 credit on upkeep; currently there’s no ship debt, damage, or crew in the Medical Bay.
Crew Tasks
- Ellen Swales: Repair
- We don’t have any more spare parts but she’ll do what she can with the Duplicator.
- Success! It can be used one time to duplicate any item we have (other than a Duplicator itself, which would be both confusing and useless).
- Reyna Crowder: Find a Patron
- We have a couple of patrons already, so hopefully we can get a job from one of them.
- Success! One of our patrons has a job for us, as does a new one. We’ll dig into the details below.
- Shurl Reeves: Trade
- She picks up some local maps that can give us a Quest Rumor if we pick up a quest on this or the following world.
- Since we already have a quest, that immediately helps us out, giving us a total of 6 Quest Rumors to work with.
- Swales will need to spend some time figuring out what this all means!
- Thornton Darby: Repair
- He’s now got the same Savvy score as Swales, so he’s going to try to repair the Flex-Armor for Reeves to wear.
- Unfortunately, the repairs fail and the item is beyond fixing at this point.
- Mark Notley: Decoy
- We’d rather not deal with rival interruptions this campaign turn so he’s going to try to keep the heat down.
- Saige Alden: Decoy
- She’ll work with Notley on this, throwing off the folks looking for us.
Job Offers
Darby picked up a new corporate patron at the end of the last turn called “Moonway”. They’re offering an extra 1 credit in Danger Pay for a job that can be done at any time, although we can’t pick up any law enforcement rivals as we need to stay clean for them. The job is to make a delivery but in an area where dangerous cultists are known to operate. We already have some of those as rivals; it’s likely that’s the same group.
There’s a new patron offering a job as well, the local government needing something fairly low-priority (reduced enemy numbers). They need us to secure an area against some local Roid-gangers, and they need it done now. They’re offering an extra 1 credit in Danger Pay, same as Moonway.
It makes the most sense to take the government job, since it’ll go away after this turn.
Notley and Alden make some minor swaps in their equipment, though: Notley takes the Shotgun (since he’s better armored and tougher) and Alden takes the new Military Rifle (since it doesn’t have the drawback of Blast Rifles here from the reflective dust on Elyria). While it has a hex grid drawn on it, as with the other maps I’m not actually using the grid for measurement and moving.
Battle Setup
Thanks to the good work of a couple of crew members, our various rivals don’t interfere with this job.
- Deployment Conditions: Brief engagement (increasing chance each round that the battle ends inconclusively)
- Notable Sights: Person of Interest (worth +1 Story Point)
- Objective: Secure
- Must end 2 consecutive rounds with crew within 2” of the center
- Crew with an enemy within 6” does not count
- Holding the Field also counts (since we can complete at our leisure)
- Enemy: Hired Muscle
- We’re at -1 to Seize the Initiative since they are paid professionals
- Roid-gangers: Criminal gangs obsessed with body enhancement. They often form sub-communities where they communicate through incoherent gibberish.
- Careless: We’re at +1 to Seize the Initiative (for a final modifier of 0)
- Panic 1, Speed 4”, Combat +0, Toughness 5, AI Aggressive
- Total of 4 enemies
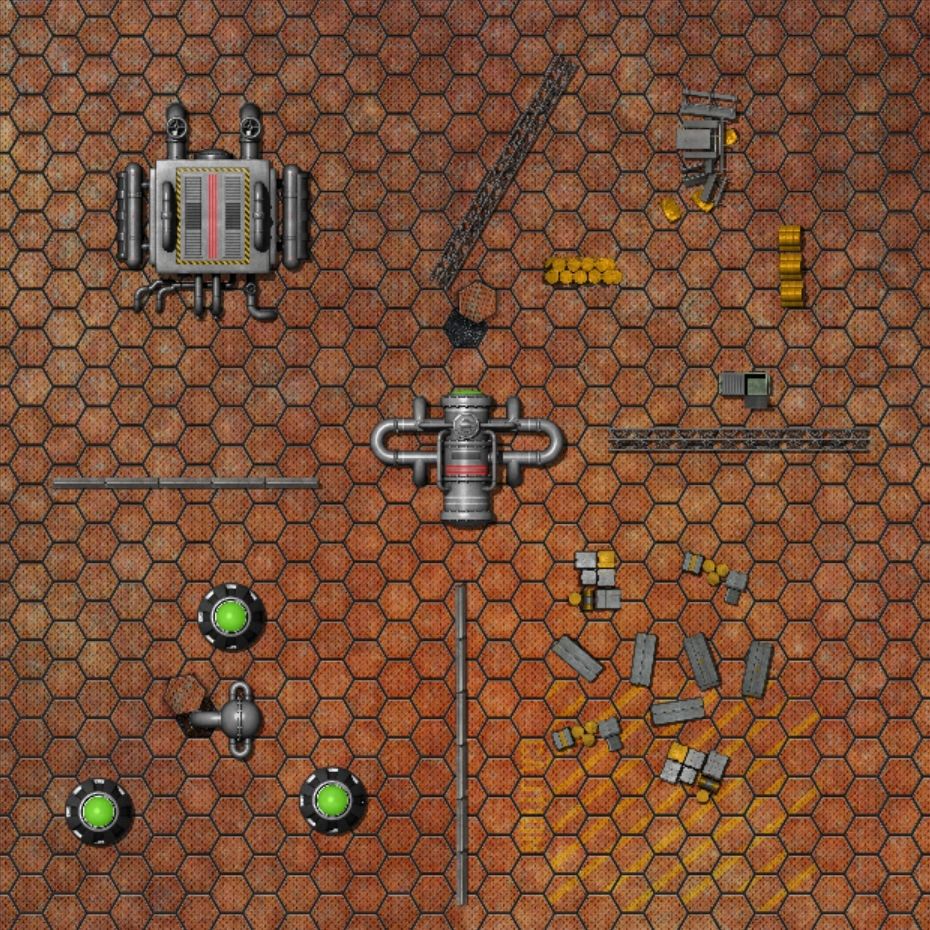
This turn, I will spend some time setting up a custom map. Loke BattleMat’s Lower Decks encounter map will be the base, and as usual I’ll add some of Gabriel Pickard’s science fiction decor. I’m also changing the scale slightly, so this is effectively a 32”x32” map, which is not how the hexes appear. But as usual, the grid isn’t being used for movement or range; it’s purely aesthetic as it’s drawn into the original image.
The guidelines for this size of map suggest 2 large, 5 small, and 4 linear features. So for this purpose, I’m putting in a large bit of machinery at the center (this is what we’re trying to secure) and another large machinery installation in the northwest part of the map. Both of these block line of sight with their main structure, and the smaller pipes and conduits around them provide cover. Each rough quadrant of the map will be separated from the others by linear features (concrete barriers or metal girders) which provide cover but do not block LoS. Otherwise, stacked barrels and the large machinery block LoS, while pipes and unstacked crates provide cover only.

I randomly determine that the crew will deploy from the south, so the Roid-gangers will be coming in from the north.
Rules of Engagement
Rather than keep a separate (physical) sheet of the encounter log, I’m going to summarize the stats below for my use during the actual fight.
- All Laser, Beam, or Blast weapons are -1 to Hit at ranges exceeding 9”.
- Aggressive enemies set up in one cluster with 1” between each figure.
- Aggressive enemies will not Aim.
- Aggressive enemies with opponents in sight will advance at least half a move towards them, attempting to remain in Cover if possible.
- Enemies that are unable to see any opposition, or which are within 12”, will advance as fast as possible towards the nearest opponent with equal or lower Combat skill in order to enter into a Brawl.
- Lieutenant (1): Panic 0, Speed 4”, Combat +1, Toughness 5 (will not Brawl with Swales or Reeves). Colony Rifle has range 18”, 1 Shot, and 0 damage bonus. Blade gives +2 bonus to Brawling rolls.
- Specialist (1): Panic 1, Speed 4”, Combat +0, Toughness 5 (will not Brawl with any of our crew). Cling Fire Pistol has range 12”, 2 Shots, and 1 damage bonus. Both shots must be against the same target, and any target hit must retreat 1D6” away from the shooter.
- Roid-gangers (2): Panic 1, Speed 4”, Combat +0, Toughness 5 (will not Brawl with any of our crew). Colony Rifle has range 18”, 1 Shot, and 0 damage bonus.
- At the end of each round, roll 2D6. If the result is equal or less than the round number, the fight ends inconclusively.
I will not be using Battle Events after rounds 2 and 4 this time, as the “brief engagement” rule keeps it complicated enough. The crew will have to move in and engage rather than simply wait for aggressive opponents to throw themselves into the open.
Round 1
The crew successfully Seizes the Initiative, so everybody gets a free move action (6” for everybody but Reeves, who gets only 4”).
When the Quick Actions phase actually starts, Notley makes a a full dash to the center, getting to cover.
The Gangers split up and dash to cover through both of the northern quadrants.
During the Slow Actions phase, Swales moves at full dash speed towards a concrete barrier, and Darby runs to back up Notley in the center, as does Alden. Crowder gets behind Swales; she’s not all the way up against the barrier, but given how everyone else is guarding the approach vectors, she shouldn’t be exposed. Finally, Reeves moves much more slowly along the central line.
At the end of the round, the crew controls the center objective.
Round 2
Two crew members can activate during the Quick Actions phase, so Notley fires a Shotgun blast at the Roid-ganger Lieutenant, taking him down in a violent mess. Swales aims carefully at the Ganger nearby, and the lance of energy from her Fury Rifle takes him down as well.
During the Enemy Actions, one Ganger moves adjacent to a row of barrels and fires at Alden but misses. However, the Specialist pulls up and fires at Alden as well with a Cling Fire Pistol, which is negated by Alden’s Deflector Field. Note that neither of them are within 6” of the center objective.
Alden moves closer to their cover and fires a shot at the Specialist with her Military Rifle which drops him. Crowder crouches next to Swales and hits the Ganger with her Needle Rifle, stunning him. Reeves walks up next to Alden with her modded Colony Rifle and takes a shot at the Ganger, adding another stun (up to 2 now).
At the end of the round, the ganger doesn’t panic despite losing the entire rest of his squad. That’s a tough dude! The fight continues (doesn’t conclude from the Brief Engagement mechanic). The crew has achieved its objective, but will attempt to take down the last ganger so that they can Hold the Field.
Round 3
One crew member can activate this phase, so Reeves takes careful aim and hits the ganger, which is a third stun and results in taking him down.
The crew has secured the objective and held the field in what might have been the quickest battle I’ve had.
Post-Battle Sequence
The Roid-gangers figure business is business (literally true for them too) and do not become rivals. They’re not invasion threats, fortunately. The Elyrian local government gets added to the Weekenders’ contacts list as a patron. Total pay comes to 5 credits, including the danger pay bonus, and the Person of Interest turns out to know something about Swales’ past and her quest. I think it’s perhaps a former colleague or contact from her time in the previous crew. That gives us an extra Story Point (not that I use them very often). Additionally, the crew finds the Lieutenant’s Colony Rifle (unfortunately not the Specialist’s Cling Fire Pistol) and a Med-patch.
Since we don’t have any casualties, everyone gets 4 XP and Notley gets the bonus 1 XP for inflicting the first casualty. Darby spends some XP on +1 Combat but everyone else is saving up for a new upgrade. Swales decides they have more than enough to get the Acidic Angel to the next world once the government lifts the travel ban, so she spends 3 credits on a Military Weapon. I’m going to spend the story point on rolling twice and choosing the better option; we end up with a Needle Rifle, excellent kit.
This went so well that the crew ends up having another night drinking and playing cards; of course Stroud is welcome to join in, while everybody’s still here. This gains back that story point again, which I then spend once more on the Character Event roll (because the first one was boring af) and Notley finds us another patron, maybe when he went out to get the liquor for the crew party.

