5 Parsecs From Home - Campaign Turn 15
One of my favorite things about this game (and the others I play and document here) is emergent narrative. Taking a bunch of random results and interpreting them into a coherent story really tickles my neurons. That said, sometimes these results need a bit of shaping to keep the coherence.
So far, I’ve focused largely on learning how 5 Parsecs From Home works and the immediate narrative: why does this character do that thing? But as I’ve gotten more familiar with the game, I want more of an arc: why is the crew doing these things? Fortunately, the expansions to 5PH have a number of tools to help with this goal, and of course I have lots of other games and materials to help inspire me as well.
With that in mind, I’m going to frame this quest a bit more, then wrap up this particular campaign. I’ll start a new one afterward, possibly with some returning characters in some form or fashion; that one will start off with a bit more direction.
For now, the quest (generated with the help of the Tome of Adventure Design) is simple: a scientist here on Noth V58 has engineered one of the native creatures to a degree of intelligence. However, she needs smugglers to get the creature to an off-world location where it will be safe. I envision an Acquire mission to pick up the creature, then using the Expanded Quest Progression system from the Freelancer’s Handbook (FH) to fill things out from there. Ultimately, I envision a Deliver mission to get the creature to its destination, but events could change things.
World Steps
Upkeep costs the usual 1 credit and other costs are at 0.
Crew Tasks
Since we’re intending to take a quest mission, we don’t need to go looking for patron jobs. But at the same time, the Captain would like to ensure that our remaining rivals here on Noth V58 (the Brat Gang that followed the Acidic Angel all the way from Elyria) don’t get in our way.
- Ellen Swales: Train
- With the intention of making sure she is better-prepared, she hits the gym and gets another XP.
- That’s enough for her to get +1 Toughness.
- Reyna Crowder: Explore
- Crowder just gets a few drinks. Nothing special results.
- Shurl Reeves: Trade
- She’s got additional Merchant training now, so let’s put that to use. Specifically, it gives us an ability (albeit limited) to reroll trade offers we don’t like.
- However, she gets a good deal on some medical supplies, so we get another stim-pack.
- Thornton Darby: Decoy
- He doesn’t feel great about sitting out a fight that ended up getting his friends ambushed, so he’ll ensure that doesn’t happen again.
- Saige Alden: Trade
- Her efforts turn up something interesting: 2 doses of Still, a drug that prevents the user from moving but helps their aim significantly.
- Robert Shelby: Explore
- He knows this is likely his last stint here, so he goes out in search of fun.
- However, his fame-hungry nature gets the better of him and ends up with an offer of a small job.
- During the next fight, we’ll get 2 credits for killing a randomly-selected enemy figure.
Equipment
Time to put things back. Alden has to give Darby back his Needle Rifle and she reluctantly picks up her Military Rifle instead. Similarly, Shelby hands back the Boarding Saber (which he made good use of) and puts his regular Blade back on his belt.
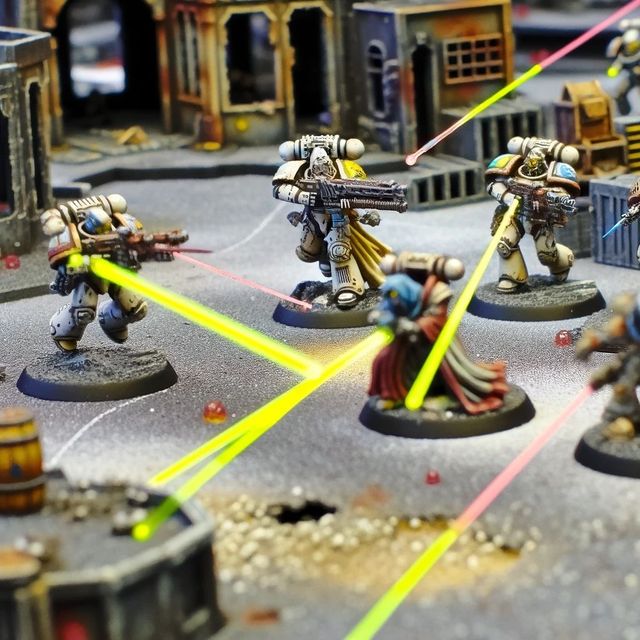
Battle
With Darby on decoy duty, our sole rival here won’t interfere at all. Instead, this will be a quest mission as discussed above.
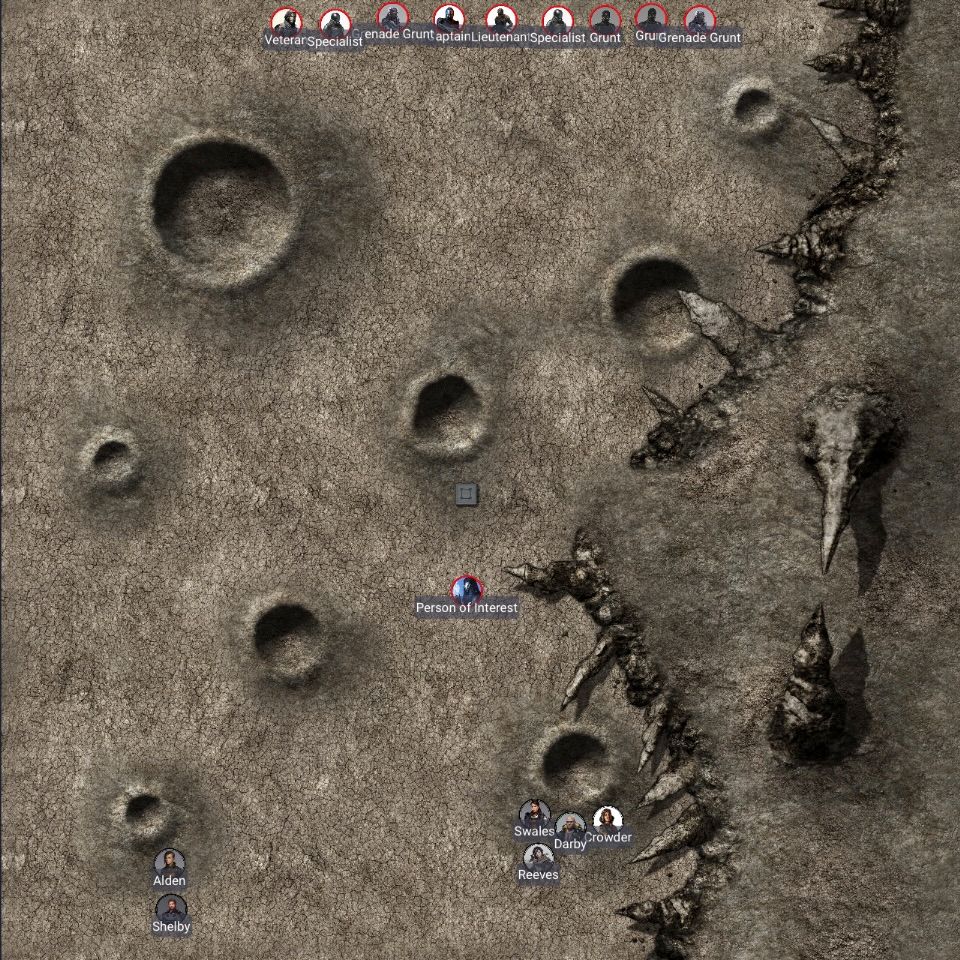
Setup
For this fight, I’m using the Elite-level enemies from the Trailblazer’s Toolkit (TT) and Dramatic Weapons from FH (including the Adjusted Shooting ranges but not Duck Back and Lunge Attack, which I’d inevitably forget anyway). I’m also using Enemy Deployment Variables, AI Variations, and all the Hit Me Harder toggles from TT. The latter are reflected in the Profiles and Weapons below. (I put all these details so I can reference them in a single place during the actual battle.)
- Deployment Conditions: Toxic environment
- Whenever a combatant is Stunned, roll 1D6+Savvy (0 for enemies). Failure to roll a 4+ becomes a casualty.
- Notable Sights: Person of Interest
- Gain +1 story point if we can contact this person (likely the scientist who engineered the creature, or one of their associates).
- The person will be 3” south of the center of the board.
- Objective: Acquire
- We need to get the creature and get out.
- Enemies: Criminal Elements
- Whoever this is has a 1 credit bounty that we can earn by holding the field.
- They have an increased chance of becoming rivals, however.
- Elite Anarchists: Separatist groups violently opposing the state and the megacorps.
- Stubborn: They ignore the first casualty of the battle when making Morale checks.
- Explosive Politics: Two basic enemies carry Frakk Grenades and will use them if in range.
- Fight the Power: Anarchists receive +1 to Hit rolls when shooting at or brawling with the crew captain.
- They’ll total 9 enemies (Strength-adjusted toggle) but no Unique Individuals this time.
- Enemy AI: Aggressive
- Any group of enemies where a given figure is within 2” of another will obey the same die roll instead of rolling for each figure. If any figure in the group would be subject to the base condition, they all follow that option.
- Base Condition: If able to engage an opponent in brawling combat this round, advance to do so. Otherwise, roll on a d6 table to determine the action.
- Profiles: 1 Captain, 1 Lieutenant, 2 Specialists, 1 Veteran, 2 Grenade Grunts, 2 Regular Grunts
- Captain: Panic 0 (Fearless), Speed 5”, Combat +1, Toughness 5, 4+ Saving Throw, Military Rifle, Ripper Sword
- Lieutenant: Panic 0 (Fearless), Speed 5”, Combat +1, Toughness 4, 5+ Saving Throw, Colony Rifle, Blade
- Specialists: Panic 1-2 (1 while leaders are alive), Speed 5”, Combat +1, Toughness 4, Hand Flamer
- Veteran: Panic 1-2 (1 while leaders are alive), Speed 5”, Combat +1, Toughness 4, Infantry Laser, Blade
- Grunts: Panic 1-2 (1 while leaders are alive), Speed 5”, Combat +0, Toughness 4, Infantry Laser
- Weapons:
- Blade: Brawl, Damage 1, Melee (+2 Brawl)
- Colony Rifle: Range 18”, Shots 1, Damage 0
- Hand Flamer: Range 8”, Damage 1, Area (every figure within 2” of target point are hit on 4+, or 5+ if partially obscured), Burn (targets that are hit but survive make a full move in a random direction unless deflected by armor)
- Infantry Laser: Range 30”, Shots 1, Damage 0, Snap Shot (+1 to hit within 6”)
- Military Rifle: Range 24”, Shots 1, Damage 0
- Ripper Sword: Brawl, Damage 2, Melee (+2 Brawl)
Since I expect this is the last mission here on Noth V58, which is a barren world, I’m going to continue to use Gabriel Pickard’s Jagged Wastes assets for the map. In particular, I’m using the “Into the Barrens” map, noting the following:
- The map is 30” x 30”.
- The escarpments are linear features that are treated as 2” high.
- Spires block line of sight and are treated as 6” high. They can be climbed.
- Craters are difficult terrain and provide cover to figures within them.
The crew will deploy from the south edge of the map, and the enemies will deploy from the north edge.
Round 1
The crew successfully seizes the initiative (and thus Enemy Deployment Variables don’t end up applying). This gives everyone a free Move action before the battle proper begins, allowing them to get to cover.
For this first Quick Actions phase, I can activate three figures. Swales runs to the contact and spends her action consulting with them, confirming this is the pickup point and the cargo. (That gains a story point.) Darby dashes over to cover behind a crater near the center, with Reeves moving more fully behind the cover he left.
None of the enemy Anarchists are in range to brawl, so they’ll all advance to the next forward position in cover.
Alden takes cover near Darby behind a crater. She has line of sight to a Specialist and drops him from long distance with her Military Rifle. Shelby gets to better cover, then Crowder (who previously jumped down the escarpment) dashes along it, intending to get to a flanking position.
One of the Anarchists starts to panic, but their captain barks at him and he gets back in line. The contact moves off towards the player edge, not wanting to stay in the line of fire.
Round 2
With the contact out of the way, Swales quickly moves to the crate and will spend the rest of the round picking it up. Fortunately, it also provides cover.
Again, none of the Anarchists are in range to brawl, although closer, so the cluster furthest forward (the remaining Specialist, a Grunt, and their Lieutenant) all dash towards Swales! (That’s got to be slightly intimidating for her, but she can handle it.) The squad with their Captain, Veteran, and a Grenade Grunt try to advance to the next forward position in cover, leaving them in the open from some angles. Finally, two more Grunts advance to fire on the nearest enemy. The nearest enemy in LOS is Crowder; one misses, and the other doesn’t have LOS yet.
Crowder takes careful aim with her Needle Rifle and stuns a Grunt that’s almost on top of Swales. Darby has that open angle on the Captain and fires as well, hitting him twice but only stunning him with both hits due to the leader’s armor. Alden aims and volleys with him, getting the third stun which renders the target unconscious and takes him out of the fight. Shelby dashes up between Darby and Alden. Reeves has her LOS on the Specialist blocked by a spire, which is a real problem given the hand flamer that enemy is carrying. She’ll move behind it, though, in case anyone comes running past.
The loss of their Captain is a blow, but the Anarchist Lieutenant keeps order in their ranks and no one bails. The contact, though, gets off the board.
Round 3
Swales is exposed now and is going to turn and run, carrying the cargo. As the cliche goes, discretion is the better part of valor, because the mission matters. Reeves will hold her shot for Snap Fire during the Enemy Actions phase.
Speaking of which, the enemy Specialist has his base condition matched and charges Reeves intending to brawl, but her Snap Fire activates as he comes around the spire. Her shot doesn’t miss and he is dropped in his tracks. The Lieutenant and Grunt can’t quite get to Reeves or Crowder, so they’ll advance and fire on the nearest enemy from cover. The Grunt can just get to the edge of the spire to fire on Reeves from cover, but his stun prevents him from actually taking the shot. In turn, the Lieutenant moves to the edge of the escarpment and fires on Crowder, hitting her but not getting through her armor. The next cluster can’t get to brawling range, so a Grenade Grunt advances to fire on the nearest enemy from cover, who happens to be Shelby (albeit not close enough to toss a grenade, which is good since there are three crew clustered together). The shot goes wide; Shelby wasn’t really in danger from it at all. But the Veteran can also get to cover, and Darby is in his sights - but he misses.
The rest of the crew can activate now. Darby has LOS on the Grunt nearest Reeves, so he aims carefully and puts two Needle Rifle shots into the enemy, one of which takes them down. Shelby stuns the Veteran with his Blast Rifle. Alden follows up with her Military Rifle, again only stunning the enemy. Crowder is the last to activate and uses her sole action (due to the stun) to move out of LOS from the Lieutenant.
Due to the Lieutenant’s commanding presence, none of the Anarchists panic.
Round 4
At this point, the crew is going to try to exfiltrate rather than simply eliminate the enemy. Reeves falls back, covered by her fellow crew members, diving into a crater to stay in as much cover as she can.
None of the Anarchists are in range to brawl, so instead the Lieutenant activates and dashes towards the nearest enemy by the fastest route, which will put him in the open. The next cluster is the Veteran and a Grenade Grunt who also are giving chase like their leader. In the remaining cluster, they’re just going to maneuver within their current cover to fire, and the Grunts both have a shot on Darby but can’t hit.
Swales holds still, aiming her Fury Rifle at the Lieutenant, hitting him with an Armor-Piercing round that stuns him, with the Shockwave knocking him back a full 5 inches into a crater. Shelby dashes back behind cover near the edge, and both Alden and Crowder successfully exit the map fully. Darby instead uses his turn to aim at a Grunt, killing him.
Despite their loss, the Anarchists continue to give chase.
Round 5
Two of the crew will activate before the enemies, and Swales uses the opportunity to fire at the Veteran with that Fury Rifle, which takes him down entirely. Shelby is able to get off the board.
The Lieutenant recovers from his stun, but because of it he won’t be able to advance into a brawl. Instead, he takes a shot at Darby, but combat armor absorbs it. That rear squad of Grunts continues to maneuver within their current cover to fire, stunning Darby again but he’s still conscious (and closer to the edge of the map).
Darby gets off the board, so those stuns won’t end up mattering.
Again, the Anarchists don’t see a reason to panic even with the Veteran going down.
Round 6
(At this point I realized I totally forgot the Toxic Environment condition! Oops…)
Reeves goes first, taking careful aim, and firing on the Lieutenant, stunning him again.
In the Enemy Actions phase, that same Lieutenant recovers enough to return fire, but the shot hits the crater edge in front of Reeves. Finally the rear echelon advances, one Grunt firing and missing and the other not getting a shot at all.
Swales gets off the board, accomplishing the objective fully.
Round 7
The enemies will go before Reeves can act, and the Lieutenant moves out of the crater by the fastest route and fires but misses. The Grunts take cover to shoot at Reeves as well without effect.
Reeves gets to the edge of the map but can’t exit until next round.
Round 8
This is the enemy’s last chance to stop one of the crew, and they’re certainly going to try. Rather than just roll, I think it makes sense that they just fire from where they are because none of them can get to brawling range. One of the grunts hits Reeves, taking her down. Oof.
Post-Battle Sequence
Since we didn’t hold the field, there’s no danger of a rivalry here. Instead, to progress the quest, a business contact might be able to help. We’ll need to complete a specific protection mission against aggressive enemies to progress.
The crew earns 5 credits in bounty and looted a Sonic Emitter, which can disrupt nearby enemies’ ability to shoot.
The report for Reeves’ condition comes back, and it’s a Crippling Wound. Swales spends the needed 2 credits on immediate surgery to prevent further damage to the already-disabled Reeves. (Why didn’t I use that stim-pack??)
Reeves therefore gets 1 XP, while everyone else gets 3 XP and Alden gets a bonus 1 XP for the first kill. Crowder, Shelby, and Darby both spend XP on +1 Toughness, while Alden gets +1 Savvy. The captain also decides to spend 3 credits on a new gadget, a Scanner Bot that will help with initiative rolls.
Finally, word has gotten out - it’s time to go! Every turn we stay on this planet will add a new Rival. Crowder is kind of disappointed - the local food was really good, and she’ll get +1 XP for that.
Final Thoughts
This felt much more interesting to me; those difficulty toggles went a long way in making it not feel like shooting fish in a barrel. If I’d tried to have the crew stand and fight, those Anarchists would probably have caused a lot of hurt, and that makes for a much more exciting game. After spending more time with the supplements, I’m confident that I will be able to inject a lot more narrative into the next 5PH campaign soon.