5 Parsecs From Home - Campaign Turn 14
The previous mission went fine despite the increased difficulty. I had a few worries here and there - that Specialist was tough as nails - but never truly felt like the crew might get wiped or even fail. This time, I plan to try a few different options, in particular no-minis / no-map battles.
World Steps
Upkeep, medical care, ship repair… all the same. We’ve been fortunate. 1 credit spent, down to 24 total.
Crew Tasks
We don’t need another patron job for a few reasons, but that at least takes some pressure off of the crew’s assignments.
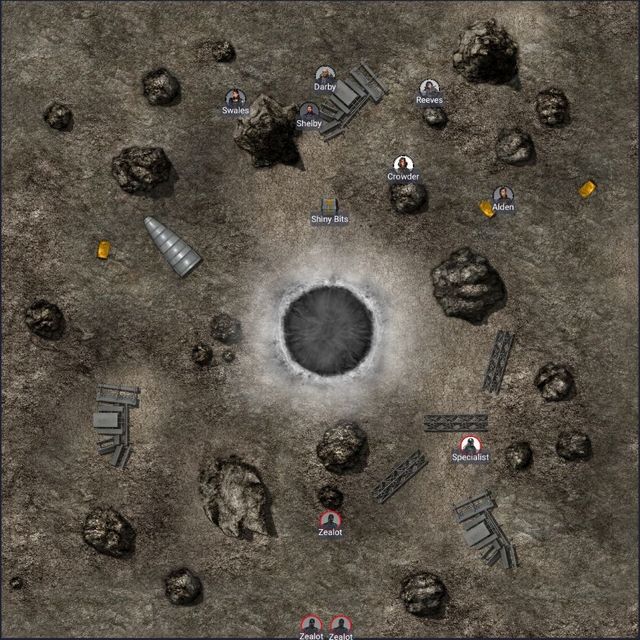
- Ellen Swales: Repair
- I don’t know when we’ll actually use the Grapple Launcher, but she’s going to try to fix it anyway.
- Not quite, but at least she didn’t biff it.
- Reyna Crowder: Trade
- Somehow she comes across some bits of scrap, maybe recovered in the last mission? She’s able to sell them on for 1 credit.
- Shurl Reeves: Trade
- As a respected trader with a reputation for fairness in dealings, she manages to secure some gear at a substantial discount.
- Without additional expenditures, she secures another set of Combat Armor!
- Thornton Darby: Explore
- He’s taking a walk, lost in thought, when he across somebody looking for a Shotgun, and he sells them his for 1 credit.
- Is his disillusionment with violence part of the reason he’s willing to part with it? Who can say?
- Saige Alden: Explore
- While slumming it around town, she overhears some talk and gains a Rumor.
- Robert Shelby: Train
- As the newest, least-experienced member, he hits the range and gains 1 XP.
- This gives him enough to get +1 Combat.
Job Offers
The job from Customized Acquisitions is still available. It pays an extra 2 credits in Danger Pay, even if the crew fails, and if we succeed, we’ll get some additional connections (+1 Rumor). Then again, if we fail, they’ll be looking to take revenge. They’ve got a VIP holed up someplace that needs extraction.
I think we’re going to attempt it, assuming our rivals don’t get in the way.
Equipment
Darby is sitting this one out - he’s not looking to kill anybody over some corporate muckety-muck. Alden will carry his Needle Rifle for this fight, and Shelby will take the Boarding Saber.
As for existing equipment in the stash, Swales is finally going to wear some Combat Armor and Reeves will swap out that old Colony Rifle (that has a Bipod) for an Infantry Laser. Longer range, and a bonus to hit at short range, albeit without that mod.
Rumors
As mentioned, Darby isn’t going on this one. However, he does spend some time looking into the rumors the crew has heard. That leads to a new quest, which we’ll look into after this mission.
Battle Setup
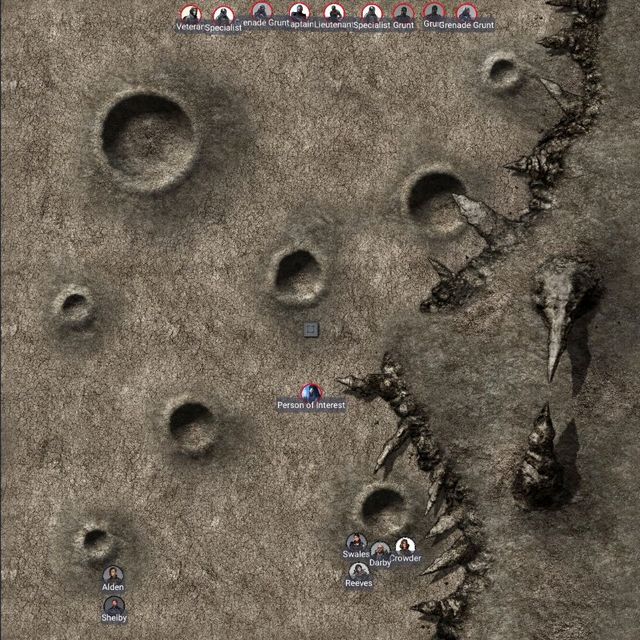
Despite our intention to go rescue that corporate VIP, the crew will actually be ambushed by a rival; more specifically, the Cultists from Elyria have followed us here and are looking to get even! They might even be intending on something extremely nefarious if they can get some of our crew in their clutches.
I envision this happening in an isolated urban environment, partly because that’s what they used as home turf the last time we tangled with them and partly because it feels like a good place for a group like that to set up an ambush. Due to that factor, we end up having one fewer crew member than we would otherwise, and I determine randomly that’s Alden. Given that Darby is already sitting this one out, this is a bad situation. We also can’t even try to Seize the Initiative.
Also, I’m combining the Battle Setup and Rules of Engagement lists into one so I’m less likely to miss stuff like last time.
- Deployment Conditions: Small Encounter: A random crew member must sit out this fight. Reduce enemy numbers by 1 (2 if they initially outnumber us).
- That’s extra rough! Crowder is caught out of position this time.
- Notable Sights: Nothing special
- Objective: None
- Ideally, we hold the field to have a chance to run them off permanently.
- If we flee before the end of the 4th round, we’ll lose a random piece of equipment.
- Enemy: Criminal Elements
- There’s an extra 1 credit bounty if we hold the field.
- Cultists: Fringe Space is full of odd, para-religious groups, congregating around this or that principle. They are often heavily armed and up to no good.
- Intrigue: After the fight, roll 2D6 and add +1 if we killed a Lieutenant or a Unique Individual. On a 9+, we’ll obtain a Quest Rumor.
- Total of 4 basic enemies.
- The dice really favored us, apparently wanting the battle to be small indeed, given all the other factors pumping up their numbers.
- Aggressive Enemies
- Aggressive enemies do not Aim.
- They will not enter a Brawl with us, as we have higher Combat skill in all cases (due to Shelby’s recent training).
- Other Aggressive constraints don’t apply for this particular battle.
- Difficulty Toggles:
- Respawn 3: The first three basic enemies to be slain are replaced at the end of the round. Replacements arrive from the center of the enemy battlefield edge.
- Strength 2: Added 2 additional basic enemies. (That’s why there’s no Lieutenant or Specialist despite the group size, since I decided that the Difficulty Toggle gets added at the end of the process.)
- Profiles:
- Panic 1, Speed 4”, Combat +0, Toughness 3
- Military Rifle: Range 24”, Shots 1, Damage 0
Honestly, this might actually be a great candidate for the no-minis combat, since the scope is about as limited as it will ever get. That’s such a drastic change that I’m not using any of the other in-battle changes I’m looking at, like Dramatic Weapons.
Each round, there will still be three phases. But they’re quite different: Battle Flow Events, Initiative Actions (some of which require rolls), and then the Firefight (which is the main phase).
 Image generated by DALL-E
Round 1
The crew is making their way to the extraction point for their intended mission, heading through the city and trying to keep their heads down. Crowder and Alden are taking a separate path so as not to alert the opposition, but it turns out this plays right into the cult’s hands as they spring an ambush! It’s just Swales, Reeves, and Shelby. There’s no time to seize the initiative, just react.
As a Battle Flow Event, the crew could do a Covered Retreat for any number of crew members to escape, but that’s not how this is going to go down.
In the Initiative Actions phase, only Swales will get to go. She immediately Takes Cover successfully, making it much more difficult to hit her (and for her to hit back, but at the start she’s trying to size up the situation).
During the Firefight, 3 enemies will activate and each targets a random crew member. The first Cultist takes a shot at Shelby. These enemies don’t aim (due to their aggressiveness), but due to their longer range, the Cultist fires first, missing. Shelby returns fire, but also misses. The second Cultist targets Swales, hitting despite the cover! The Combat Armor takes the hit and her Nerve Adjuster prevents the stun. She returns fire, hitting the enemy’s cover. Finally, the third Cultist also targets Swales but misses badly.
Round 2
Again, the Battle Flow Event allows a Covered Retreat, but as before that’s not our plan.
In the Initiative Actions phase, Swales and Reeves will both act. Swales has already Taken Cover, which will last until she Moves Up (not applicable in this battle without specific Locations) or gets into a Brawl, which she’s not likely to do anytime soon given her loadout. Instead, she will Support Shelby, giving her the option to engage any combat that would otherwise involve him. Reeves will try to make an Optimal Shot on a random enemy at a 30” range (they’re all the same anyway), but can’t line it up.
Now the Firefight starts. A Cultist targets Shelby, but Swales is going to take it instead as she’s better protected. The shot misses anyway, and she returns fire and misses as well. The second Cultist targets Reeves and the exchange of fire doesn’t hit anything. The third Cultist who has a shot takes it at Reeves as well with the same result.
Round 3
This Battle Flow Event would be a crew member finding a shortcut, but as noted there are no specific Locations in this battle.
Just like the previous round, Swales and Reeves will act in the Initiative Actions phase. Swales will continue to Support Shelby, and Reeves still can’t find that Optimal Shot.
In the Firefight, the first Cultist targets Reeves, missing, but this time her return shot hits the enemy and stuns them. The second Cultist targets Swales and all the shots miss. That ends her Support, though. Not that it matters, because the third Cultist targets Reeves and no shots hit. (There’s a lot of this in this battle.)
Stuns clear at the end of the round.
Round 4
During the Battle Flow Event, two characters stumble into each other, Shelby and one of the Cultists. They get into a Brawl, and Shelby is both better at it and wielding a Boarding Saber, taking down an enemy.
As the Initiative Actions phase starts, Swales also tries to get an Optimal Shot, which come to think of it is a bad idea given that she uses a Heavy weapon (Fury Rifle) which incurs a penalty on that Battlefield Test. She fails, and the Firefight starts.
This part of the Firefight has three enemies total anyway (though one will respawn soon and that’s going to be a pain.) The first Cultist fires at Swales, missing, as does the return fire. She may leave this extra Cover at some point to get a better shot, but not yet. The second targets Shelby and all shots ping off the cover. The third targets Reeves and misses, and despite his aiming, he can’t hit back.
None of these cultists panic and flee, so the fight continues.
Round 5
The enemies get reinforcements (1/3) and are back up to the full 4. Due to this Battle Flow Event, if anyone tries to enter Brawling combat, they’ll count as being in the open since they’re having to cross Open Ground to do it.
In the Initiative Actions phase, Swales will Move Up to the general battle space, leaving the security of her extra-covered position, though in a ranged fight, she’ll still count as being in regular cover. (Upon review, I realized that it was only benefiting her enemies since they needed a natural 6 to hit her anyway due to their +0 Combat). Reeves tries for her Optimal Shot again, but still can’t get it.
Now the Firefight resumes with a Cultist firing at Shelby and hitting him, taking him down for our first friendly casualty of the fight! But he activates a Stim-pack and is only stunned. The next Cultist shoots at Reeves with no effect in either direction. Finally, a Cultist targets Shelby again but is taken out for their trouble.
That doesn’t send anybody packing, but it does get them a reinforcement (2/3).
Round 6
The Battle Flow Event intensifies the fight, with the enemies getting an extra activation this round, so that all four will activate in the Firefight phase.
But first, the Initiative Actions has Shelby deciding to Charge an enemy (now that he no longer needs to cross open ground to do it). He succeeds at the Battlefield Test, meaning he’s able to get to the enemy in the first place, and he does so without the enemy getting a shot off at him while he’s charging. Of course, he wins the Brawl, but the enemy is only stunned. I decide this fight is going on too long anyway and use a Story Point to reroll that damage, which is enough to kill them. They’re not getting four activations this round after all. Swales will also try to Charge an enemy, and she’s so fast that the cultists literally never have a chance to fire at her on approach. She gets two hits in on the enemy during the Brawl, taking them down.
With only two of them up, this will be a shorter Firefight phase. One Cultist gets off a rifle shot against Reeves and misses, then she returns fire and removes them from the fight completely. The last Cultist tries to hit Shelby and misses, but he doesn’t miss back and takes them out.
The last reinforcement (3/3) shows up and has the balls to keep the fight going.
Round 7
The Battle Flow Event has the enemy on the other side of Open Ground again, meaning anybody entering a brawl will be in the open.
Swales thinks that’s worth it and Charges this enemy, because she’s fast enough to get across that ground without getting shot at. She pistol-whips them and ends the battle.
Post-Battle Sequence
The Weekenders have held the field and these cultists have had enough. They won’t be coming after us again. We get 4 credits in loot and bounties, plus an extra 1 credit for a special bounty on these cultists. We also get a Rumor to help with the quest progress. We also find another Rage-Out dose and a Ripper Sword.
Due to the judicious use of Stim-packs, nobody suffered any injuries of note. Since there’s no win condition against rivals, the crew only gets 2 XP, although Shelby gets an extra 1 for getting the first kill.
Swales decides to send Reeves to Merchant School, paying the 1 credit application fee. Reeves just barely gets accepted, and we’re down to 21 credits after the course cost. But that will give her some benefits in future Trade tasks. The captain spends another 3 credits on new gear, and we end up with a second Grapple Launcher, for all the good it does us.
While Darby was back on the ship, he again found some problems with the life support system that need immediate fixing. He gets it done, but the parts and supplies cost 2 credits. We’re down to 16 credits. Swales earns a little on the side, though, earning those 2 credits back.
I didn’t mind the no-minis battle that much, although it was slow to start as I grappled with the implications of some of the choices. I don’t expect to use it every time, particularly since it doesn’t work well with Salvage missions, and I would like to try it on a mission with more objectives than just holding the field. I’m also curious to see what happens with other enemy types, especially if they’re willing to get into Brawls. Finally, the Strength and Respawn toggles feel like they’re just kind of grindy so I would like to try to use some of the others, notably the ones that Hit Me Harder. I’ll hold off on the Elite-level enemies for now until I see how those work out.