5 Parsecs From Home - Campaign Turn 13
After a little bit of an interlude, I’m ready to get back to the crew of the Acidic Angel. But the game will be a little different this time around…
Supplements
I purchased all the supplements for 5 Parsecs From Home in a single compendium and I think these may address some of the things I had noticed about the game. In particular, most missions seem like you could just sit behind cover with good ranged weapons and pick off enemies as they approach, then complete the mission at your leisure. This hasn’t been true for every single mission, but it’s true often enough that I wanted to find some other approaches.
So I’m going to implement a few things this time around:
- AI Variations: This basically means that, depending on the AI type, enemy figures will have a base condition and action, and if it doesn’t apply, they take a random action based on a table.
- Difficulty Toggles: Rather than just add more enemies and reduce the XP and credits awarded, there are some more granular options for increasing difficulty. The game even has a Progressive Difficulty system that takes into account how far into the campaign you are.
- Expanded Missions: If I get a mission with one of the covered objectives, I’ll have a little more specifics about this. Hopefully it’ll apply soon!
- Terrain Generator: I’ve struggled with battlefield setup quite a bit. More guidance will be greatly appreciated. (There’s also a “No-Minis Combat Resolution” mode in one of the supplements, but I will test that one separately because of how fundamentally it changes the game.)
World Steps
As ever, upkeep is at the minimum (1 credit) and the ship is undamaged. The previous mission ended up being a bit of a turkey shoot, so no crew members need any medical care.
Crew Tasks
- Ellen Swales: Repair
- It’s time to try to fix that Time Distorter again.
- Success! This is a single-use item that can freeze up to three enemy figures in time for a couple of rounds.
- Reyna Crowder: Find a Patron
- She actually finds two. I’ll generate the details for these below.
- Shurl Reeves: Trade
- She gets some ordnance, same as Darby did last time. But she won’t keep these for her own use, handing them to Crowder instead.
- Thornton Darby: Explore
- Darby has gotten yet another package to deliver, as he has on previous planets (and as Crowder did last turn).
- Saige Alden: Decoy
- Robert Shelby: Decoy
We don’t really want to deal with rivals just yet, so having a couple of crew members (including a fairly new one) cover our tracks will help.
Job Offers
Crowder found two patrons. The first is a local government and pays only 1 extra credit in Danger Pay, but it can be done in this or the following 2 campaign turns. The enemies will be somewhat veteran (-1 to their Panic Range) and we’ll be asked to secure a point of interest. However, there will be strict rules of engagement defining who and when we can shoot. This is particularly relevant because the opposition will be Interested Parties - some Tech Zealots have a stake in this point of interest. There’s no time limit during the mission, but we’re not sure what the extraction setup will be like.
The other patron is another corporation, Customized Acquisitions (from a table in the Trailblazers Toolkit). They’re offering 2 extra credits in Danger Pay and the mission can be done in this or the following campaign turn. If the crew succeeds, they’ll gain connections (an extra Rumor), but if they fail, the vengeful patron will become a rival. This is because they want us to rescue a VIP, though cautiously (no Jump, Flight, or Teleport devices, but we don’t have any anyway.) This is an area where we’ll face Converted Infiltrators - an invasion threat! - and we’ll need to exfiltrate the VIP within 6 rounds, then escape ourselves within the next 3 rounds.
Captain Swales wants to take the government job first, as it seems slightly less complicated.
Equipment
Swales will attach the new Bipod to her Fury Rifle. The Time Distorter will be put into Alden’s care to spread this around. Finally, Shelby will swap out his Blast Rifle for a Shotgun, due to the rules of engagement - when he can shoot, he wants to make sure he takes them down.
Battle Setup
As before, the decoy work by Alden and Shelby keep the rivals out of the picture.
- Deployment Conditions: Slippery ground (all movement at ground level is -1 Speed)
- Notable Sights: Shiny Bits (1 credit available 6” straight north from the center of the battlefield)
- Objective: Secure
- We must end 2 consecutive rounds with a crew member within 2” of the center. A crew member with an enemy within 6” does not count.
- Holding the Field will also count, of course.
- Enemy: Interested Parties
- Increased chance of Unique Individuals and more enemies
- Tech Zealots: Cultists who worship technology. Often brimming with poorly fitted cybernetics.
- Loot: Gain an extra Loot roll if Holding the Field
- 6+ Saving Throw
- Total of 7 enemies (see Difficulty Toggles below) but no Unique Individuals
Rules of Engagement
It’s entirely possible I’ve made too many changes all at once, looking at this now. My crew may get slaughtered.
- Slippery Ground: All movement at ground level is -1 Speed
- Strict: Crew may not shoot at any target unless it shot at the crew last round OR is currently within 6”.
- Aggressive: If an enemy is able to engage an opponent in brawling combat this round, they will advance to do so. Aggressive enemies will not aim. Otherwise:
- Maneuver within current cover to fire
- ”
- Advance to the next forward position in cover. Fire if eligible.
- Advance and fire on the nearest enemy. Use cover.
- Advance and fire on the nearest enemy. Fastest route.
- Dash towards the nearest enemy. Fastest route.
- Difficulty Toggles:
- Respawn 3: The first three basic enemies to be slain are replaced at the end of the round. Replacements arrive from the center of the enemy battlefield edge.
- Strength 2: Added 2 additional basic enemies.
- Profiles: (incorporating the Slippery Ground condition)
- Lieutenant (1): Speed 4”, Combat +1, Toughness 5, Hand Laser and Blade
- Specialist (1): Speed 4”, Combat +0, Toughness 5, Shell Gun
- Zealots (5): Speed 4”, Combat +0, Toughness 5, Infantry Laser
- Weapons:
- Hand Laser: Range 12”, Shots 1, Damage 0, Snap Shot (+1 to hit within 6”), Pistol (+1 to Brawling rolls)
- Shell Gun: Range 30”, Shots 2, Damage 0, Heavy (-1 to hit if firer moved this round), Area (Resolve all shots against target, then one bonus shot against every figure within 2”)
- Infantry Laser: Range 30”, Shots 1, Damage 0, Snap Shot (+1 to hit within 6”)
In terms of deployment, I’m still using the original rules. The crew is deploying from the northern edge, and therefore the enemies will be coming from the southern edge. Given their Aggressive stance, they’ll set up in one cluster on the edge with 1” between each figure. I’m putting my longest-range figures, Swales and Alden, on the edges, with Reeves (as the best shot) in the middle, although I plan for her to hang back. Crowder, Darby, and Shelby have various types of armor and they’ll be responsible for securing the objective.
Round 1
Before the initial round starts, we’ll try to Seize the Initiative, and we do! Everyone in the crew gets a free Move action, which lets them get to cover.
For the regular Quick Actions phase, then, I’ll activate Swales first, who aims carefully and just barely has an enemy Zealot in range, taking him down thanks to her Bipod on the Fury Rifle! Alden goes next and is able to reach her first intended firing position. Finally, Crowder runs to cover, near the Shiny Bits. She hopes to reach those next round.
All of the Tech Zealots are much too far away from anyone to get into a brawl. The Lieutenant activates and advances to the next forward position in cover, albeit still out of range to get a shot with his Hand Laser. A front-line Zealot dashes to cover, taking care to stay out of firing lanes for his comrades. Another Zealot does the same, and takes a shot on Crowder but misses. The Specialist does not have a viable target and thus dashes forward into cover. The last two Zealots also dash to cover, getting into positions to be able to fire.
(I completely forgot the Slow Actions phase!!!)
At the end of the round, 1 of the 3 enemy reinforcements spawns in the center of the enemy edge. However, another one flees in panic.
Round 2
Two of the crew can activate now, and Alden has a shot on a regular enemy, and as the crack of her Military Rifle echoes across the battlefield, the enemy Zealot stumbles back, stunned. Swales has an angle on the Lieutenant, so she aims and fires, taking him down as well.
Now the enemies go, though without their leader. The zealot Specialist will advance to the next forward position in cover, but their heavy weapon won’t be able to hit anyone in cover at this range until they take a moment to stand still. Another Zealot moves next to the Specialist, trying to get to Alden but they don’t have line of sight to her. Instead, they shoot at Darby, hitting him but his armor takes the brunt of it and he’s only stunned. One of the nearby enemies advances into the next forward position and also takes a shot at Darby, missing badly, as does one more against Crowder. The reinforcement that arrived simply dashes forward to cover.
This time I won’t forget the 2/3 of my team who can still go. Shelby maneuvers in cover and shoots at a Zealot, with no luck. Darby shakes off the stun and gets back closer to cover. Crowder aims carefully and sends a fusillade of needles at a Zealot, taking him down. The last to go is Reeves, who similarly takes her time lining up a shot on an enemy, dropping him.
At the end of the round, one of the regular Zealots bails from the fight, but the last two reinforcements arrive.
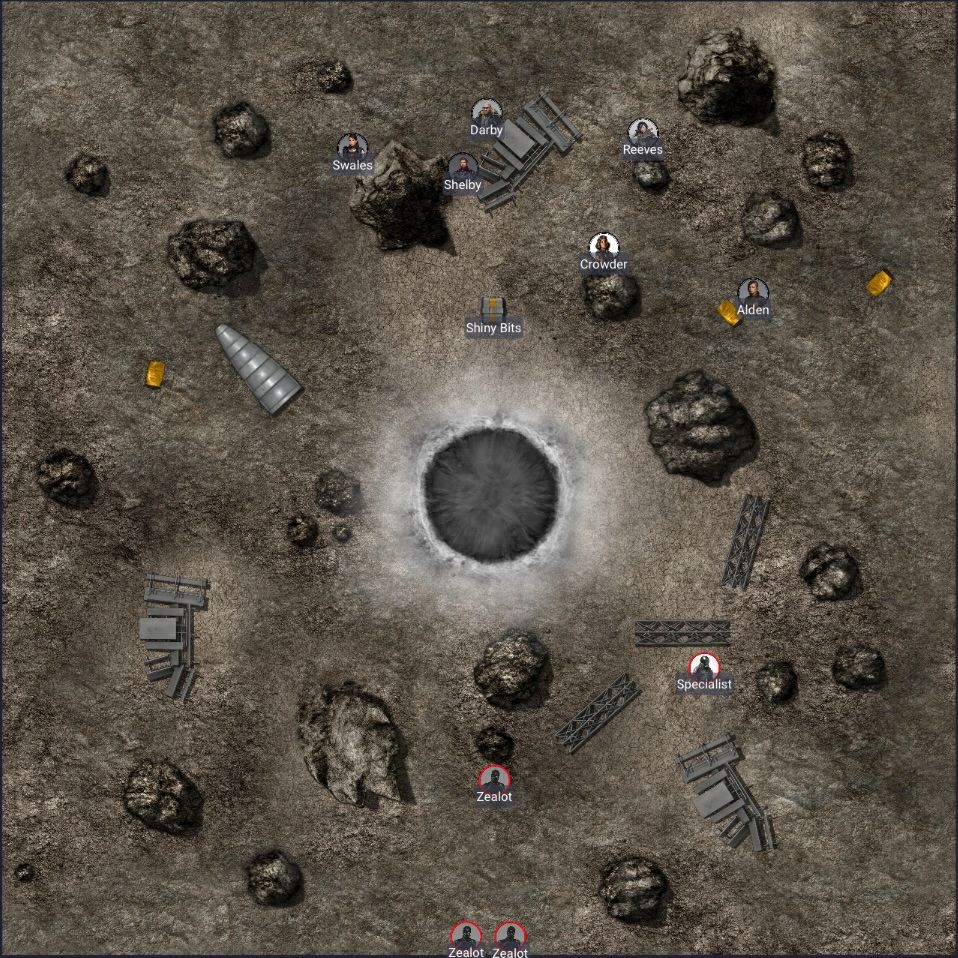 Battlefield at the end of Round 2. Most assets (c) Gabriel Pickard.
Round 3
This Quick Actions phase will have one crew member activate, and Darby will try to hit the enemy Specialist with his Needle Rifle, and he does but only for a stun.
Now the Enemy Actions phase starts and the Specialist fires back with his Shell Gun. (This isn’t actually what the Aggressive AI table indicated, but it’s too much of an obvious action to skip. Also, I want to see this Shell Gun in action, even if it’s bad for me!) One fragment hits Darby, stunning him again. As an Area weapon, this also has a chance to hit Shelby but the cover is enough to protect him. A Zealot reinforcement from round 1 activates and takes the fastest route to fire on Alden, but his Infantry Laser hits the cover in front of her instead. The last two reinforcements from the previous round dash to cover.
I almost forgot the Slow Actions phase again, but no. Shelby is feeling exposed and runs to cover, grabbing the Shiny Bits. Crowder runs through the slippery mud to get out of Reeves’ firing lane, then gets a critical hit on a Zealot and takes him down hard. Reeves follows to Crowder’s prior position and takes a shot at another reinforcement. Alden moves up to shoot at the Specialist, just missing. Swales aims and fires at a reinforcement, removing him from the fight.
With two enemies dropping this round, the most recent reinforcement turns tail and runs.
Round 4
Two crew members can go in this Quick Actions phase. Alden sights down her Military Rifle carefully and hits the Specialist, stunning him. Shelby fires at him as well but misses.
The Specialist is the last enemy left and is still more or less in cover, so he’ll take a shot at Alden. He hits her but her deflector field takes care of it instead.
The crew is hungry to get this fight over with. Crowder moves around cover slightly, but her Needle Rifle can’t hit the enemy. Reeves also has to move, which throws offer her aim and she misses. Darby recovers from his stun and gets out of LoS. Finally, Swales (who also has to move a bit within her cover) misses, but I’m going to spend a Story Point to retry that shot. That allows her to hit him, but he’s still only stunned.
Round 5
Only one of the crew will go before the enemy, and I decide to have Swales try again. She aims her Fury Rifle and puts another level of stun on the Specialist.
That Specialist is tough as hell and curses at Alden as he fires at her again, missing.
Surely this will be the round, right? They only need one shot to hit and roll damage at 5+, or at least two shots to hit regardless of the damage. Crowder hits, though just for a stun. Finally, Reeves puts him down for good.
Post-Battle Sequence
That’s a victory by holding the field. The Tech Zealots have had enough and don’t become rivals. The patron, the local government here on Noth V58, is pleased and may offer additional work in the future. However, I forgot about the Strict Rules of Engagement, so I decide that as a penalty we’ll forgo the Danger Pay and they aren’t going to stay as contacts. Otherwise, we receive 5 credits in regular pay and recover one Infantry Laser from the battlefield, as well as Documents (1 Rumor) and a Military Ship Part that will be worth 8 credits the next time we buy a ship component.
These enemies were not an invasion threat, and none of our crew sustained any real injuries. Everyone gets 3 XP, and Swales gets an extra 1 XP for getting the first kill of the fight. She’ll take +1 Savvy, and Alden will take +1 Toughness. The rest of the crew will save their XP for now.
With 11 credits’ worth of ship parts, Swales decides to buy a new ship component. She invests an additional 4 credits for a Cargo Hold that will allow the Acidic Angel to deliver more valuable cargo to new destinations.
In hindsight, this fight will make a great story; as no one on our side was seriously hurt, we’ll gain 1 Story Point. But the violence depresses Darby even more, and while we’ll get 1 additional Story Point, he won’t participate in any battle in the next campaign turn. That’s the second time for him; at some point, I think he may leave the crew.