5 Parsecs from Home - Campaign Turn 16
The crew is smuggling a funky little guy, a genetically-engineered creature that a scientist is trying to get to a safer location. They successfully picked the creature up last time, but they need to meet with a business contact on another world to proceed.
Travel Steps
Other groups have heard about what’s going on and we’re starting to make enemies. Every turn that the Acidic Angel remains on Noth V58, they will attract another rival. This isn’t an invasion of the world itself, just a situation that’s getting hotter.
So it’ll cost 5 credits in fuel and other costs to leave (which we’ll make back very quickly with some of the cargo we’re carrying). The ship’s hull is in good shape so the trip isn’t any more dangerous than usual.
Somebody else ran into danger, though, as the ship finds an escape pod drifting through space. There’s no way Swales is going to let it go - somebody could be in danger, and it’s basic decency to help them out of such a dire situation. There’s a freelancer inside who’s been drifting for a few days, and he’s in fact willing to sign onto the crew. We’re not hiring right now, though, so we’ll drop him off when we get to the next world.
The new planet is Nivelle IV, a hazy planet with poor visibility (1d6+8”). The crew will have to be careful during any operations here. They don’t require freelancer licenses, though. Only one rival was still on Noth V58, the Brat Gang that followed the crew from Elyria. Fortunately they stay there rather than follow us here.
World Steps
Crew needs and other expenses come to 1 credit. The new cargo hold has a shipment worth 3 credits, and Reyna Crowder and Thornton Darby both have packages to deliver; all told, this earns us 9 credits (more than covering our fuel and upkeep costs), but Crowder’s package also results in a new rival and story point. We don’t know who they are yet; I’ll figure it out when it comes up.
Crew Tasks
As before, the crew is here for something in particular, so nobody will go out looking for patrons. However, since the word on the street is that somebody’s looking for Crowder, she’ll be trying to cover her tracks.
- Ellen Swales: Trade
- The captain finds a chance to unload some stuff; more specifically, a revolutionary is looking for weapons.
- We have a Military Rifle that we’re not using, as well as a modded Colony Rifle with Bipod. This results in 4 credits!
- Reyna Crowder: Decoy
- Her delivery got those rivals on our tail, so she’ll be the one to take care of it.
- Shurl Reeves: Trade
- Since she has the merchant license, she’ll go out looking for some deals. That gets us another 2 credits from selling cargo.
- Thornton Darby: Explore
- He knows a good deal when he sees one, and something comes up!
- Somebody offers him some starship repair parts, but we have plenty so Reeves helps out and we get 1 credit in scrap that we can sell on instead.
- Saige Alden: Explore
- She gets in a bad fight and is injured, plus loses some equipment! Ain’t that always the way…
- Instead, I’m going to spend a story point and reroll:
- Actually, she finds this world rather nice. Whenever the crew leaves, she’ll stay behind unless we pay another story point. We’ll see.
- Robert Shelby: Train
- Again, the new guy needs to hit the gym. +1 XP.
Battle
Crowder keeps these new folks confused and we won’t have to worry about them. Instead, the crew will stay focused on its quest.
Setup
Again, I’ll use the Elite-level enemies from the Trailblazer’s Toolkit (TT) and Dramatic Weapons from the Freelancer’s Handbook (FH) along with the same difficulty toggles as last time (Hit Me Harder).
- Deployment Conditions: Delayed: 2 random crew members won’t start on the table. At the end of each round, roll 1D6: If the roll is equal or below the round number, they may be placed at any point of your own battlefield edge.
- Haze: Maximum visibility is 11”.
- Notable Sights: Really shiny bits: Gain 2 credits, located 7” northwest of the center of the battlefield.
- Objective: Protect
- We will be accompanied by a VIP character (Reactions 1 / 4” / +0 / 3). They are unarmed and may never initiate a Brawl, but will defend normally. They cannot be given any equipment. The VIP must set up at least 12” from the center of the table. The enemy must set up 12” from the center on their side. Treat the VIP as another member of the crew.
- If the VIP spends a full round within 3” of the center of the table, we Win. If you achieve this within the first 4 rounds of the game, you earn an additional 2 credits in pay.
- Note that, due to the Quest Progression option, the enemy will be Aggressive no matter what.
- Enemies: Interested Parties
- Another group has taken an interest in the job we’re doing. They’re more likely to have Unique Individuals and, since this is a Quest mission, less likely to have few opponents.
- Elite Salvage Team: A rival crew looking for salvage and ready to fight for it.
- Scavengers: If we are allowed to roll for Battlefield Finds after the battle, we can roll twice.
- Hard entry: Two basic enemies carry Flak guns in addition to their main weapon and will fire them in preference if in range. All Lieutenants and Captains carry Shatter Axes.
- Here for the goods: Enemies within 6” of an objective or Notable Sight when activated will move directly towards the item, then fire, taking one more shot than usual.
- They’ll total 8 enemies with no Unique Individuals.
- Enemy AI: Aggressive
- Any group of enemies where a given figure is within 2” of another will obey the same die roll instead of rolling for each figure. If any figure in the group would be subject to the base condition, they all follow that option.
- Base Condition: If able to engage an opponent in brawling combat this round, advance to do so. Otherwise, roll on a d6 table to determine the action.
- Profiles: 1 Captain, 1 Lieutenant, 2 Specialists, 2 Flak Grunts (with Flak guns), 1 Veteran Grunt, 1 Rookie Grunt
- Captain: Panic 0 (Fearless), Speed 4”, Combat +2, Toughness 5, Saving Throw 4+, Military Rifle, Ripper Sword
- Lieutenant: Panic 0 (Fearless), Speed 4”, Combat +2, Toughness 4, Saving Throw 5+, Infantry Laser, Blade
- Specialists: Panic 1-3 (reduced for Leadership), Speed 4”, Combat +1, Toughness 4, Rattle Gun, Blade
- Grunts: Panic 1-3, Speed 4”, Combat +1 (+2 for Veteran), Toughness 4, Military Rifle, Blade (+Flak Gun for Flak Grunts)
- Weapons:
- Blade: Damage +1, Melee (+2 Brawling)
- Flak Gun: Range 9”, Shots 2, Damage +1, Focused (all shots at the same target), Shrapnel (All shots hit on a 5+ regardless)
- Infantry Laser: Range 30”, Shots 1, Damage +0, Snap Shot
- Military Rifle: Range 24”, Shots 1, Damage +0
- Rattle Gun: Range 24”, Shots 3, Damage +0, Heavy
- Ripper Sword: Damage +2, Melee
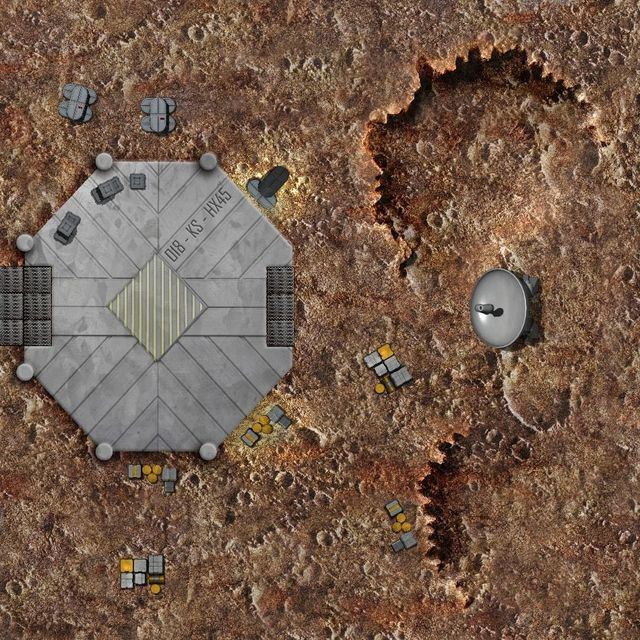
Since it’s a little hazy here, I decide this is going to be in a desert area, and thus I’ll use the Desert Outcrop map from Loke BattleMats, set to be 30” x 30”. I’m defining the four outcrops themselves as large Blocks, which means they block Line of Sight but can be climbed (2” high); in this case, they will also be considered Difficult terrain once climbed. There’s an antenna at the center of the map, which is the VIP’s objective, and it blocks LOS. A long linear feature (conduit) leads to the antenna from the south; it counts as Difficult terrain but does not block LOS (so it provides cover). There are some other individual features, such as a toppled antenna in the southwest and several more rock outcroppings around the map; they will generally block LOS in the center but can provide cover around the edges (e.g. the tapered end of the toppled antenna). As usual, all the terrain features I’ve added are the work of Gabriel Pickard.
Initiative and Deployment
Rolling a die to determine deployment edges, the crew will deploy from the south (as last time) and thus the Salvagers will deploy from the north.
The scanner bot gets sent ahead and helps pinpoint the enemy location, giving the crew enough of an advantage to seize the initiative. Therefore the enemies are caught out before they can fully deploy, though due to the mission setup they start 12” from the objective.We get a free Move action (or shot that will only hit on a natural 6) for our side. 4 of the crew escort the VIP behind a nearby outcrop, including surrounding them to block LOS. The other 2 crew members will move along the other side of the conduit, potentially looking for flanking opportunities.
Round 1
Before the enemy can get started, Swales activates but goes into Snap Fire mode (will wait to react to enemy movement). Alden gets next to the objective, although that doesn’t really count as the VIP would. Darby climbs up on a rock to get a better view of the battlefield.
For the salvagers, none of them meet their base condition so they’ll roll on the AI table. The first, much smaller, cluster is a Flak Grunt and the Veteran; they will advance to fire on the nearest enemy from cover, but as the Veteran does so, that activates Swales’ Snap Fire. She takes aim and fires her heavy Fury Rifle, taking him down completely. The Flak Grunt then follows behind and dashes to take cover in that same outcropping. The bulk of the enemy force will attempt to maneuver within their current cover to fire. Since they’re largely behind that outcrop, they will climb it but cannot fire this turn as they are still within its LOS blocking.
The rest of the crew reacts; Shelby isn’t fast enough to get to the top of the nearby outcropping, climb it, and fire in the same round, so he just gets next to it, with the plan to climb and fire next round. Crowder leads the way for the VIP, staying in front of them to prevent anyone having a shot. Reeves moves next to the conduit as far forward as she can.
None of the enemies are interested in bailing just yet.
Round 2
Darby gets to the top of the outcrop, which gives him a good view of the battlefield - including the enemy. He takes down a Flak Grunt with his Needle Rifle. Shelby climbs up the outcrop where he’s already waiting and realizes the enemy captain is just in range, so he fires his Blast Rifle but misses. Reeves dashes to the center objective to take cover.
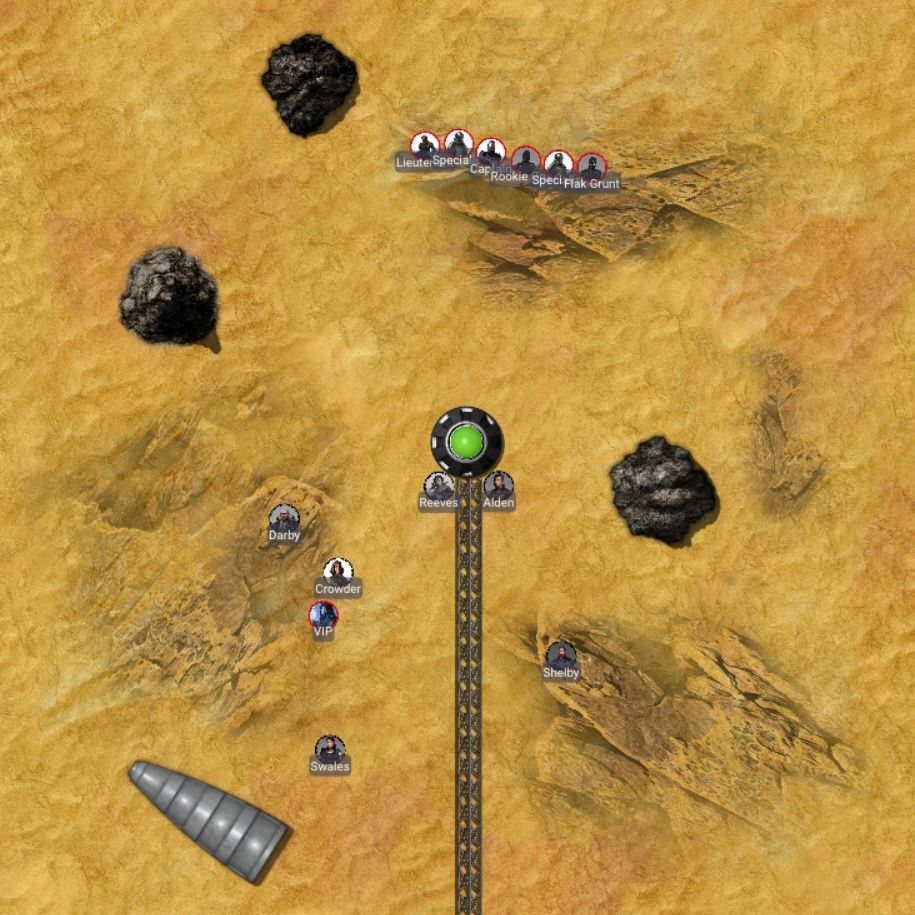 Via Owlbear Rodeo
The enemies still aren’t close enough to get into the brawl they desire, so they’re going to maneuver around the outcropping to fire. Their Lieutenant moves forward a bit to shoot his Infantry Laser at Darby but misses. A Specialist also maneuvers slightly, volleying their three shots at Crowder, stunning her and knocking her back into the VIP. The salvager Captain, carrying a Military Rifle, brings it up and fires at Darby, just missing him. Their rookie Grunt climbs partway down the outcropping before firing at Alden and hitting, but her Deflector Field sends the shot off course. The second Specialist has to climb forward a bit to try to hit Alden as well, doing nothing but hitting sand and cover. Another Grunt, this one carrying a Flak Gun, climbs over the rocks and shoots at Alden but doesn’t even get close enough for the shrapnel to be a problem.
Alden returns fire at that Flak gunner and misses. Crowder recovers from her stun and unloads a flurry of Needle Rifle shots at the captain, and takes him out despite his body armor! The VIP gets within 3” of the objective, but they need protection while they carry out their data upload via the antenna. Fortunately, the antenna itself provides cover - as does Reeves herself. Swales is standing in the open, but she’s got a good angle on a enemy rattle gunner (Specialist) and takes careful aim before firing her Fury Rifle, taking him out.
That’s three enemy casualties this round; the salvagers remain stalwart, though, and do not flee.
Round 3
If we can hold the VIP here for the whole round, we’ll win. To wit, three crew members activate; Darby tries to take out the Lieutenant; with careful aim, he is able to stun the enemy. Crowder aims as well, and gets a second stun on him. Reeves attempts to get the KO but misses. Ah, what the hell, I’ll spend a story point - and actually, she just straight up takes him out.
The enemy has three figures left, and they’re going to advance by the fastest route to fire on the nearest enemy, who happens to be Alden. (I probably should have put her in Snap Fire mode.) The Specialist climbs down and hits her with the rattle gun - hard. She’s down, or would be if we didn’t use a stim-pack. But then the Grunt with a flak gun climbs down and fires at her as well; this is a second stun. The rookie Grunt is equidistant from Reeves and Alden, but Alden won’t be in cover so he’ll go for her. He climbs down and fires, but misses.
At this point, victory is assured because the VIP will complete his task. However, we’d like to get everybody out of here safely, so Alden pulls back as far as she can (her stun prevents her from dashing). Shelby looks down the sights of his Blast Rifle and stuns the flak gunner. Swales hops the conduit and moves next to Alden, ready to provide cover fire next round.
At the end of this round, the VIP completes his task and the crew wins the battle (with bonus pay for doing it by round 4). The stunned flak gunner realizes that their squad’s leadership and most everybody else is down, so he bails.
Round 4
We still need to exfiltrate the team. Alden gets further back and out of LOS of the enemy, while Darby hits the enemy rookie, stunning him twice due to the Needle Rifle’s rate of fire. Shelby takes out the rattle gunner specialist, severely reducing the remaining risk to the crew.
The enemy rookie Grunt, the last man standing in fact, should have retreated when he had the opportunity with his buddy. But he didn’t, so instead he’s going to return fire against Shelby. That shot misses, though.
Swales is safely behind cover and aims her heavy, modded Fury Rifle at the rookie, and drops him in his tracks. That’s the end of the battle, and we hold the field.
Post-Battle Sequence
The Elite Salvagers know this was just business so they don’t turn into rivals. The contact gives us another Quest Rumor, helping us with our ongoing quest. However, we learn that the enemy is massing; future battles will have more enemies than usual, but this gives us some additional intel (another rumor) for the next mission.
The Weekenders earn 3 credits in salvage off these folks, plus bonus pay of 2 credits for accomplishing the objective within the first 4 rounds. They also pick up another starship part worth 2 credits towards a new component. Because these were elite enemies, we can choose either one set of damaged bits of gear (an Auto Sensor and a Jump Belt, both of which would need repair before use) or… a different set of damaged gear (a Deflector Field and a Motion Tracker). The latter are probably more useful, so we’ll take those.
Thanks to the judicious use of a stim-pack, we don’t have any casualties to resolve. Instead, everyone gets 3 XP, plus the extra 1 XP for first casualty inflicted goes to Swales. She takes +1 Toughness, while Reeves takes +1 Combat. Everyone else is saving their XP for an upgrade.
Swales also takes Pilot Training, which will significantly improve our abilities to avoid problems during travel. That costs us a total of 21 credits, leaving the crew with 14 credits remaining. She doesn’t spend any more on gear this turn, though.
With that mission, the crew has made friends among the locals, particularly those connected with this business contact (+1 Story Point). And Crowder (unsurprisingly) knows someone who knows someone, and she’s got us a new patron, a local government. No extra benefits, but they may come in handy if we get in trouble or just need work.
Final Thoughts
As usual, I realize after the fact that I neglected an important factor: the planetary haze should have kept visibility low. This would have drastically changed the flow of the fight; I’ll presume it was an unusually clear day and move on.
There will be at least two more missions before this campaign ends, but I expect to pick up the new one pretty quickly after that and have some amount of continuity between the two…