5 Parsecs From Home - Campaign Turn 17
One thing about the Quest Progression system is that it doesn’t specify a need to go to a new world, so I’m going to stay here on Nivelle IV until the quest finale, or perhaps if some other factor drives us away. In the mean time, we’re continuing to investigate and try to get more information (in the form of Quest Rumors) to get us there.
World Steps
We’ve kept upkeep and other overhead at the minimum of 1 credit, so we’ll go into the rest of the campaign turn at 13 credits total.
Crew Tasks
While in theory we should put some crew on decoy to keep our rivals from getting to us, I personally kind of want to see what happens if we need to curb stomp them.
- Ellen Swales: Repair
- We have three broken bits of equipment, but I think the Motion Tracker would be the most useful.
- Unfortunately it was actually beyond repair, so it’s gone.
- Reyna Crowder: Explore
- For once, she just sees the sights and enjoys the view, and nothing significant happens.
- Shurl Reeves: Trade
- Our designated merchant is able to replenish our medical reserves, and we end up with another 2 stim-packs and 2 med-patches (now at 3 and 5, respectively).
- Thornton Darby: Repair
- Getting that Deflector Field working is the next priority, and he’s able to get it back online!
- Saige Alden: Explore
- She overhears some talk and gets us another Quest Rumor, which is very helpful!
- Robert Shelby: Train
- Back to the range with the rookie.
Equipment
There are a few things to parcel out. None of the consumables need to be assigned individually, though.
- Deflector Field: Shelby (who only has a Frag Vest for armor)
- Grapple Launcher: Reeves (she has low speed due to her old injury)
- Sonic Emitter: Darby (most likely to get sent into close range)
Battle
The crew is headed to a quest mission rather than looking for patron work. Our rivals don’t track us down this time.
Setup
- Deployment Conditions: Poor visibility (no more than 1d6+8” visibility rolled at the start of each round).
- Haze: Maximum visibility is 11”.
- Notable Sights: Documentation (+1 Quest Rumor), located 7” ESE of the center of the map.
- Objective: Fight Off: Hold the field to win.
- Enemies: Interested Parties
- For reasons of their own, another group has taken an interest in our job.
- This increases the chance of a Unique Individual as well as their general numbers.
- Zealots: Near-suicidal devotees to some cause, belief, principle, or brand loyalty.
- Ferocious: +1 to brawling rolls when initiating combat
- Excitable: Leaders carry an additional Hand Flamer and will fire them in preference to other weapons when in range.
- The Prophecy!: When a 6 is rolled on a Morale die, the Zealot nearest the player’s edge gains +1 to Combat for the rest of the fight.
- A total of 6 +2 (enemy type) +1 (quest progression) +1 (interested parties) = 10 non-unique enemies.
- Unique Individual: Enemy Heavy
- The enemy has opted to bring some additional firepower. This is likely also the mastermind of the Zealots.
- Enemy AI: Aggressive, naturally
- Base Condition: If able to engage an opponent in brawling combat this round, advance to do so. Otherwise, roll on a d6 table to determine the action.
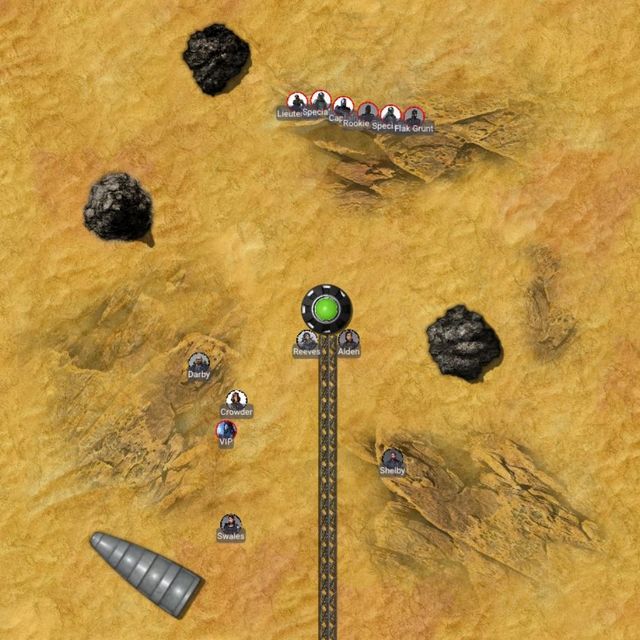
- Profiles: 1 Enemy Heavy, 1 Captain, 1 Lieutenant, 2 Specialists, 6 Basic Zealots
- Enemy Heavy: As Basic Zealot but with Defensive AI, Plasma Rifle
- Captain: Panic 0 (Fearless), Speed 5”, Combat +1, Toughness 5, Saving Throw 4+, Hand Flamer, Shotgun, Ripper Sword
- Lieutenant: Panic 0 (Fearless), Speed 5”, Combat +1, Toughness 4, Saving Throw 4+, Hand Flamer, Scrap Pistol, Blade
- Specialist: Panic 1 (Leadership reduces this), Speed 5”, Combat +1, Toughness 4, Shotgun, Blade
- Basic Zealot: Panic 1 (Leadership reduces this), Speed 5”, Combat +0, Toughness 4, Handgun
- Weapons:
- Blade: Damage +1, Melee
- Hand Flamer: Range 8”, Damage +1, Area (every figure within 2” of target point hit on 4+/5+), Burn (surviving targets make a full move in a random direction)
- Handgun: Range 9”, Shots 1, Damage +0, Pistol
- Plasma Rifle: Range 20”, Shots 2, Damage +1, Focused, Piercing, Overheat (if the weapon was fired in the previous round, 1 less Shot)
- Ripper Sword: Damage +2, Melee
- Scrap Pistol: Range 7”, Shots 1, Damage +0, Pistol
- Shotgun: Range 8”, Shots 1, Damage +1, Critical
I considered doing this as a non-minis combat, but decided that I didn’t want to feel like I was skipping the visibility restrictions again; additionally, some of the enemy weaponry is less impactful in an abstracted setup.
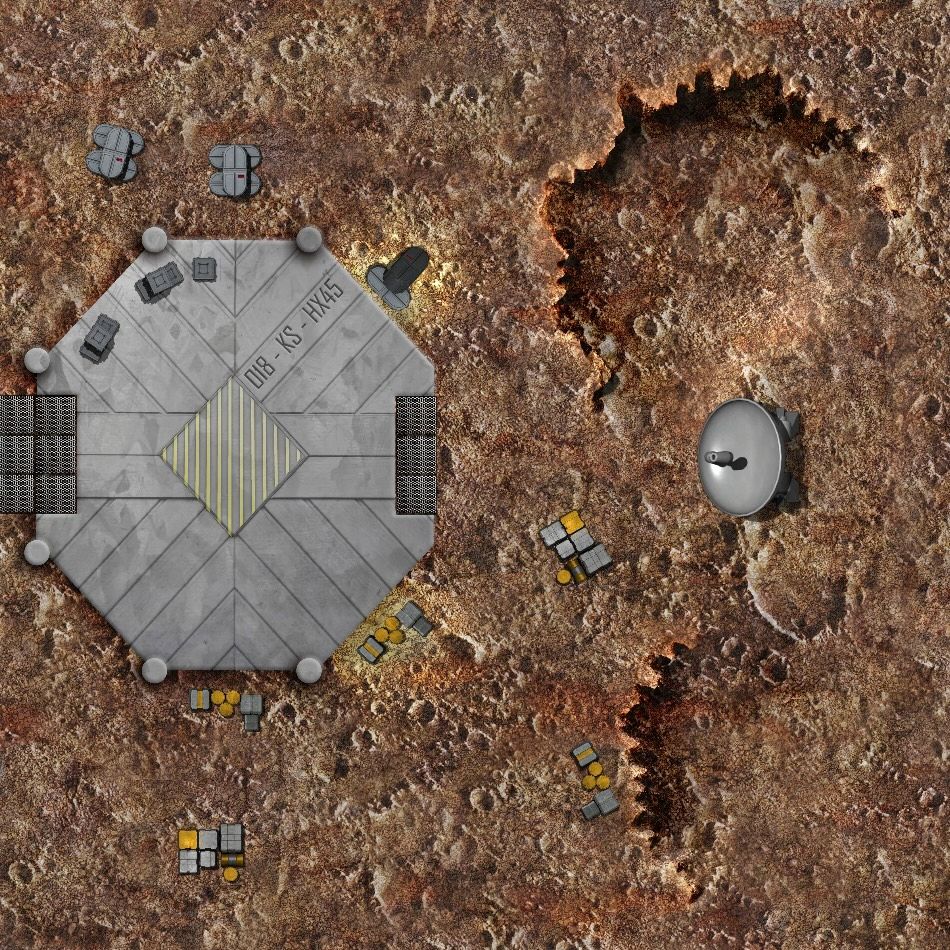
So instead, I’m using a Landing Pad map that I’ve been saving for a situation where I didn’t need a central objective. As last time, I’m setting this up as a 30” x 30” map. It has some craters that I think can provide some interesting cover (they are treated as 1” deep next to the edges), plus the small pillars can do the same. The landing pad itself will be mostly an open space. I will, however, add a bit of industrial clutter to the rest of the battlefield. The crates and such provide cover, but only the stacked ones can block line of sight. The satellite dish also blocks LOS.
This time, the crew is deploying from the west (this is not particularly advantageous, to say the least). The enemies are deploying from the east as a consequence.
Deployment
Everybody sets up in lines, although the crew gets set up in two squads of three each (Alden, Swales, and Reeves, then Darby, Shelby, and Crowder). The enemies have their two leaders in the center, flanked by Specialists, then the basic zealots and the heavy on the south end.
The Weekenders try to Seize the Initiative, which will be 2d6 +3 (Swales’ Savvy) +1 (Outnumbered) +1 (Scanner Bot) = 2d6+5 = 7+5 = 12. We’ll get our free move, so all crew can get to cover, and the enemy will not carry out a deployment maneuver.
Round 1
Visibility this round is only 10”. The plan, as I often do with aggressive enemies, is to set up behind cover and let them come to us. Unless they do something particularly unintelligent like cross the one patch of open ground, we can hopefully drop some of them before they get to brawling range. This may end up being a problem, given the limited visibility on this world, however.
Darby couldn’t quite get to the cover he wanted, so he’ll activate before the enemy to do so. Crowder and Swales set up in Snap Fire mode, though it’s unlikely any enemy will get close enough to be visible in any case.
The enemy will stay in any existing cover, in fact. That means their officers and specialists will stay behind the satellite dish, for starters. The basic zealots (including the heavy) will all dash into the larger craters.
As expected, none of the enemies are visible to the crew. Shelby will move up to the next cover position (another small pillar). Alden gets on top of a crate with another level of crates in front of her for a better firing position when the enemies approach. Reeves holds where she is.
Round 2
Visibility stays constant at 10”. I think Darby is the most likely to get an enemy in his visible range, so he’ll enter Snap Fire mode. The other crew members have to wait until after the enemy moves.
Those zealots still aren’t close enough to get into brawls, so the northern squad of Basic grunts move right under the crater edge; they might have a shot on Alden were it not for the hazy conditions. The central (leadership) squad get aggressive and advance to fire on the nearest enemy via the fastest route. That would be Shelby, but again, visibility prevents anyone from having a shot. Finally, the southern squad decides to advance to the next forward position in cover. The Heavy has Defensive AI, though. With no opponents in the open and visible, he will get into a better cover position than the one he was in.
As expected, Darby never had a shot. Everyone else is holding their fire.
Round 3
Visibility increases to the maximum of 11”. Shelby, Darby, and Alden all enter Snap Fire mode, watching for enemies to appear through the haze.
The northern zealot squad now dashes toward the nearest enemy (Alden) by the fastest route. The first Basic grunt comes over the crater edge, running full tilt towards Alden, who knows more or less where they’ll be based on hearing them as well as the intel from Crowder’s scanner bot. Her shot misses, though, and two more zealots follow behind. The two officers and one specialist will advance to fire and use cover as they do so; the Captain activates Shelby’s snap fire and, despite his combat armor, is taken down by the rookie! However, the Lieutenant approaches as well and fires his Hand Flamer next to Shelby, at a target point on the landing pad that Shelby isn’t obscured from. The rookie is in fact hit by this, but his Deflector Field negates it (one time use per battle). Meanwhile, a Specialist comes around the crates to fire his shotgun at the same target, but only hits the crates providing cover. The other Specialist is far in the back, which explains why he just dashes via the fastest route towards the nearest enemy. The remaining Basic zealots would like to stay in their current cover to fire, and they all have Shelby in view now - but not range of their handguns. Instead, they’ll advance to the next forward position in cover and fire if they can from there. The first of those activates Darby’s snap fire and goes down for the privilege. The next one, though, gets in Pistol range and hits Shelby, but his frag vest keeps it from being serious; the last basic zealot gets closer but isn’t quite in cover. Finally, the Heavy does not have any open visible targets, nor indeed any targets that could be visible from cover, so he climbs up the crater wall and stays behind the crates.
Crowder takes careful aim with a Needle Rifle at a basic zealot, and both slivers hit but only stun him. Reeves can barely see the lead enemy in the north, takes a deep breath, fires her Infantry Laser, but hits one of the small pillars around the landing pad instead. Despite her careful aim, Swales misses the same target entirely.
During this round, the crew inflicted two casualties on the enemy, including their captain, so the regular enemies are now susceptible to Morale checks. Not only do they stay in the fight, one of them (the one that everyone missed on the north) gets a +1 to Combat for the rest of the fight, yelling that “THE PROPHECY MUST BE FULFILLED!”
Round 4
Visibility can’t go past 11”, so that’s where it stays. Shelby clears his stun and falls back to the next position in cover behind him. Alden aims at the enthused zealot and knocks him back somewhat. Swales follows up and takes him down completely. Getting your enemies’ attention usually is a bad idea, and that turns out to be the case for that guy.
The other two Basic zealots in the north can’t engage in a brawl this round, so they stay in cover to fire but miss Alden. The central cluster (including the Lieutenant, both specialists, and a basic zealot who’s at two stuns) try to do the same. Of those, the first Specialist just has Crowder in shotgun range; fortunately he misses. The other Specialist takes cover next to his fellow believer and also misses. The Lieutenant is in range but has his shots blocked by his own specialist, and the nearby Basic zealot can’t do more this turn than move behind cover. A lone Basic zealot in the south runs to a spot that has cover from both Crowder and Darby before firing his handgun at the latter but hits the cover instead. While the Heavy would like to stay in cover to fire, nobody is visible, so he’ll wait for someone to come in range of his plasma rifle.
Darby shoots back at the zealot near him and sends him spinning down into the dirt. Crowder takes aim at a Specialist and blows his head off with a critical hit from her Needle Rifle. Reeves has a fully open shot on one more Zealot and drops him as well.
This round, the Zealots lost three more members; nobody panics, and the lone zealot in the north picks up the cry, “I WILL FULFILL THE PROPHECY!” (for a +1 Combat bonus).
Round 5
Visibility remains at 11”. Alden has a clean shot on the new “prophetic” Zealot; at this range, she almost can’t miss, and she doesn’t. She does only stun him, though, and he staggers back against nearby crates from the impact of the hit.
That keeps him from being able to get into a brawl, though, so the Basic zealot just returns fire and misses wildly, despite his bonus. The central squad (Specialist, Lieutenant, and Basic) all dash towards the nearest enemy by the fastest route; that enemy is Crowder. The Heavy is waiting for them to come to him still, although he gets into a slightly better angle within his current cover (some crates near the southern crater).
Swales really can’t miss from this range with her bipod and Fury Rifle and takes out the remaining enemy who wants to fulfill a prophecy; perhaps in the next life. Reeves shifts her attention to the enemies dashing across the landing pad towards her friend and she gets a kill shot on the Specialist. Shelby is a bit intimidated by the charging Lieutenant and misses despite his aim; Crowder hits him hard with her Needle Rifle, but his armor takes it and he’s only staggered. Darby has a similar result when hitting the remaining basic grunt nearby.
With two more losses, you’d think these enemies would flee, but now the Lieutenant takes up the cry, “THE PROPHECY WILL BE FULFILLED!”. He’s a fairly dangerous enemy already and this could be a problem.
Round 6
The haze stays as light as it gets and visibility continues to be 11”. Shelby wants to take out that crazy Lieutenant and runs up to get into a brawl with him (this is not necessarily the best choice but I think it’s thematic and also fun). His Brawling total only comes to a 6, the lowest it can be; that clears the Lieutenant’s head (from the stuns) and his total is a 7, which wins the brawl. In fact, Shelby does so poorly that he takes two hits. His Frag vest absorbs one, and a stim-pack helps him deal with the other. This would have been a good time to have taken Rage-Out. Swales and Alden aren’t in visible range, but Crowder is and she isn’t messing around: she pulls out a Frakk grenade and throws it betwen the Lieutenant and a nearby basic zealot. Somehow both of them evade the blast. In frustration, Darby takes a shot at the Lieutenant, stunning him.
Because of the stun, the Lieutenant can no longer get into a brawl this round so he’ll use his Hand Flamer on both Shelby and Crowder. Shelby avoids the flames, but Crowder is hit. She uses another stim-pack so she’s only stunned, but the burning effect causes her to run onto the landing pad (incidentally past that enemy). The Basic zealot nearby takes this chance to pop her with his handgun, and that staggers her back as well. This gets the Heavy moving to the next cover position nearby.
Alden moves forward towards the Heavy but doesn’t quite have visibility on him. Swales can’t see a damn thing and starts working her way down there, staying behind cover. Reeves can just make out the Lieutenant in the haze and her shot knocks him back against the pillar - but he’s still up.
No enemy casualties this round means that they don’t have to make a Morale check.
Round 7
The haze could get thicker, but it doesn’t. Unfortunately, none of the crew react before the enemy can go. That’s bad news.
Because of his stun, again, the Lieutenant can’t get close enough to stab anybody, but he cackles gleefully instead as he turns that Hand Flamer once more on these unbelieving enemies. Shelby is hit, and at 2 stuns, the stim-pack can’t save him; down he goes. Crowder manages to stay out of the fire this time. The Basic zealot recovers from his stun enough to get behind proper cover, and the Heavy finally gets to deploy his plasma rifle, firing at Crowder but missing.
Crowder is in an extremely bad spot and falls back behind a pillar. Reeves repeats her last shot with the same stun result. Swales gets within range with her Fury Rifle, though not quite close for her Dueling Pistol, and hits him with an armor-piercing shot. That’s enough to finally kill him. Alden climbs up on top of the crates in front of her, on the northeast side of the landing pad, but misses her shot against the basic enemy. Darby has a better angle and takes that grunt down.
This is finally enough to send the enemy heavy running and the crew has won the battle.
Post-Battle Sequence
The zealots have had enough of this crew and do not become rivals. Based on the enemies we faced and the information found on them, Swales has figured out where to go - but she doesn’t like it one bit! The next enemies will have more forces and be less likely to flee. If we hold the field, we’ll get another Quest Rumor.
For this mission, though, the crew earns 5 credits in bounties as well as finds a personal trinket whose owner is on another planet; if we find the owner, we’ll get an extra bit of loot as payment. Speaking of loot, the crew also finds a Dueling Pistol on the body of one of the officers.
The medical report on Shelby indicates that he was only knocked out; he’ll be back in the next campaign turn with no long-term effects. He gets 1 XP for the experience, plus another 1 XP for the first kill (on the enemy Captain no less) which will earn him +1 Toughness. Everyone else gets 3 XP. Crowder then gets +1 Combat, Reeves gets +1” Speed, and Darby also takes +1 Toughness. Swales decides not to spend any credits on advanced training or new equipment, since they’re about to take off for the next world.
Before doing so, they manage to settle some old “business” and those rivals who were unhappy about Crowder’s package delivery inform us they’ve dropped their rivalry. They won’t be trying to interfere in the future at all.
Swales gets hurt while working on the ship, and will need to spend one turn in Medical while the ship takes 1 Hull Point of damage. I’ll spend a story point to reroll that character event, though, and instead of that she loses a random piece of equipment - her Fury Rifle! There’s a chance that it’ll turn up at the end of next campaign turn. Dammit, the medical stay would have been better; that kind of gear is hard to get in the first place.
Regardless, we’re still getting close - and as we do, the quest is getting more dangerous. That is adding a good bit of tension, which is exactly what I was hoping the rule upgrades would do.