5 Parsecs From Home - Campaign Turn 5
We’re staying on Elyria for another turn as we have some business to take care of, in multiple ways.
World Steps
We’ll spend 2 credits on upkeep for our crew size of 7, then put a full 7 credits towards the ship debt, bringing it down to 9 including interest. That still leaves us with 10 credits, which Swales wants to keep for now to have the flexibility to handle whatever events happen.
Crew Tasks
Crowder will spend the crew task time in Sick Bay but is otherwise available. She’s itching to keep going and doing things!
- Ellen Swales: Trade
- Somebody offers her an item that’s usually not for sale, but she’s not interested in spending the credits on that right now, tempting as it may sound.
- Stroud Ogden: Trade
- They find another set of starship repair parts, bringing the Acidic Angel up to 2.
- Reyna Crowder: Sick Bay
- Shurl Reeves: Explore
- She had a nice chat with a local, but nothing came of it.
- Thornton Darby: Explore
- Notley and Alden had intended to try to throw our local rivals off our trail, but Darby went and got himself noticed by the folks unhappy about his package delivery. (That was a random roll but the dice cooperated with a good story.) We’ll have to deal with that in this turn.
- Mark Notley: Train (+1 XP)
- Saige Alden: Train (+1 XP)
Equipment
This is a good time to review and reassign items. The Acidic Angel will keep the Trade Goods and 2 sets each of Starship Repair Parts and regular Spare Parts (for personal equipment and the like). The crew’s Sector Permit also stays on the ship.
Otherwise, we have:
- Weapons
- Blade: exactly what you think it is, a “sturdy light-weight fencing or slashing” weapon
- Blast Rifle (2): Energy weapon, “signifies that the user means business”
- Boarding Saber: Heavier blade with good balance and hand guards
- Brutal Melee Weapon: Clumsy weapon “for smashing and breaking things… or people”
- Colony Rifle: Standard rifle popular with colonists
- Colony Rifle with Bipod: As above, but modded for better accuracy at long ranges
- Dueling Pistol: “Custom-made pistol” and often either expensive or, in Swales’ case, a family heirloom
- Fury Rifle: Beam weapon based on “anti-tank designs”, thus armor-piercing
- Handgun (2): Regular semi-automatic pistol
- Ripper Sword: “Short, chopping blade” with micro-serrations for better cutting
- Scrap Pistol: Frontier weapon built of scavenged bits
- Shotgun: Popular weapon that fires a hail of pellets
- Consumables
- Booster Pills (2): Removes all stun markers and doubles speed for a round
- Protective Devices
- Combat Armor: Provides a chance of additional protection from hits
- Deflector Field: “Automatically deflects a single ranged weapon’s hit” but only usable once per battle
- Implants
- Nerve Adjuster: Provides a chance of additional protection from stuns (already applied to Swales)
I want to make sure everybody has a good longer-range weapon, so Reeves will hang onto the modded Colony Rifle. Darby and Notley will each take a Blast Rifle, Stroud will take the unmodded Colony Rifle, and Alden will take the Shotgun. The Captain will thus add the Fury Rifle to her arsenal. Finally, Crowder takes a Handgun. (This leaves a Scrap Pistol and Handgun as ranged weapons.)
But they also need melee weapons, especially those without pistols (which provide a smaller bonus to brawling). Ogden will take the Ripper Sword, Reeves the Brutal Melee Weapon, and Notley the Boarding Saber. Finally, Darby and Alden will each take a Blade. Crowder’s just going to live with the handgun for now.
The booster pills don’t need to be assigned specifically, but the Deflector Field will go to Ogden and the Combat Armor to Notley again.
Rumors
Now that I realize that Rumors and Quest Rumors are the same thing (p. 36), we’ll automatically get a Quest because we have 6 of them (and thus any roll on a D6 will be equal or below this number). It’s a little odd that p. 85 says that, as long as we have a Quest, “any time you would receive a Rumor, you receive a Quest Rumor instead”, though, which caused my confusion.
Pre-Battle Sequence
Based on Darby’s event during his exploration, the crew will definitely be dealing with rivals this turn.
- Deployment Condition: Poor visibility
- Maximum visibility is 1D6+8”. Reroll at the start of each round.
- Notable Sights: nothing special
- Objective: Showdown
- We just fight them; there are no other conditions.
- The goal is to Hold the Field, which would gives the crew a chance of not having to fight them again.
- Enemy: Criminal Elements (determined randomly because we hadn’t already identified them)
- Gun Slingers: Desperadoes eager to test their trigger skills against an opponent.
- Trick shot: Any natural 6 when they shoot allows an additional shot against the same target or another target within 2”.
- Numbers +1, Panic 1-2, Speed 4”, Combat +1, Toughness 3, AI T [Tactical], Weapons 1B
- Regulars: Military Rifle
- Specialists: Rattle Gun
- Composition: 3 Regulars, 1 Specialist, 1 Lieutenant
- No Unique Individual
- No bounty bonus
Thinking about the fiction behind this, the Fire Shark Gang (random gang name) is a group of criminals who are trying to make a name for themselves. They have decided that these offworlders who are clearly up to something are a good target for that.
Battle
This is just a fight. We can pull back if we are getting overrun, but that’s a suboptimal outcome since we’d likely need to fight them again in the future.
Battlefield Setup
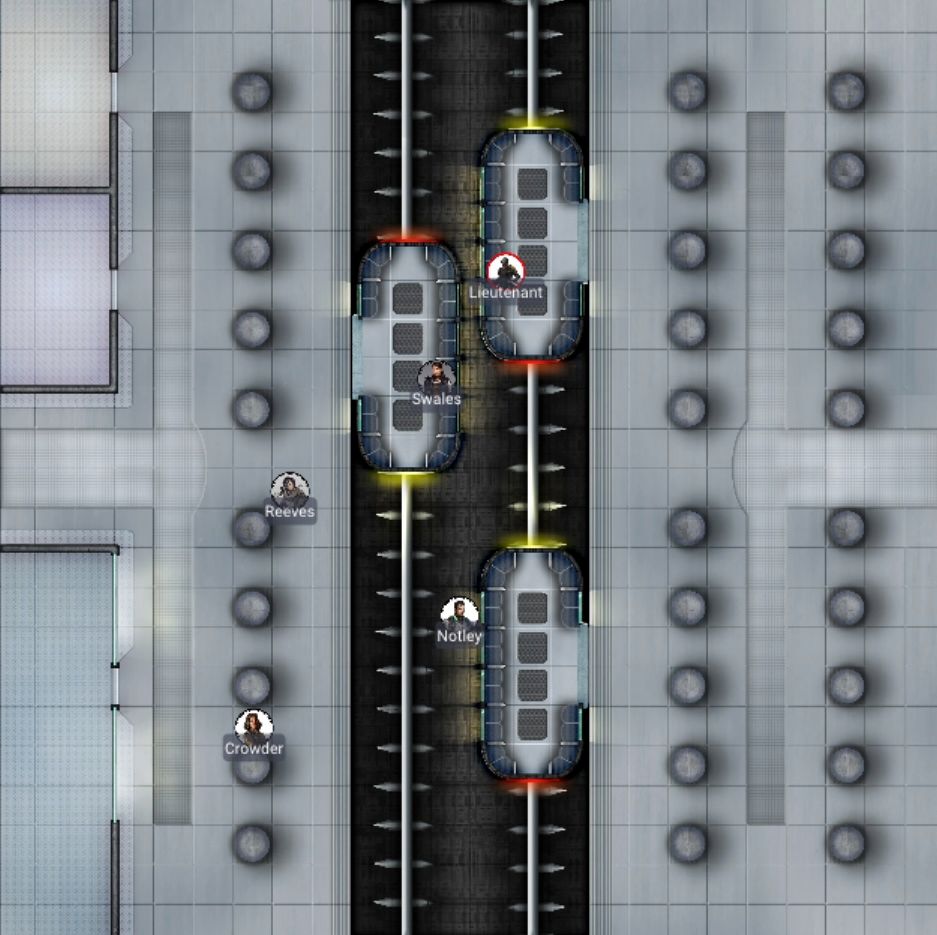
We’re still in a floating city, so it needs to be some sort of urban terrain. Alternatively, I could use a docked ship, as if they’re assaulting the Acidic Angel itself. After some thought, I think I want to use a Transit Station encounter map. I don’t need to do anything to it for it to work. Figures can jump on top of the cars or run inside and spend an action breaking out a window to shoot through it (unless it’s already broken). However, I’ll only allow the groups to enter from the east or west rather than have them come in from the other edges and be split across the tunnel section.
I also will use Battle Events, rolled randomly at the end of Rounds 2 and 4.
Rules of Engagement
- All Laser, Beam, or Blast weapons are -1 to Hit at ranges exceeding 9”.
- Maximum visibility is 1D6+8”. Reroll at the start of each round. (There must be smoke or some other particulate in the air down here in these transit tunnels.)
- Any natural 6 when the criminals shoot will allow an additional shot against the same target or another target within 2”.
- Tactical enemies will advance at half speed, always retaining Cover where possible. They will cross open ground at full speed, if needed.
- They will attempt to close to within 12” of their opponents, then will move to outflank and get clear Line of Sight where possible.
- If within one move and possessing higher combat skill, they will enter a brawl; otherwise they will fire.
- If they have a clear shot and are in Cover, they will remain in place to Aim.
- Tactical enemies will attempt to remain within 3” of a friendly figure whenever possible.
Deployment
The dice have told me that the Weekenders will enter from the east again. Also, Alden will sit this fight out; while she’s got better skills than Crowder, that’s because she’s had more opportunities for XP and I would like the original crew member to catch up a bit. Crowder will take the Shotgun and Blade instead of the Handgun on this fight, though.
Tactical enemies set up divided evenly between 3 teams, placed 8” apart. Team members will be 1-2” apart. I decide to have their teams consist of 2 Regulars, 1 Regular and one Lieutenant, and the Specialist.
Round 1
The crew tries to Seize the Initiative, but again we’re not able to do that, which makes sense. They came looking for us, after all! Visibility this round is 13”.
Two of our crew can go in the Quick Actions Phase, and that will be Stroud Ogden (who runs towards one of the transit cars) and Mark Notley (who gets behind a pillar).
The criminals move slowly, taking care to stay behind pillars for the most part, but since everyone is out of visible range this round it matters less.
Thornton Darby and Ellen Swales stay behind Ogden, keeping to cover from pillars, while Reyna Crowder and Shurl Reeves jog a bit more quickly to keep up with Notley.
Round 2
This round, visibility is decreased slightly to 11”.
One crew member can go this phase, Ogden enters a car and can see one of the criminals, so they smash out the window to be able to shoot freely next round.
That same criminal also has visual on Ogden, of course, and aims before shooting, hitting with a natural 6 but only stunning the target and knocking them back slightly. The second shot (from Trick Shot) misses badly. The rest of the criminals move up to take cover behind the next row of pillars.
Darby enters the car with Ogden but leaves a window in place. Swales cautiously approaches an exterior corner of the car, staying out of line of sight of the criminals. Short of getting on top of a car, Notley and Reeves wouldn’t be able to get a good shot this turn, so they stay behind cover. Crowder gets to cover, though, behind another pillar. The crew is taking this one carefully.
At the end of the round, I roll a Battle Event and it turns out the Fire Sharks have renewed their efforts. For the rest of the battle, a random enemy will an extra Move and Combat Action at the end of the Enemy Actions Phase.
Round 3
Nobody in the crew gets to go in the Quick Actions phase, so the criminals get to go first. Visibility is down to 10”.
The same Regular shooter from the previous round takes a shot on Ogden, getting another natural 6 and putting a second stun marker on them. The pushback knocks them out of visual range, though. One of the other Regulars advances to the closer row of pillars, while the Specialist enters another car. The last Regular decides they have a good enough shot on Darby, and they do indeed take him down. Finally, the Lieutenant goes into the last empty car.
Ogden only gets one shot and returns fire but misses. Swales aims and fires at the Specialist, taking out a window in the enemy’s car. Reeves does the same thing but also misses. Notley steps out and fires his Blast Rifle at the Specialist also, but without the opportunity to aim, his shot goes wide. The last to go is Crowder, and apparently the dice are just not with us this round as she misses the Specialist as well.
Round 4
All the crew but one will go in this Quick Actions Phase. Visibility is at 12”. Ogden moves to cover and clears their second Stun marker. Swales and Reeves continue the volley against the Specialist with the same result, but Notley finally hits the shotgun-wielding enemy and puts them down hard.
The Lieutenant gets further into the car before knocking out a window to have a clear line of sight in the next round. A nearby Regular comes out from behind a pillar and shoots at Ogden, but the shot hits the car itself. One more Regular does the same, but Ogden’s Deflector Field takes care of that shot, and the follow-up trick shot misses. The last Regular hits Ogden, stunning them again.
Crowder steps back behind a pillar to get back into cover.
At the end of the round, none of the enemies bail. Unfortunately, Notley’s gun suffers an ammunition fault and that Blast Rifle is unavailable for the rest of the battle.
Round 5
With visibility clearing slightly up to 13”, two crew members can go before the enemy. Notley draws his Boarding Saber and runs onto the tracks, staying out of sight of the enemy for now. Ogden gets back into cover inside the nearby transit car.
That forces the Lieutenant to move a bit to get line of sight again, firing at Ogden and stunning them before taking them down completely. A Regular dashes onto the tracks in an attempt to get to Notley next round. One more Regular follows him, hitting Swales but her Nerve Adjuster prevents her from being stunned. The last Regular enters the car where the Specialist was, staying to cover.
Swales has an open shot on two Regulars and aims before shooting her Fury Rifle at the one closest to Notley, taking them out entirely. Reeves leaves cover, firing her Colony Rifle at another Regular but only stunning the target and knocking it back against the platform. Finally, Crowder leaves cover to take out the last Regular in the car.
At the end of this round, the Regular bails. ((I just realized I forgot about the renewed effort event; oops!))
Round 6

Swales and Notley will go in the Quick Actions Phase, but visibility is only 10”. The Captain enters the car and blasts the enemy with her Fury Rifle, ending the battle with a victory.
Post-Battle Sequence
The Fire Sharks aren’t done with us, so we’ll likely need to deal with them again in the future. We get 5 credits for the victory in regular bounties; in examining the bodies, we also find vital info that will get us a contact with a new Corporate Patron as well as a Needle Rifle (Gauss Rifle).
The Weekenders had two casualties:
- Thornton Darby: Knocked out, no long-term effect
- Stroud Ogden: Death or permanent injury
- I randomly determine (50/50) that they are permanently injured, and this is the last straw for them. They’re going to retire from the crew and stay on Elyria, which they’d already been considering.
- Rather than use a Story Point here, I let it go because it fit the narrative. The crew was over the standard 6 anyway.
I’ll deal with that fallout in the next campaign turn or if another random event makes it relevant. For now, experience and upgrades are as follows:
- Ellen Swales: 4 XP
- +1 Toughness
- Reyna Crowder: 4 XP
- +1 Combat
- Shurl Reeves: 4 XP
- +1 Toughness
- Thornton Darby: 2 XP
- +1 Reactions
- Mark Notley: 5 XP
- +1 Reactions
- Saige Alden: 4 XP
Swales realizes she can pay off the ship’s debt next turn so isn’t willing to purchase any items just yet. Besides, with Ogden leaving, we’ll have some extra equipment to redistribute. The news networks are still talking about war, though, so that’s +2 to Invasion rolls while the crew is on Elyria. Saige Alden reflects on her experiences; since joining the crew, she’s felt at home and found purpose. She’s going to travel with them a while longer rather than stay here with Stroud, and this reflection gives her another 2 XP.
That’s it for this campaign turn. This is a bit of a downer, but I think we need ups and downs in this sort of narrative wargame. And I expect Ogden to remain in the fiction for a little while, depending on how some dice rolls go in the future.

