5 Parsecs From Home - Campaign Turn 4
As previously agreed, it’s time to travel.
Travel Steps
No invasion is happening on Kothea 4. The crew of the Acidic Angel spend 5 credits on fuel and whatnot. As they arrive in their next system, however:
Local conditions force you to jump to the very edge of the system and approach under standard drives. Any Injured crew may rest for one campaign turn.
That frees up Crowder sooner than expected.
Arrival
We have three rivals on the world we’re leaving: the (undetermined) folks Stroud got in a bar fight with, the criminals who wanted the contraband Shurl sold, and the mercenaries from the second job we did for Worldwares. None of them follow us off Kothea 4, fortunately! At the same time, our patrons don’t either.
No license required here for freelancers or anything like that.
- World trait: Reflective Dust.
- All Laser, Beam, or Blast weapons are -1 to Hit at ranges exceeding 9”.
- This feels less bad than the fog, at least on first impression.
- World name: Elyria
- Tag: [26] Flying Cities
Perhaps the world is a gas giant, or plagued with unendurable storms at lower levels of the atmosphere. For whatever reason, the cities of this world fly above the surface of the planet. Perhaps they remain stationary, or perhaps they move from point to point in search of resources.
World Steps
Upkeep costs 2 credits now that Crowder is out of Sick Bay. We’ll pay 5 credits to reduce our Debt to 15 (after interest) with 8 Credits left in our accounts.
Crew Tasks
First, we have trade goods from Kothea 4 to sell here on Elyria. They’re worth 3 credits here; we can take that, or carry them onto the next world to see if they’re worth more (although there’s a risk they get damaged). Captain Swales decides to hang on for now.
Similarly, Darby has a package to deliver, and he does earn 3 credits for that. However, in doing so, we pick up a rival here (plus a story point). He’ll look to cover our tracks; fighting them isn’t particularly profitable if we can avoid it.
The crew goes off and does some things on their own:
- Ellen Swales: Repair (Combat Armor)
- She has the highest Savvy rating in the crew
- Success, it’s now available for use.
- Assigning it to Notley who always seems to be out front.
- Stroud Ogden: Explore
- This place is rather nice, really. Stroud may stay behind when we eventually leave. What will that mean for Saige?
- Reyna Crowder: Find a Patron
- She’s got the personality of a leader and Swales trusts her on this.
- Unfortunately, no luck this time.
- Shurl Reeves: Trade
- More Spare Parts (used for Repair rolls)
- Thornton Darby: Decoy
- +1 on the roll to avoid rivals
- Mark Notley: Trade
- Starship repair parts (single use)
- Saige Alden: Explore
- She has a nice chat with Stroud about their future, and we gain a story point. (I feel like we have a lot of these.)
Swales takes the time here to check out the gossip and scuttlebutt but still doesn’t pick up anything useful for the crew do to. ((ETA: I just realized I’ve been handling rumors incorrectly, as if there are two kinds, but Quest Rumors and Rumors are the same thing. That will change things in the future.)) With Darby’s decoy, we avoid any rivals.
Pre-Battle Sequence
Since there are no patron jobs, rival interruptions, quests, or invasions, the crew will just take whatever opportunity they find.
- Deployment Condition: Slippery Ground (all movement at ground level is -1 Speed)
- Notable Sights: Documentation (+1 Quest Rumor if recovered)
- Objective: Move Through
You Win the mission if at least 2 crew members move off the opposing battlefield edge. If you drive off all enemies, you Win as long as you have at least 2 crew members remaining.
- Enemy: Criminal Elements
- Cultists: Fringe Space is full of odd, para-religious groups, congregating around this or that principle. They are often heavily armed, and up to no good.
- There’s a chance there will be a bounty on their heads or that we’ll get a Quest Rumor, and an increased chance they’ll become rivals.
- Numbers +2, Panic 1, Speed 4”, Combat +0, Toughness 3, AI A [Aggressive], Weapons 1A
- Regulars: Scrap Pistol + Blade
- Specialists: Shotgun
- 6 - 1 (Easy) + 2 (Cultists) = 7 Enemies
- 4 Regulars, 2 Specialists, 1 Lieutenant
- No Unique Individual
Since we’re in a floating city, I’ll use a city map; maybe rain-slicked streets to reflect the deployment condition and world traits. Also, there’s a small bounty of 1 Credit if we Hold the Field after the battle.
Battlefield Setup
I want to pay more attention to the terrain setup this time. While my recent battles have had more interesting layouts than before, I still struggle to make something that doesn’t feel like a dungeon but a place where a firefight breaks out.
“5 Parsecs From Home” recommends a battlefield between 24” and 36” on a side. Depending on the size, it also suggests 2-3 large things that dominate their sector (an area roughly a foot on a side) and offer opportunities for cover and even climbing. There should also be 4-6 smaller features that offer cover and concealment. Both kinds should contribute to the visual theme of the battlefield. Finally, there should be 2-4 linear features that provide movement obstacles and natural regions within the battlefield. There’s a lot more advice in the book, which I genuinely appreciate! Finding resources on this aspect of wargaming has been a challenge for me thus far.
This time I’m using the Future Streets map from Loke BattleMats, which has a few sectors already. Rather than get more props, I want to use more of what I have, which is mostly industrial or interior props. I also found a rain texture to overlay.
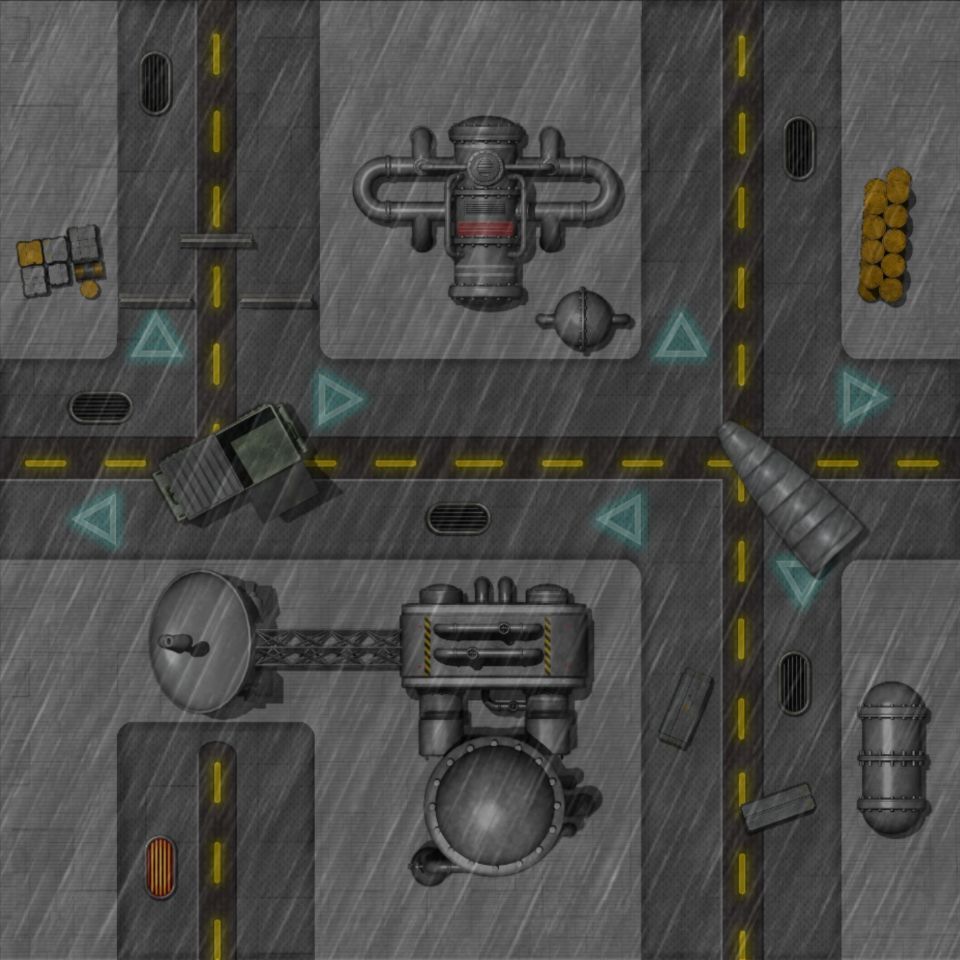
There, this is better.
Rules of Engagement
- All Laser, Beam, or Blast weapons are -1 to Hit at ranges exceeding 9”.
- All movement at ground level is -1 Speed.
- Aggressive enemies will not Aim.
- Aggressive enemies with opponents in sight will advance at least half a move towards them, attempting to remain in Cover if possible.
- Enemies that are unable to see any opposition, or which are within 12”, will advance as fast as possible towards the nearest opponent, attempting to enter into a Brawl.
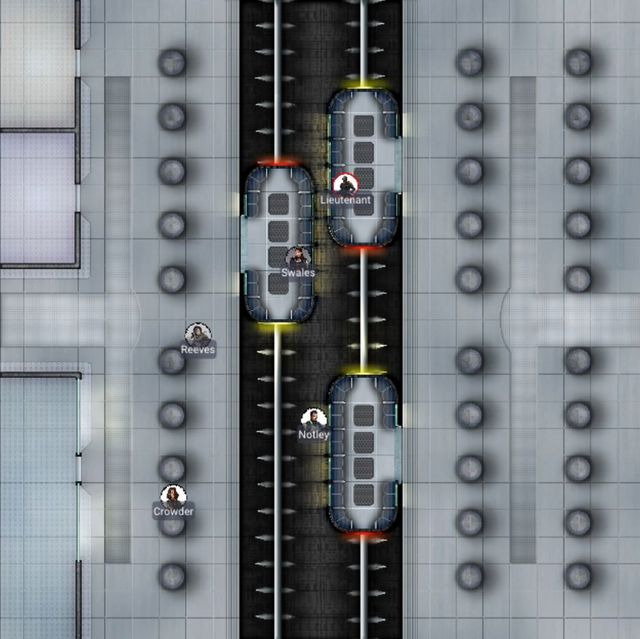
Deployment
The crew will set up on the western edge (determined randomly of course) and their objective will be to move through the area, getting at least two figures to the eastern edge. But some cultists have trashed this area and taken control of an industrial zone. Thornton Darby will stay back at the ship, monitoring communications (because I can only bring a maximum of 6 figures into battle and he’s re-evaluating all the violence).
I also place the documentation (notable sight) 8” from the center of the table, roughly northeast.
Round 1
In the Quick Actions phase, Swales and two other characters can go. I’ve separated the crew into two fire teams of three each, so her whole team will activate now. First, Notley moves to the documentation and grabs it (+2 Rumors). Then Swales and Ogden dash along the northern edge of the battlefield, out of line-of-sight from the enemies. We’re not necessarily trying to eliminate them; our job is to get to the other side of the area.
But now the cultists go. Since they’re aggressive, they’ll look for any of the Weekenders in sight and move towards them, staying in cover (because they’re beyond 12”). Mostly this means dashing towards Reeves or Ogden.
In the Slow Actions phase, Reeves aims carefully and fires her Colony Rifle at a cultist, but misses. Alden and Crowder take off running towards the southern edge of the battlefield.
Round 2
Two crew members go in the Quick Actions phase this time. Two crew members are fairly exposed so Swales and Ogden move to cover.
The cultists continue to converge on various crew members, depending on who they can see. They haven’t had the opportunity for a shot yet, though that’s going to change in the next round.
Notley realizes he’s in danger and dashes north behind Swales and Ogden, and more importantly behind the large industrial equipment. Reeves has the same thought and moves south. Alden and Crowder continue to run; we may get through this thing without any casualties on either side (probably not, though).
Round 3
Only Swales can go in this Quick Actions phase. She moves carefully along the industrial equipment, trying to stay out of sight of the enemies.
Speaking of which, the cultists no longer have LOS to anyone and Swales is the closest. The first regular takes a shot at Swales through cover, but misses. All the others run towards her but can’t get to a place where they’d have an open shot.
The southern fire team (Reeves, Alden, and Crowder) keeps running. Notley runs along the very northern edge and gets to where he has a shot on one of the cultists. Rather than keep running, he shoots his scrap pistol and hits, stunning the cultist. Ogden runs between him and Swales.
Round 4
One crew member goes before the cultists, and Crowder takes a similar opportunity to Notley’s, moving to cover and firing her shotgun at a different cultist. This one also is stunned.
The cultists are now in a position to do what they’ve been wanting. The Regular that shot at Swales earlier tries again, but misses completely. A Specialist runs around and does the same, with an identical result. The others can see Crowder now, and the other Specialist takes her down with a shotgun blast. (She could almost have reached the edge of the battlefield, too, if she hadn’t diverted.) The other two regulars and the Lieutenant run towards Swales.
Reeves and Alden run along the southern edge. As far as the northern fire team, Notley runs, then shoots his Scrap Pistol at a Lieutenant but misses. Ogden does the same with their Blast Rifle (close enough that the reflective dust doesn’t matter) and hits, taking out the Lieutenant. Swales aims and fires her Colony Rifle at a Specialist, taking them down as well.
At the end of the round, two of the remaining cultists bail due to seeing their losses. That removes the other specialist and a regular.
Round 5
Swales and one other crew member can go this phase. She aims her Colony Rifle, takes a breath, but misses. Reeves moves to cover, standing over Crowder’s form, and fires her Colony Rifle (modded with bipod) at a cultist, taking them out.
There are two remaining cultists, and they head for Ogden and Swales.
Now in the Slow Actions phase, Ogden does in fact brawl with the cultist that reached them, taking two stuns for their efforts. Notley continues to move east towards the edge, but stays close enough to turn and fire his Scrap Pistol at the same cultist, stunning them. Swales draws her Dueling Pistol and shoots at the advancing cultist, scoring a critical hit and killing them.
The cultists took two casualties in this round, so the remaining one bails. We Held the Field after all!
Post-Battle Sequence
The cultists become rivals; whatever this area means to them, they’ve definitely got a grudge against the Weekenders now.
We get 7 Credits in payment, plus 1 for the bounty, bringing us to 19 total. We didn’t find anything of value on the field other than a Fury Rifle (which is actually amazing). Crowder took minor injuries and won’t have any long-term effects other than another short stint (1 campaign turn) in Sick Bay.
She gets 2 XP for being a casualty, and everyone else who participated gets 4 for surviving and winning (plus Easy Mode of course). Ogden gets an additional 1 XP for being the first to take out an enemy.
That unlocks a few more ability increases:
- Ellen Swales: +1 Combat
- Stroud Ogden: +1 Reactions
- Mark Notley: +1 Combat
- Saige Alden: +1 Combat
We’re close to paying off the ship, but not yet, so still no purchases. However, while monitoring communications on the ship, Darby finds out that those mercenaries from Kothea 4 who held a grudge against the crew have shown up here on Elyria and will keep tracking us down until we do something about them. Shurl Reeves spends some time making local friends, maybe because she’s the adventurous type, and gains an extra XP.
And that’s the end of this turn! I’m glad to be on a new world, even if it turns out to have heated up more quickly than expected; this is an adventure wargame, after all.