5 Parsecs From Home - Campaign Turn 3
Captain Swales and I have decided to stick around Kothea 4 for at least one more job, even if that damnable fog is so frustrating. We’ve got another patron job here, but we have a couple of rivals too, so it might get hot enough for us to leave soon.
Pre-Battle Sequence
Upkeep is still at 1 credit for now. We’re trying to get the creditors off our backs, so we’ll pay 5 credits to reduce our Debt to 19 (after interest) with 12 Credits left in our accounts. Crowder is getting better, and next turn she’ll come available again.
Crew Tasks
The crew goes off and does some things on their own:
- Ellen Swales: Repair (Combat Armor)
- She has the highest Savvy rating in the crew, and she’d really like to see this get to be useful.
- 1D6+1=3, no good.
- Stroud Ogden: Explore
- They’re off having fun with their new romance, Saige.
- After getting a few drinks, nothing much happens (no effects).
- Saige Alden: Explore
- While out with Stroud, she runs into a good deal!
- This ends up getting a Deflector Field with a lot of blinking lights. That could save a casualty.
- Reyna Crowder: Sick Bay
- Shurl Reeves: Trade
- Contraband. Shurl takes it and sells it on for 4 credits (balance now at 16), but we also pick up another Rival (up to 3 now).
- Thornton Darby: Trade
- Thornton spends 3 credits (balance down to 13).
- That nets a Ripper Sword, which he hangs onto instead of his existing Brutal Melee Weapon. You don’t usually see these for sale, and it’s much less clumsy.
- Mark Notley: Decoy
- This will help when we roll to avoid rivals shortly.
Job Offers
We already have a patron, a private organization who’s got a dangerous job for us (from Campaign Turn 1), with +1 Danger Pay but also +1 enemy forces. We’ll plan to take that. First, Saige will don the Deflector Field, and Stroud will carry the Brutal Melee Weapon.
Swales checks again into the current rumors but nothing useful comes up (no Quest). One of our rivals would have come for us, but Notley’s decoy setup keeps them away.
- Deployment Condition: none
- Notable Sights: Really shiny bits (2 Credits will be on the field for us to pick up)
- Objective: Eliminate
- Enemy: Interested Parties
- Higher chance of Unique Individuals
- Swift War Squad: Diminutive winged lizards who live in a highly ritualistic caste society. They’re unpredictable so the Seize the Initiative roll will be unmodified.
- Numbers +2, Panic 1, Speed 6”, Combat +0, Toughness 3, AI A [Aggressive], Weapons 1B
- Regulars: Shotgun
- Specialists: Rattle Gun
- Numbers: 4 (2 Regular, 1 Specialist, 1 Lieutenant)
- No Unique Individual
The Swift are, as noted, diminutive winged lizards who got that nickname due to their erratic, jerky motions (also they move quickly across the battlefield). This will affect the rules of engagement shortly. Our target is the Lieutenant (rolled randomly but this makes sense).
The diminutive reptilian aliens known commonly as The Swift are a mysterious elder species. It is commonly accepted that they already existed as a sentient civilization when even the Precursors emerged from barbarism but they have essentially settled into a state of technological mysticism where they seem content to remain.
Putting it together, our patron organization, the Blaze Clan, wants one of their own rivals taken out. That’s a bit underhanded, but credits are credits.
Battle
This one will be less objective-based; while the crew technically only needs to kill a specific enemy, that’s not quite the same as just delivering a package (although they held the field in both previous engagements).
Battlefield Setup
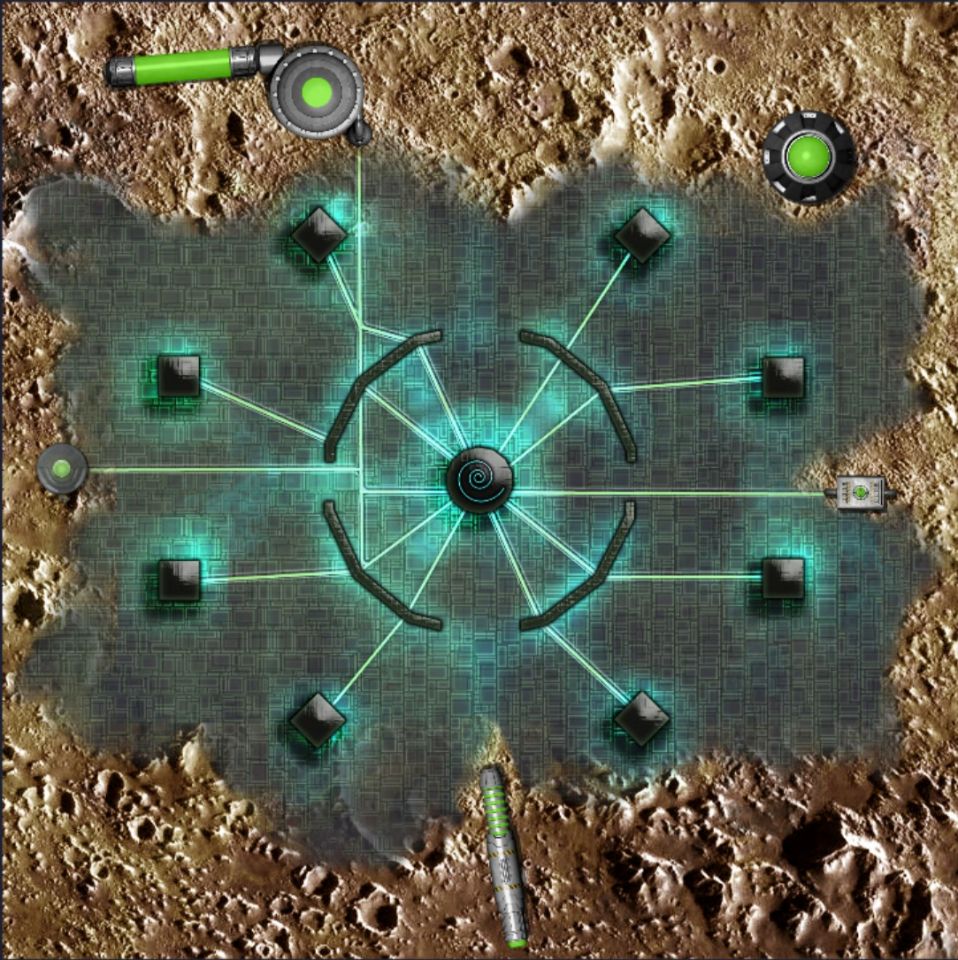
After some thought, I decide to lean on that “technological mysticism” and use the Alien Ruins 2’x2’ map from Loke BattleMats, plus some more of that sci-fi decor from Gabriel Pickard.

For game purposes, all the decor I added, other than the eastern control unit, plus the pillars from the ruins block lines of sight (LOS). The barriers around the central pillar and that control unit provide cover without blocking LOS. Additionally, the southern stretch of craters and rocks are Difficult Terrain (cost double movement).
Rules of Engagement
- All shots beyond 8” are at -1 to hit (World Trait: Fog).
- Swift characters can jump straight down any distance and sustain no damage. Simply jumping down is a Free Action for a Swift.
- Swift characters may glide down from a height. Gliding counts as a Swift’s Movement Action.
- Swift characters must shoot at the closest visible target using all available shots.
- Aggressive enemies will not Aim.
- Aggressive enemies with opponents in sight will advance at least half a move towards them, attempting to remain in Cover if possible.
- Enemies that are unable to see any opposition, or which are within 12”, will advance as fast as possible towards the nearest opponent, attempting to enter into a Brawl.
- Heavy weapon figures will not move if they have LOS to a target.
Deployment
Rolling randomly, I determine that the crew will enter on the eastern edge, and therefore the Swift War Squad will enter on the western edge. The crew is unable to Seize the Initiative so it’ll proceed normally from here.
I also randomly determined that the extra 2 credits are sitting in a small crate a bit north of the center of the map.
Round 1
In the Quick Actions phase, Swales and one other character can go. She moves behind a nearby pillar, and Reeves takes cover behind the control unit.
The Specialist has LOS to Notley and unleashes all their shots, with one hitting. He’s only Stunned, though. The two Regulars move up and take cover behind the central barriers on the western side of the center pillar, as does the Lieutenant.
Notley takes cover behind a pillar (and clears his stun), with Darby backing him up. Alden and Ogden also move behind nearby pillars.
Round 2
This Quick Actions phase will allow Swales (who has a better Reactions rating) and two other crew members to go. Notley is actually in danger from the Lieutenant and runs to cover. Darby moves into better blocking behind the pillar where Notley was. The fog prevents anyone from having a shot on the Swift, though, so the captain doesn’t take her turn yet.
Now the Swift squad gets to go. Both Regulars dash towards Notley, although only one has anything resembling cover at the end of their moves. The Specialist moves behind a pillar on the south, and the Lieutenant enters the central pillar area, staying behind it.
Reeves has a shot now on one of the regulars, takes careful aim, and hits, taking it out. Ogden leaves the pillar and moves up to a central barrier, giving them LOS to the Lieutenant. That’s an easy shot, but the Lieutenant is only Stunned. Alden barely has a shot on the Specialist, but misses. Finally, Swales advances behind a barrier and fires a Dueling Pistol at the remaining Regular, getting a critical hit and taking it out.
Neither of the enemies panics and bails, which is good because the crew needs to take out the Lieutenant.
Round 3
Only one crew member can go in the Quick Actions phase, so Ogden takes a shot at the Lieutenant again, this time taking him down (and thus accomplishing the objective).
The Specialist has a shot on Alden, just barely, but misses badly with all three shots.
Alden returns fire, missing due to the fog. Reeves moves behind a pillar, and Notley runs into the open but still on the other side of the pillar from the rattle gunner. Swales sees an opportunity and takes it, firing her Colony Rifle at the Specialist unsuccessfully. Darby runs behind a nearby heat sink.
At the end of the round, the gunner does not bail.
Round 4
This time, Swales and one other crew member will get to go first. The captain aims and fires at the Specialist but misses. Notley runs around the pillar, drawing his blade and attacking the Specialist; unfortunately, the Swift stuns him. I decide to use a Story Point to reroll Notley’s Brawl roll (because otherwise the enemy will have him at point-blank range with a multi-shot weapon), and he succeeds, taking out the Specialist.
Post-Battle Sequence
The Swift know this was just business and do not become rivals. The Blaze Clan is now a contact here on Kothea 4, and pay us 5 Credits for a successful completion. We also find those 2 Credits in the crate, getting The Weekenders up to 20 Credits, plus booster pills (2 uses).
No crew members are injured! Everyone gets 4 XP (Survived and Won, Easy Mode), plus Reeves gets an additional 1 XP for being the first character to take out an enemy. We’ll spend some of that XP now:
- Stroud Ogden: +1 Combat
- Shurl Reeves: +1 Combat
- Thornton Darby: +1 Combat
- Saige Alden: +1 Toughness
The crew still isn’t purchasing any items until the ship is paid off. But the sector news networks are awash with rumors of war (+2 to Invasion rolls). That’s getting to Darby, who despite his intolerant ways is a bit affected by that plus the wanton violence of the crew taking a job to just straight up eliminate someone. He won’t participate in the next fight unless it’s an Invasion battle. (This also replaces the story point I spent earlier.)
And that’s it this time. Next turn, the crew of the Acidic Angel will head to a new world.

