The Cryptorum - Session 2
In the hellish desert of Cinderheim, where the demon sun beats down on the land, a group of adventurers seeks to win riches and glory, and perhaps a place in the legions of the local warlord. But doing this requires continuing to scout the Cryptorum, a horrifying prison where said warlord dumps his enemies and other “inconvenient” folk to be forgotten, on behalf of his warlock advisor. Worse still, it is thought that the demon lord Raaz, namesake of their settlement of Koraaz, is chained somewhere at the very bottom of the prison.
OD&D Lessons
After considering the previous delve, I had a few thoughts about OD&D specifically.
OD&D generating encounter distance randomly (e.g. in dungeons, 1d6x10 feet) helps tremendously as it keeps me from having to decide how the monsters are set up, or at least constrains that decision significantly. In a group game, this has some benefits around preparation, but in a solo game it means that it’s one less thing for me to have to judge as the GM.
I was a bit concerned about the attribute scores for some characters, but in reality they mostly affect secondary things like opening doors, carry weight, and so on. They definitely matter, but far less than in modern editions of D&D. In terms of stats, their hit points and saving throws matter more.
Also, a reminder to myself: S&W Complete specifies that monsters use d8s instead of d6s for their hit dice. I don’t think it would have mattered in the previous delve, but I’ll remember that going forward.
Delve Preparation
For the adventurers themselves, I’m taking some advice from the Solo Game Master’s Guide by Deborah, perhaps better known for her “Geek Gamers” channel on YouTube. She recommends rolling up a trinket for the characters as a way to get a better sense of them as characters and tie them into the world. Conveniently, Cinderheim has a large trinket table, so:
- Menat (female elf, Fighter/Mage) has the hilt of an old sword. (Her own? Perhaps from a friend who died?)
- Kang (male human, Mage) has a petrified egg. (Does he know what kind of creature it was?)
- Omolora (female elf, Thief) has a shattered chess piece. (Perhaps she was once a pawn in someone else’s game?)
- Yash (male human, Fighter) has an ominous drawing. (Of what? And what makes it “ominous”?)
Hopefully we’ll discover more about this in play.
I also decided to change wandering encounters; slow-moving mushrooms didn’t feel like the right kind of monster for this sort of thing, although they’re fine as something that might already be in a room. So I looked back at the purpose of the Cryptorum as a prison and decided that those prisoners should be the core of the wandering encounters along with demons and vermin. While gnolls in S&W do not have the same demonic origins as they do in later editions of D&D, in Cinderheim that makes a great deal of sense.
For in-room encounters (indicated by “Solo Dungeon Adventures” table V.5) I will continue to use the S&W Complete rulebook’s “Monsters in the Dungeon” tables.
Also, the table in “Solo Dungeon Adventures” only has a 5% chance of a trick or trap, so I replace the “Special or Empty” result with another chance at that.
For some empty rooms, I used the “Tables for the Otherwise Empty Dungeon Room” from The Dungeon Dozen, p. 26, by Jason Sholtis.
Wandering Encounters
- 1-4: Humanoids (see subtable)
- 5-8: Vermin (see subtable)
- 9-10: Manes (consider adding custom demons in the future)
Humanoids
Roll a d6 on the following table. d3 of the result will be present. Also roll a d10 on the “Demonic Corruption” table in Cinderheim p. 41 to see how the “abyssal forces of the desert have physically tainted” the prisoners.
- 1-2: Elves
- 3: Dwarves
- 4: Humans
- 5: Goblins
- 6: Gnolls
Vermin
Roll a d6 on the following table.
- 1-2: Giant Rats (d6 present)
- 3-4: Giant Beetles, Fire (d4 present)
- 5: Centipedes, small giant, non-lethal (d4 present)
- 6: Stirges (d4 present)
Delve
As before, the four of them are sent down into the dungeon and given a passphrase to identify themselves later to the guards. They’ve already been down here once, so they have a sense of where they want to start.
Just as in the previous delve, Menat and Omolora go in front due to their ability to see much further in the dark than the lanterns can illuminate. Kang has prepared protection from evil while Menat has sleep.
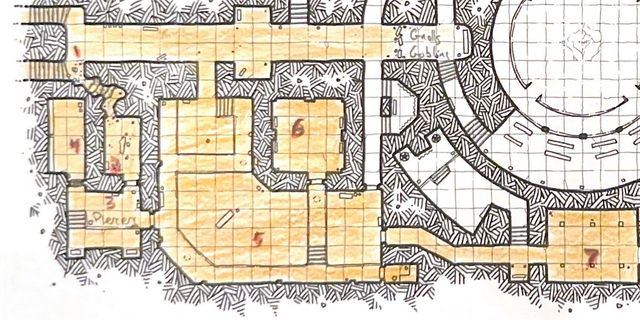
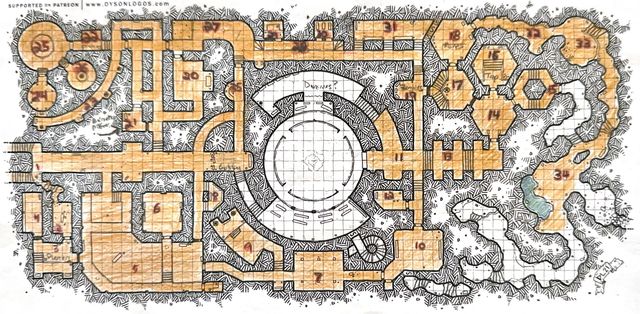
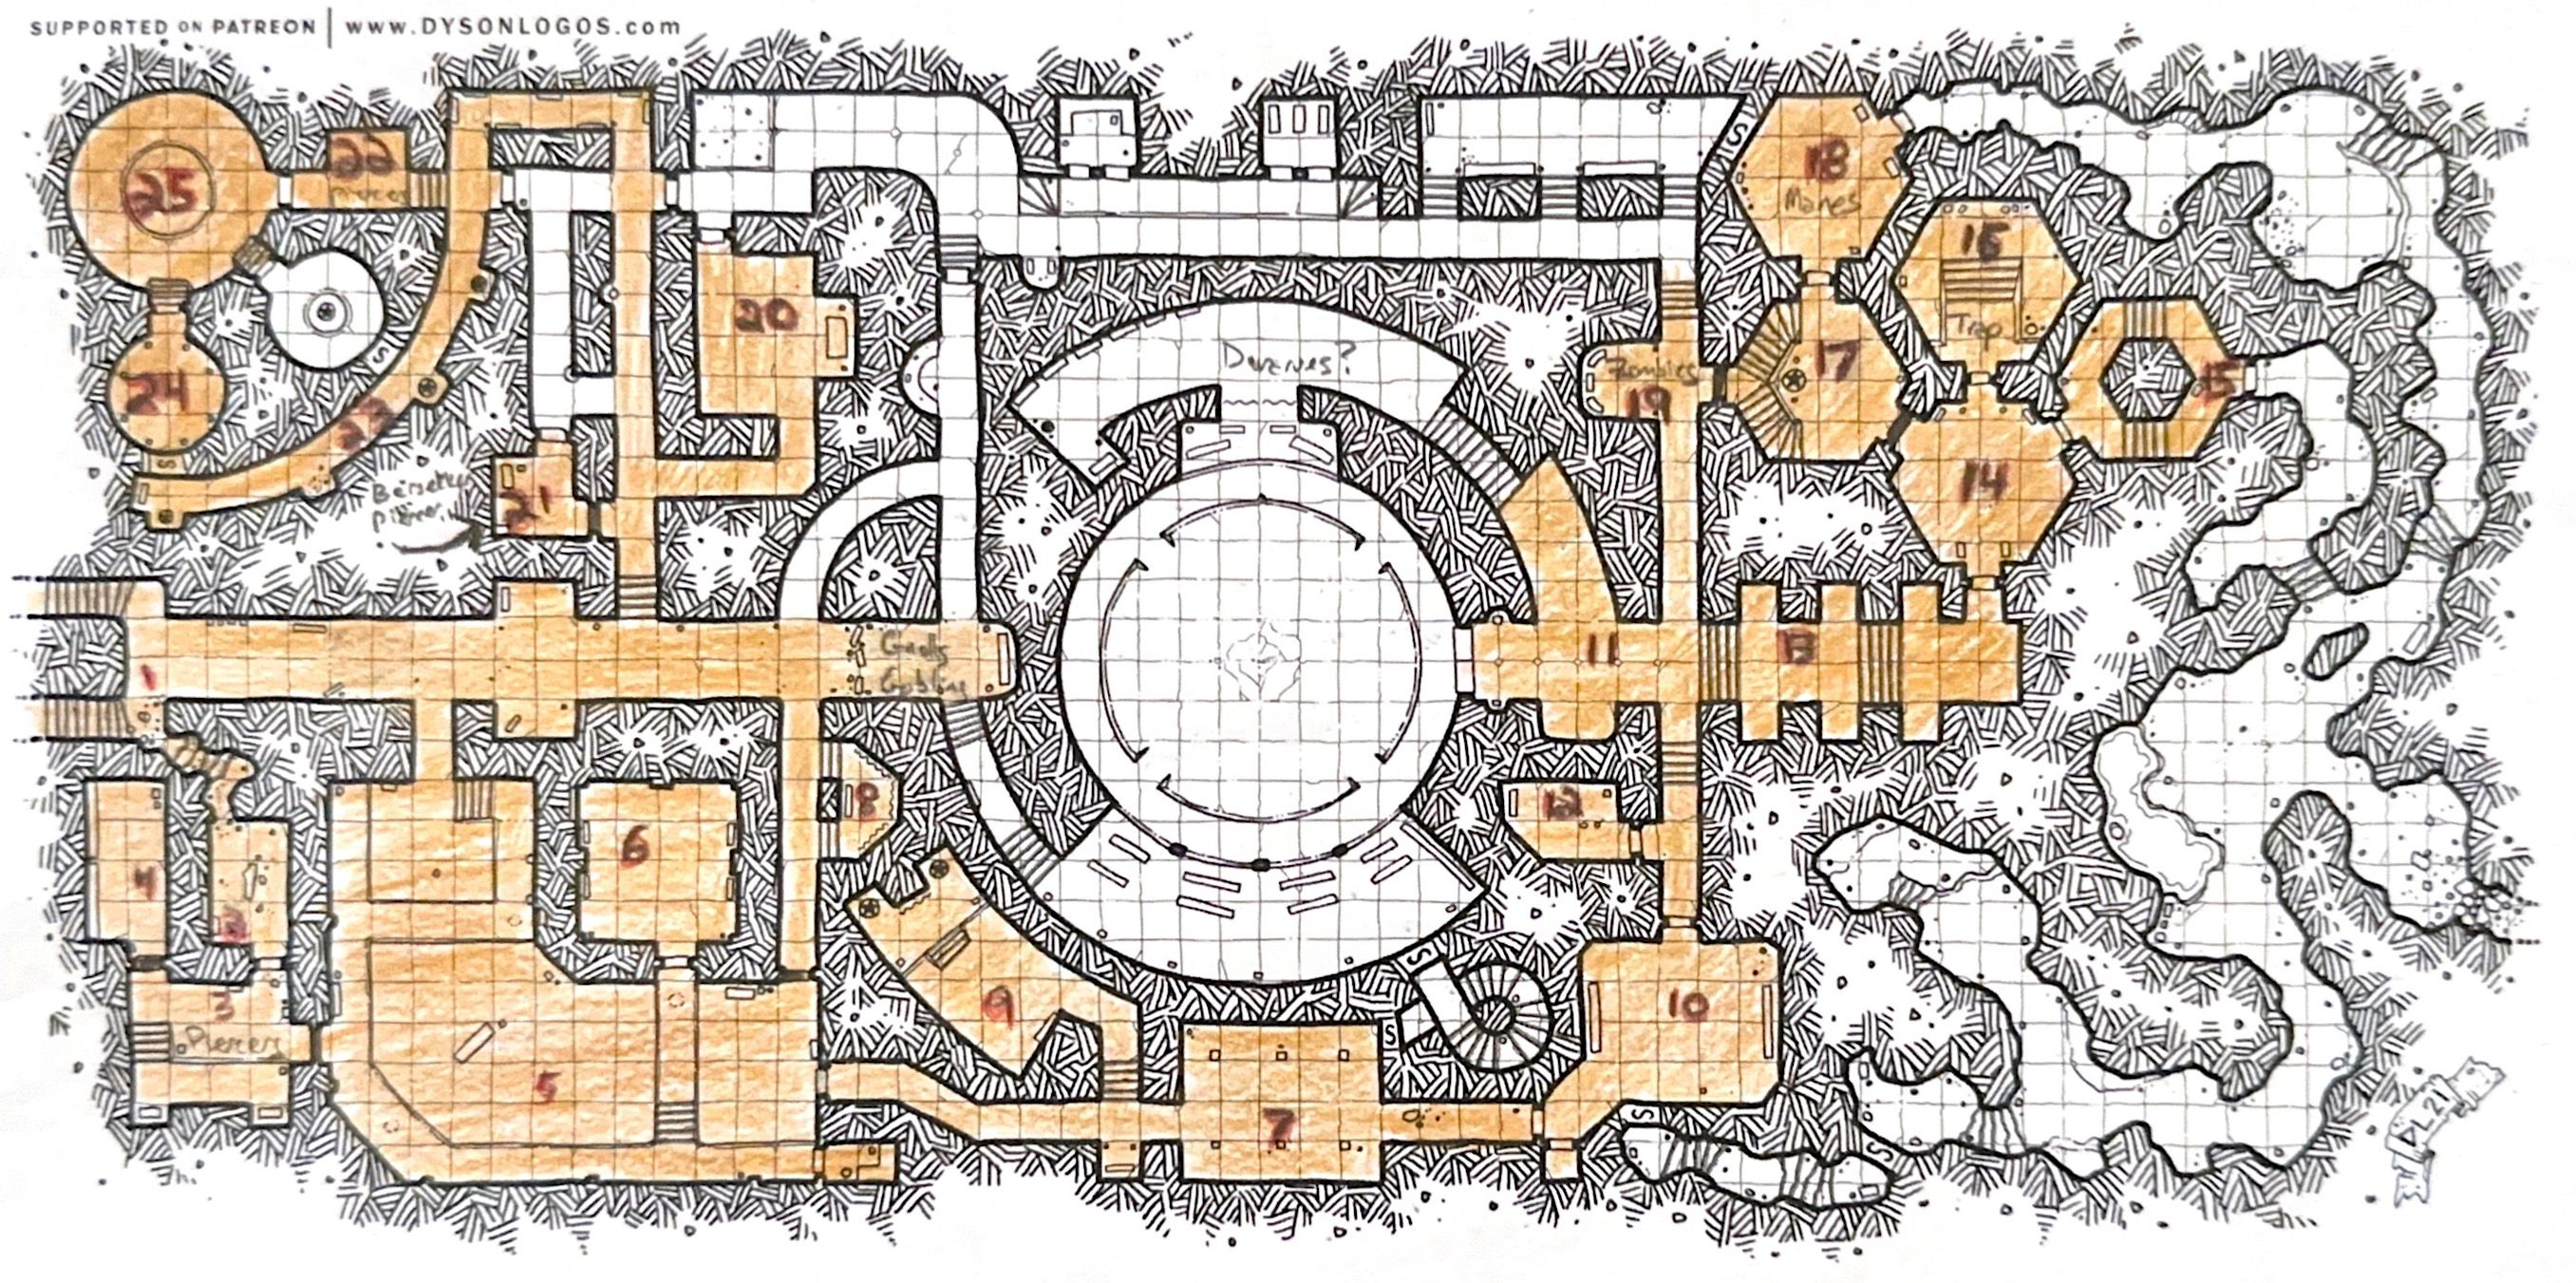 Spoiler map showing what they explore in this session. Cartography by Dyson Logos.
Turn 1
After descending the initial stairs, they are in Room 1, a very long hallway. I decide there’s a 3-in-6 chance that the gnolls and goblins that lair at the end of the hallway behind a barricade are present, but they’re not. Maybe something else cleared them out, or they might just have wandered elsewhere in the dungeon on their own.
Turn 2
From those barricades, the adventurers turn south down a long hallway. This leads to the first new room of this delve, Room 8. This is a small display area off the corridor with rotted worthless tapestries and a place on the wall where once there hung a portrait. Perhaps a former ruler of Koraaz before Qualenethi? It’s gone now, regardless.
The door is stuck, so Omolora listens first and hears nothing, then uses her crowbar to burst through into Room 5, what they believe to have been a dining area.
Turn 3
No monster patrols are visible. Since the group didn’t spike the door leading east out of here last time, it’s stuck again. Omolora pries it open with her crowbar and Yash hammers a spike into the ground, holding it from closing.
Turn 4
Before heading all the way into the room with the columns, they turn left into a Room 9, a curved chamber that measures something like 30’ x 60’ with two defaced statues and more rotted tapestries.
However, this room has a literal insect war:
Huge colonies chewed into opposite walls, floor strewn with countless tiny casualties, sophisticated troop formations attempting to outflank one another.”
Whether this is a sign of abyssal influence or an omen of things to come (or both), the group decides after a few moments of fascinated observation to turn around and not try to influence the outcome.
Turn 5
The group passes through Room 7, which they’ve previously explored. Three stirges have flown into the room (wandering monster encounter), but they fly on and leave the group alone (positive reaction result).
Neither of the elves notice the secret door in the northeast. (I decide that the group won’t focus on looking for secret doors until either they stumble on one or perhaps get ambushed that way.)
The door to the east is stuck, and Menat puts her shoulder into it, forcing it open but spilling uncontrollably into whatever lies beyond.
Turn 6
Now in Room 10, there isn’t much here. (Again, the elves do not notice the secret door.) Yash spikes the door behind them, keeping their line of retreat open if needed.
Menat hears sounds behind the door to the north, so she covers Omolora while the thief forces it open with her crowbar.
Turn 7
There are two monsters in Room 11, the giant centipede (literally 7’ tall) that lairs here and a corrupted elf with unnatural-looking eyes that has wandered in. The elf, perhaps a prisoner or even a deserter from Qualenethi’s legions, reacts with hostility and draws his sword, intending to charge them from 30’ away.
Because Menat heard the monsters from the other side of the door, they aren’t surprised; nor are the elf and giant centipede. (Omo can’t act in the first round because of being off-balance from forcing the door open.)
No one is casting spells this time, and the adventurers win initiative for this round. As previously noted, Menat was ready for a fight, so she throws three darts at the hostile, demonic elf. All three hit, dealing enough damage to drop him in his tracks! Kang does the same at the giant centipede, with the same result. (I literally screen-capped my online dice roller because I couldn’t believe it - actually, he rolled two natural 20s but those do not have any special effect in OD&D.)
In the giant centipede’s nest, they find a small treasure hoard: 10 platinum pieces, 65 gold pieces, 33 silver pieces, and a full 1000 copper pieces. Those copper pieces are too heavy to be worth carrying, but Kang puts the rest in his backpack. Yash spikes the door behind them.
(Upon review, I’m not entirely sure I ran this combat correctly. Specifically, the groups started 30’ apart and the darts have a range of 15’. The text says “Each combatant on the side that won initiative may move, or may fire any missile weapons.” Does that mean they cannot do both? Because both of the combatants definitely needed to move up to get in dart range. For now, I’m leaving this as-is, because I noticed that after the combat, but I may revise that interpretation in a future session.)
There’s another door on the west side of the hall before the corridor fully reaches room 11. Omolora, hearing nothing in the room beyond, again uses her crowbar to open it.
Turn 8
In Room 12, a small storage room, they find a small scroll case. Since Kang is carrying the coins, Menat takes it. (She will need to cast read magic later to see that the scroll is instructions for charm person.)
This is a fairly defensible position, but Yang does not spike the door because it’s not on a travel route. The hallways are short enough that it’s easy to get to another new room. Rather than go into the large central arena, they decide to check the easternmost portion of this level of the prison.
Turn 9
Room 13 is a hall with six alcoves and a couple of sets of steps. But there’s also a trap here; per Ruins of the Undercity table Q, I get “Cesspit”. Omolora has a 2-in-6 chance to notice, and Menat has 1 (due to their darkvision). If neither of them notice it, I’ll start testing triggers, but thankfully Omo does. There’s a door near the northeast corner of the hall. The elves hear nothing beyond it.
Turn 10
As expected, no creatures are to be found here in Room 14 at the moment. This hexagonal space has three doors (north, northwest, and northeast). It’s largely empty, except for:
Sizable swarm of dungeon gnats forms into patterns that appear to be a repeating series of runes.
As the demon lord Raaz is known to communicate through bloody sigils and runes, this likely is a sign of his influence and corruption in this space.
The group avoids dealing with the gnats. Omolora listens at the northeast door and hears nothing, nor does Menat at the north door. The group heads through the northeast door first.
Turn 11
Room 15 is empty, with only two parallel sets of steps in a roughly hexagonal formation that lead to a door into the caverns. The adventurers are not interested in going below just yet, so they return to the central hexagon and head through the north door.
Turn 12
Here in Room 16 they would encounter a trap, a hail of needles. But none of them trigger it on this visit! (If the group returns for any reason, I’ll reroll the 2-in-6 trigger chance.) Instead, they go back once more to the central hexagon and listen at the northwest door, but only silence is heard. Omolora forces it with her crowbar.
Turn 13
The fourth hexagonal area, Room 17, has another defaced statue in front of some steps leading up and to the west. There’s a door to the north as well, and it sounds quiet. The adventurers have no difficulty entering that door.
Turn 14
As soon as they open the door to Room 18, though, they see a wandering monster - a demon! This is a gray-skinned, roughly humanoid, abyssal denizen, with its flesh and skin sloughing off. It’s a manes, a low-level demon, but still a creature they would have difficulty with. It hesitates for a moment, waiting to see what they’ll do. Retching slightly at the sight of it, the group closes the door and pulls back! They have no interest in dealing with that, especially since they aren’t planning to proceed to the caverns on this delve.
The door west out of Room 17 is quiet; Omolora can’t get it open with her crowbar, but Yash can with his strength.
Turn 15
In Room 19, there’s treasure guarded by 5 zombies. The explorers are surprised, but the undead creatures don’t immediately attack them. The two groups are only 10’ apart, so they have to decide quickly.
While this is a major thoroughfare through the dungeon, and thus they’d like to clear it out, those are dangerous creatures for the unprepared. They don’t have a cleric, and it would take at least two solid hits to take out even a single zombie, whereas any one of them could be taken out in a single hit.
Thus, the group decides to retreat for now. They let the ancient dungeon door close behind them while they plan the next move.
Turn 16
At their full movement speed, exploration can be carried out at 240’ per turn. They reach Room 13 where they come upon a female dwarf with gnarled limbs, warped by demonic influence. She’s 50’ away and hesitates; Kang considers casting a spell to charm her into service, but an abyssally-corrupted prisoner would certainly not be allowed out, and eventually she’d break free. Instead, they decide to ensure she does not present a threat behind them.
The adventurers win initiative. Menat and Kang fling their full complement of three darts each at her, but all miss or at least are unable to penetrate her armor. She also dodges the arrows from Omolora as she and Yash close distance to each other, but his polearm brings her down in one fell swoop.
Turn 17
In Room 11, they find another group of 3 dwarves, one with protruding tusks indicating his slow conversion into a demon. They’re only 10’ away, so Menat decides this isn’t a good opportunity to try to cast a spell. But the dwarves hesitate again, seeing this group that outnumbers them. This gives the adventurers the opportunity to strike first.
As previously, Menat and Kang are unable to hit anything with their darts. The others get into melee range; Yash swings his polearm but the dwarf he is attacking easily ducks under the attack. Omolora grasps her bastard sword firmly with both hands and takes down one of the opponents. Seeing this, the other two dwarves flee northwest up stairs and around a curve into the arena observation area.
But the adventurers don’t know if the dwarves have reinforcements there, so they choose not to pursue and potentially get pinned between two groups. This also makes the arena itself a dangerous proposition, because they could have enemies attacking them from above. They’ll keep pulling back.
Turn 18
They continue moving at exploration speed. While they’ve previously been through Rooms 10 and 7, they don’t want to get surprised by any hostiles, so they don’t go running down darkened corridors.
Turn 19
Once they reach Room 5 (the dining area), they realize they didn’t spike the door that they used to enter (from Room 8). Menat hears nothing at the door, but all her efforts combined with those of Omolora and Yash are unable to get it open.
Turn 20
Rather than keep trying and potentially confront something they’ve already alerted to their presence, the four of them go around the long way to the passage leading north into Room 1 albeit further west, and they can see into another passage going further north that they haven’t explored yet. (I should have checked the gnoll & goblin lair here, but I forgot.)
Turn 21
Going down the corridor and around a corner, they find Room 20, a 30’ x 40’ room with an altar in an alcove along the east wall. More urgently, a couple of (smaller, non-lethal) giant centipedes are here and only 10’ away - and they’re attacking! However, the group wins initiative, allowing Menat to light and throw a flask of oil, burning the vermin to a crisp.
The altar conceals nothing of value, unfortunately.
Turn 22
They go back into that corridor where they had passed a closed door. Omolora hears something at it and the group prepares their weapons. The door doesn’t open easily, so she pries it open with a crowbar.
Turn 23
In this smaller 20’-square room, there are a couple of human berserkers (a man and a woman). They look up from where they are preparing to dice up a (3 HD) piercer. No one is surprised, but the humans are also not hostile from their spot on the other side of Room 21. These are just prisoners holing up, but they’re powerful enough that the group thinks twice about taking them on - more accurately, they don’t want to get into a fight with them and then have to deal with the piercer as well.
Instead, Yash talks to them, telling them that they are hunting goblins. The humans tell them of the goblin lair behind them. The adventurers thank them and back out slowly, allowing the door to close behind them.
Turn 24
Of course, they’re not really hunting goblins. Instead, they go all the way north and then west, using a side hallway to bypass another door. Their intended destination is the room with some sort of pool in the northwest corner of this level of the dungeon, but in Room 22 they see 2 more of those non-lethal (perhaps I should say “less lethal” because they still have a bite) giant centipedes - and 4 orcs only 10’ in from of the group. Again, no surprise, but the orcs are confused. “This is ours!” The adventurers prefer not to fight them right now, so they over-apologize and retreat.
Menat also relights her lantern as it sputters out after four hours.
Turn 25
The group carefully moves southwest through a curved statue gallery (Room 23). Unexpectedly, Omolora notices a secret door at the very end of the room. This gives the group ideas about what else might lay in the dungeon. For now, since this is otherwise a dead end, she listens carefully but hears nothing. It takes them a minute to figure out how to unlatch the door, but even then it’s stuck and she needs her crowbar to make it through.
Turn 26
In Room 24, a small circular space about 30’ in diameter, they find a small treasure hoard: 1000 silver pieces. Menat and Yash each take 500, splitting it between their backpacks and empty sacks. There’s a door here leading to the pool room to the north, and it’s both quiet - and easy to open.
Turn 27
The large 20’-diameter pool in Room 25 reflects the lantern light strangely, dancing the shadows on the ceiling and around the room. Omolora notices a full 750 electrum pieces in the corner and scoops them up, although this will load her down significantly and slow her movement rate.
But Kang has his attention fully fixed on that pool. He sets his pack down on the floor and wades into it. (Pools have their own table in “Solo Dungeon Adventures”: I roll a d12 and get “Magical Pool”, then an 8 on 2d6 to determine that it is a talking pool.) A voice echoes in Kang’s mind: “Human. You seek neither the chaos of those who would see the universe dissolved, nor the law of those would seek its dominion. How may I further your quest?”
This is granting a wish spell. I personally don’t want to upend the campaign so quickly (again) so I review what that spell covers in S&W:
This spell is not all-powerful; it grants wishes of limited scope (although more powerful than a limited wish). The Referee’s discretion will rule what sort of wishes are within the spell’s power. (One possible - unofficial - guideline might be that a wish can grant effects that would be similar in power to an 8th-level spell or lower, with permanent effects in many cases.) After casting a wish spell, the Magic-User is mentally drained and unable to cast spells for a period of 1d4 days.
I decide that this means the pool will only grant this one wish, at least for now. After reviewing the Magic-User spell list, the best choice here seems to be polymorph object, so Kang asks Yash to hand him one of the iron spikes. Lowering it into the pool, he has the pool transform it into a major gem.
Per the “Gem and Jewelry Treasures” table in S&W, I roll a d4 and get “Gem or jewelry worth 1d100 x 200 gp”, so the gem ends up being worth 13,400 gp! This is the jackpot and the real reason they’ve been exploring the Cryptorum. It’s time to go. Kang climbs out of the pool, retrieves his pack, and the four of them leave the pool room.
Turn 28
The group passes through Rooms 24 and 23, but when they pass near Room 22, those orcs give chase! The rest of the group is faster than them, except Omolora who is weighed down by treasure. She will attempt to hide in the shadows; if that doesn’t work, a confrontation will ensue. Indeed, the orcs clearly see her, so Menat begins to cast sleep upon them. While the orcs are only 30’ away, the adventurers win initiative. Kang flings his last dart, hitting one of the orcs but not killing it. Yash swings his polearm wide, missing, but Omolora (who is slowed but not restrained) brings her bastard sword around, killing one of the orcs outright. At this moment, Menat finishes her spell, summoning abyssal energy that she flings in the direction of the melee, and the remaining orcs fall asleep. But the spell will affect 2d8 HD 1 creatures; this turns out to be 4. Since Omolora had killed one, that means either she or Yash will be affected. I roll a d2: Yash will be unconscious for an hour. Omolora executes the sleeping orcs.
Is it safe to wait here? This isn’t actually the orc’s lair, and the piercers are now friendly (likely the orcs had intended to do the same to them). The nearby doors are relatively secure (stuck), so they’ll wait out the next turns.
Turns 29-33 pass without incident.
Turn 34
As Yash slowly stirs from his slumber, a demon (manes) shows up, confused. Menat rapidly intercepts it to discuss their shared demonic lord, Raaz, the Praetor of Slaughter. In Cinderheim, arcane magic generally comes from demonic sources of one sort or another. Whether she actually serves Raaz or not, in this situation she urgently needs the manes to believe so, and this is convincing enough to work.
Turn 35
Finally the human fighter is fully conscious and the group flees. But back in Room 1, they find those two dwarves that fled earlier, together with another companion, hunting them aggressively. The dwarves see the adventurers from 50’ away and win initiative, moving to melee range. Before melee itself begins, though, the group gets to move, and they’re faster (even Omolora is quicker than the short-legged dwarves). They reach the exit from the prison, quickly warn the guards and provide the passphrase.
Against all odds, they have escaped with their lives and their treasure.
Rewards
I’ll start by adding up the XP from treasure:
- 13400 gp gem
- 118.3 gp in assorted coinage
- 100 gp in silver pieces
- 375 gp in electrum pieces
This is 3498.325 XP each. Further, I add up the monster XP:
- 1 elf (15 XP)
- 2 dwarves (30 XP)
- 4 orcs (60 XP)
- 1 giant man-sized centipede (60 XP)
- 2 small non-lethal giant centipedes (20 XP)
Together, the monsters were worth 185 XP. This is 46.25 XP each.
Adding this to their current XP, and with Kang receiving his 5% bonus for his high Intelligence, the characters are now at:
- Menat: Fighter 1 / Mage 1 (multi-classing moves slowly in S&W but has benefits nonetheless)
- Omolora: Thief 3
- Kang: Mage 2
- Yash: Fighter 2
Next time, I’ll figure out what they do with the treasure before they head back down to finish the rest of this section of the Cryptorum.