The Cryptorum - Session 3
As the adventurers prepare for their third delve into the Cryptorum, there are a few preparatory things to dig into.
Party Composition
It would be useful to have another sword arm or perhaps a cleric, since this part of the dungeon definitely has some undead. At a minimum, we need a couple of torchbearers or porters so the group can carry treasure without slowing down their movement rate.
Followers as listed on Swords & Wizardry Complete Revised p. 48 “are assumed to be employed full-time by the player character. They are given room and board plus a wage.” It goes on to specify that short-term hiring is up to the Referee. I’m fairly surprised that S&W does not have recruitment mechanics, as OD&D definitely did.
So I decide that short-term day laborers (torchbearers, porters, and similar “adventuring non-combatants”) cost double the listed wage, or 2 gp/day. Charisma affects their morale, but they are not limited to a certain number as with “special hirelings” (classed characters, effectively).
So each adventurer hires one porter. The elves hire other elves, fitting the setting of Cinderheim and in particular in the settlement of Koraaz. Humans have a 2-in-6 chance each of hiring dwarves, halflings, or humans. From there, I assign names, roll their HP, and equip them.
Equipment and Preparations
Yash upgrades to plate armor, then gives his handaxe and sack to his human porter, Yordi. (To make it easier for me, I named each hireling with the same initial as the hiring character.)
Kang replenishes his supply to a full 10 darts, then gives his bullseye lantern, oil, and some other equipment to a human porter named Kliv. He prepares shield and protection from evil spells.
Omolora gives her sacks and dagger to an elven lanternbearer named Onder. She’ll make a more concerted effort to stay in the shadows in case she gets the opportunity to backstab any enemies. To that end, she gives her crowbar to Yash and puts him on door duty.
Menat gives a sack and lantern to her elven porter Mako, then buys them more oil and also replenishes her darts. As before, she prepares sleep (a spell which Kang doesn’t know yet).
The group changes their marching order such that Yash and Menat, the fighters, are in the front. Omolora and Onder (carrying a lantern) are in the middle, then Kang and his porter, then the final two porters, Yordi and Mako.
Procedural updates
Wandering encounters will now be rolled at the end of the turn, rather than at the beginning with room contents, which delineates things more nicely but also keeps things unpredictable.
I think Menat’s alignment is probably closer to chaotic, given the affinity she’s claiming with Raaz, the demon lord who lies imprisoned beneath Koraaz (likely within the Cryptorum itself.) As the Praetor of Slaughter, it’s not exactly subtle about what it’s about.
Also, after listening to some other OD&D solo playthroughs, I decide to treat traps mostly as a delay. That is, there’s a 3-in-6 chance they do 1d6 damage per dungeon level, and a 1-turn delay while the group frees the affected character.
The oracle I’m using is simple: I roll one d6 for likelihood, with 3-in-6 for uncertain outcomes, adjusted by ±1 for more or less likely events (and, rarely, ±2). A second d6 roll determines qualifiers: 1 results in “but”, while 6 results in “and”.
Finally, whether the elves search for secret doors in likely places requires an oracle check.
Vignette
(One thing I decide to start doing, as this is a RPG not just a wargame, is to start having a little in-character vignette for a random character at the start of each session.)
Kang is visiting Nordak Rumna, their warlock patron, to inquire about this petrified egg he carries. Does the warlock know what this egg is? (I check the oracle: “Yes, he does”.) The younger mage is cagey about where he got it, just “from a past teacher”. Rumna tells him it may hold power, but unlocking any latent potential requires immersion in demon ichor. (I decide that the corpse of any demon has a chance equal to its Hit Dice in 6 to have sufficient ichor to immerse the egg in for this purpose.)
The Delve
As the group enters the dungeon, it’s a particularly hot day under the demonic sun of Cinderheim. Going underground is a relief from the heat, but intensely dangerous.
Their immediate objective is to investigate that group of gnolls and goblins, preferably neutralizing the threat.
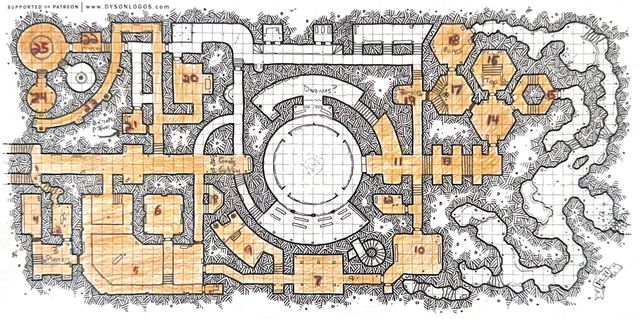
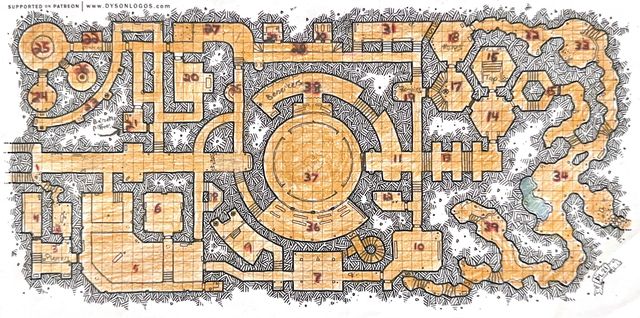
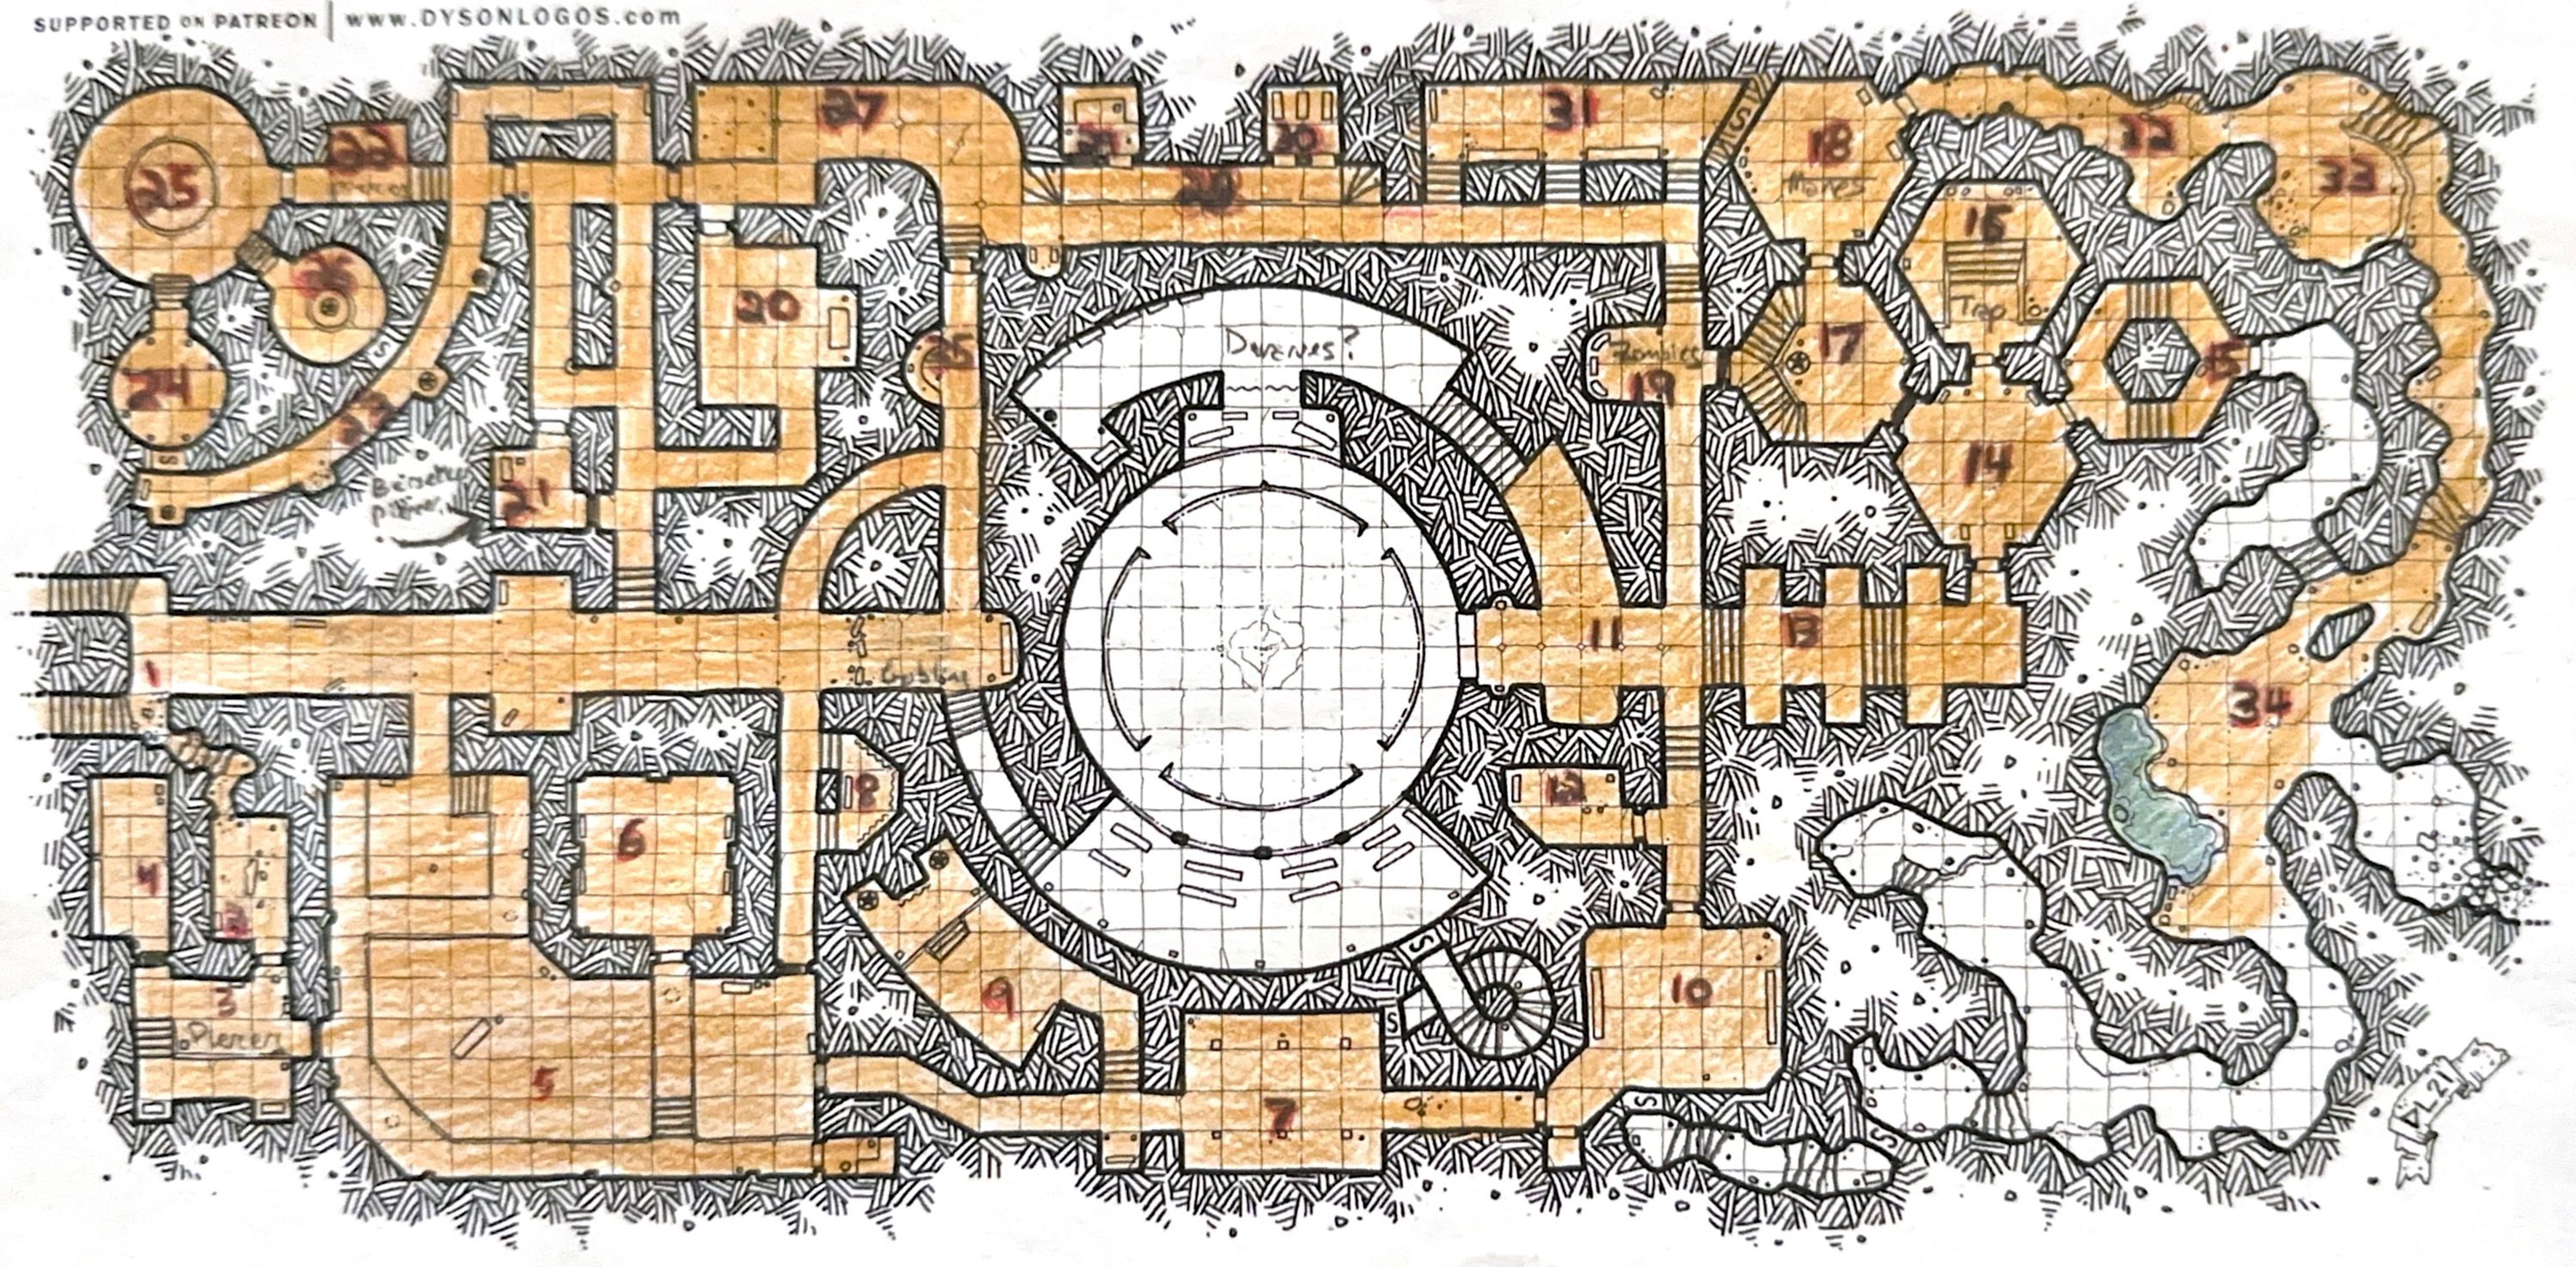 Map of the Cryptorum as it stands by the end of this session. Cartography by Dyson Logos.
Turn 1
Here in Room 1, the gnolls were originally at the end of the long hallway. Are the monsters present (likely)? Yes, 2 gnolls and 6 goblins as before. There’s no surprise, but the encounter starts at 20’.
(Rather than recount the blow-by-blow of OD&D combat, I’m going to start summarizing it.)
The group advances and engages the gnolls in melee combat after a brief volley of darts and arrows. After the dust clears, both gnolls are dead (one to darts, one to a polearm swipe) and the goblins have fled. But at the same time, Menat is unconscious (dropped to exactly 0 HP). A few other adventurers have minor wounds.
Turn 2
The group decides to loot this lair, then help Mako get Menat to safety. They find 200 gp plus a gem worth 760 gp on its own!
The wounded elf staggers back out into the daylight, supported by her porter, while the rest of the group forms up again and continues their exploration. The new marching order is Yash and Omolora in the front rank (albeit she will continue to try to stick to the shadows), followed by Onder and Yordi, then Kang and Kliv in the rear.
Turn 3
The group passes through a northern-leading corridor, just past Room 21.
Turn 4
They explore a corridor they didn’t previously pass through and reach Room 22 where some piercers have made their home. As before, the creatures are uninterested in prey, either because they’re full or because they remember the group from last time when they (unintentionally) saved them from some orcs that had intended to eat them.
Turn 5
The door leading to Room 25 is stuck, and Omolora hears nothing on the other side. But none of the group, even with the crowbar, is able to unstick it. Fortunately, nothing comes to investigate.
Turn 6
Yash finally is able to force the door. Is the magic pool still active (unlikely)? No, it’s quiet and mundane now. He spikes the door open to preserve their line of retreat. Omolora listens at the door to the next room, which they had not previously been able to enter, and hears nothing.
Turn 7
Despite Omolora and Yash’s efforts, Kang is the one who finally gets the door to Room 26 open, and they all fall in. Fortunately, it contains nothing but an old, featureless statue. Omolora suspects there could be a secret door here (similar to the one in the parallel Room 24) but fails to find it (because it is, in fact, there). Yash spikes the regular door, just in case.
Turn 8
There’s a door just east of Room 22 they’ve been going around, and this time they decide to check it. There’s no sound on the other side, and it turns out to be unstuck anyway.
Turn 9
At the next door, leading to Room 27, Omolora only hears silence, and Yash pries it open.
Turn 10
The room is empty, so Yash hammers in another spike to hold the door open.
There’s a set of stairs leading south to a door, but also the passage further east is fully open. They decide for now to go east and not deal with door issues.
Turn 11
Room 28 is empty, with a pair of small steps that lead to a lower area with multiple doors. (My labels on this room are a mess.) They check the western set of doors first; no sounds can be heard within, and Yash has to force one of them again.
Turn 12
The doors open to Room 29, both empty and small, so Yash uses a spike to hold one of them open, then the group moves on to the eastern set of doors.
Turn 13
While they have no trouble entering Room 30, there is a trap here! Kang gets caught; although the trap doesn’t do any damage, he’s going to be delayed while they figure out how to get him out of it.
Unfortunately, at the end of this turn, a manes (demon) comes upon them, and it’s hostile. I decide that the trap means the group has an increased chance of surprise, but fortunately they are paying enough attention (or perhaps the lanternbearers cry out).
As the fight begins, Kang is still in the trap! I decide he has a 1-in-6 chance of getting free at the end of each round. The manes closes to melee distance immediately and bites Omolora for a small amount of damage.
As the fight continues, it bites and claws her further, but she’s able to get in a few hits (damage reduced due to the lack of magical damage capability). Kang eventually gets out and everyone starts to gang up on the demon. It’s a tough fight, but they manage to kill it, with some additional damage to Yash.
The manes does not leave enough ichor for Kang’s purposes.
Turn 14
Omolora suspects the room may have secret doors, but she can’t find any (because actually it has none).
Turn 15
The adventurers move on to Room 31, a long rectangular-ish space with a strange angle on the eastern side. Omolora does find the secret door, but either it’s stuck or nobody can figure out how to open it; the result is the same.
But some wanderers come along - a couple of friendly humans. The group tells them they’re hunting demons, and they know there was one in the next room a while ago, but they can’t figure out how to get in there from here without going through a bunch of zombies to the south.
(In theory, could the adventurers lure these humans into service? I think there should be rules for this in S&W but it doesn’t seem so; O&D does, however that requires offering treasure. Unfortunately, the group isn’t carrying any at the moment.)
Since these humans are friendly, could they at least show Omolora how to open the door (50/50)? Yes, and the group slides on through.
Turn 16
There’s no chance of surprise on either side. Before entering, Kang casts protection from evil on himself. (Upon re-reading OD&D, I believe he is invulnerable to physical contact from a demon while this spell is in effect.)
The demon immediately leaps into the fight, but it realizes that Kang is protected, so it goes for Omolora instead, giving her another bite. After another minute or so, she brings it down! As with the previous manes, there’s not enough ichor remaining for Kang’s egg
The hoard here has a gem worth only 50 gp, plus a few assorted coins, all of which go in Yordi’s backpack.
With no cleric, and down one adventurer, the group does not want to face a pack of zombies, much less get exposed in the arena. They know there are caverns to the east, but those are unmapped, so they’ll take their chances there.
Turn 17
They find themselves in rough-walled caves; Room 32 is empty. The group presses on, looking for a way down.
Turn 18
There’s a trap in Room 33 that Omolora triggers. It doesn’t hurt her, but she’s temporarily caught.
Turn 19
The group spends this turn pulling the thief out of the trap.
Turn 20
At first, Room 34 (a very large cavern) seems empty, with a gummy substance on the ground. There’s a small body of water along the side, though, and when they check it - surprise, skeletons!
The combat lasts quite a while, with no cleric in the group, and while the first few skeletons crumble quickly, a few of them are significantly hardier (rolled high on the HP). Omolora is taken to 0 hp during the first round of the fight, after which Kang (who is still protected) stands in the gap and takes several down in conjunction with Yash; eventually the group triumphs.
Fortunately, it’s mildly worth the danger as the skeletons have a gem worth 100 gp and a few coins, which are entrusted to Kliv.
Turn 21-28
While they are closer than they know to the stairs leading down, they need to get Omolora to safety. I decide that, in her state, she only has a Movement Rating of 6, meaning 120 ft/turn.
Over the next hour and a half or so, the group reaches the exit of the dungeon with no greater challenges than one stuck door and relighting a lantern.
Rewards
Menat, having left early, gets a reduced payout of 15 XP from the gnolls themselves, plus 240 gp (and thus XP) from the treasure recovered from the gnoll lair.
The others get the same, plus 180 XP from the 2 demons and 8 skeletons they defeated and another 191.24 gp (not great). For their exploration bonus from the patron, they each get 90 gp.
In total, Omolora, Yash, and Kang get 214 XP and 153.74 gp each (Kang gets a little more XP due to his attribute bonuses). This isn’t enough to level up, although Yash is getting fairly close to level 3.
Next Steps
Bringing a cleric along would really help here, particularly for turning undead. (Clerics in OD&D cannot cast spells until 2nd leve.) However, I need to think about how they’d fit into this setting ruled by demon lords, full of exiles sent into the hellish wastes. I may also update some rules for binding wounds.
The group also needs to plan more effectively for checking out the arena. While they’re at it, they should remember that their primary objective is supposed to be scouting rather than fighting.