The Cryptorum - Session 4
This should really be the final foray into this part of the dungeon. The adventurers will head back in one more time to scout out the arena and find where the caverns descend to the next level.
Rule Updates
After considering the fiction of Cinderheim, I have decided not to bring in clerics yet, at least until gods become a factor in the campaign. Instead, I’m going to grant mages access to the “Turn Undead” ability, but at one level lower, and applying to demons as well. That is, a 2nd-level magic-user can turn undead or demons as a 1st-level cleric in Swords & Wizardry (which uses their “challenge level”), and a 1st-level magic-user can’t do it at all.
Additionally, characters can spend a full turn resting and spend a hit die, but they can only spend do this as many times in a single day as they have HD. (This is basically the 5e short rest, but 1 HD/turn.) They also must consume a ration, which creates a minor cost and encourages planning. Resting in the dungeon is dangerous, especially in a busy one like this where I roll for wandering encounters at the end of each turn!
Delve
Some time later, the adventurers have regathered, fully recovered their HP, and replenished their supplies of darts, rations, oil, etc. Menat prepares protection from evil this time, rather than sleep, while Kang prepares protection from evil and shield. They head back down, getting the day’s passphrase from the guards so they can be allowed back out once their exploration is complete.
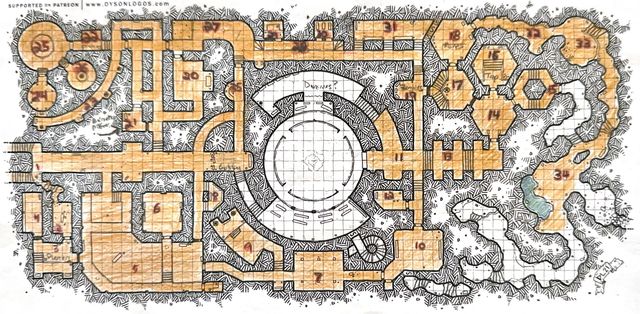
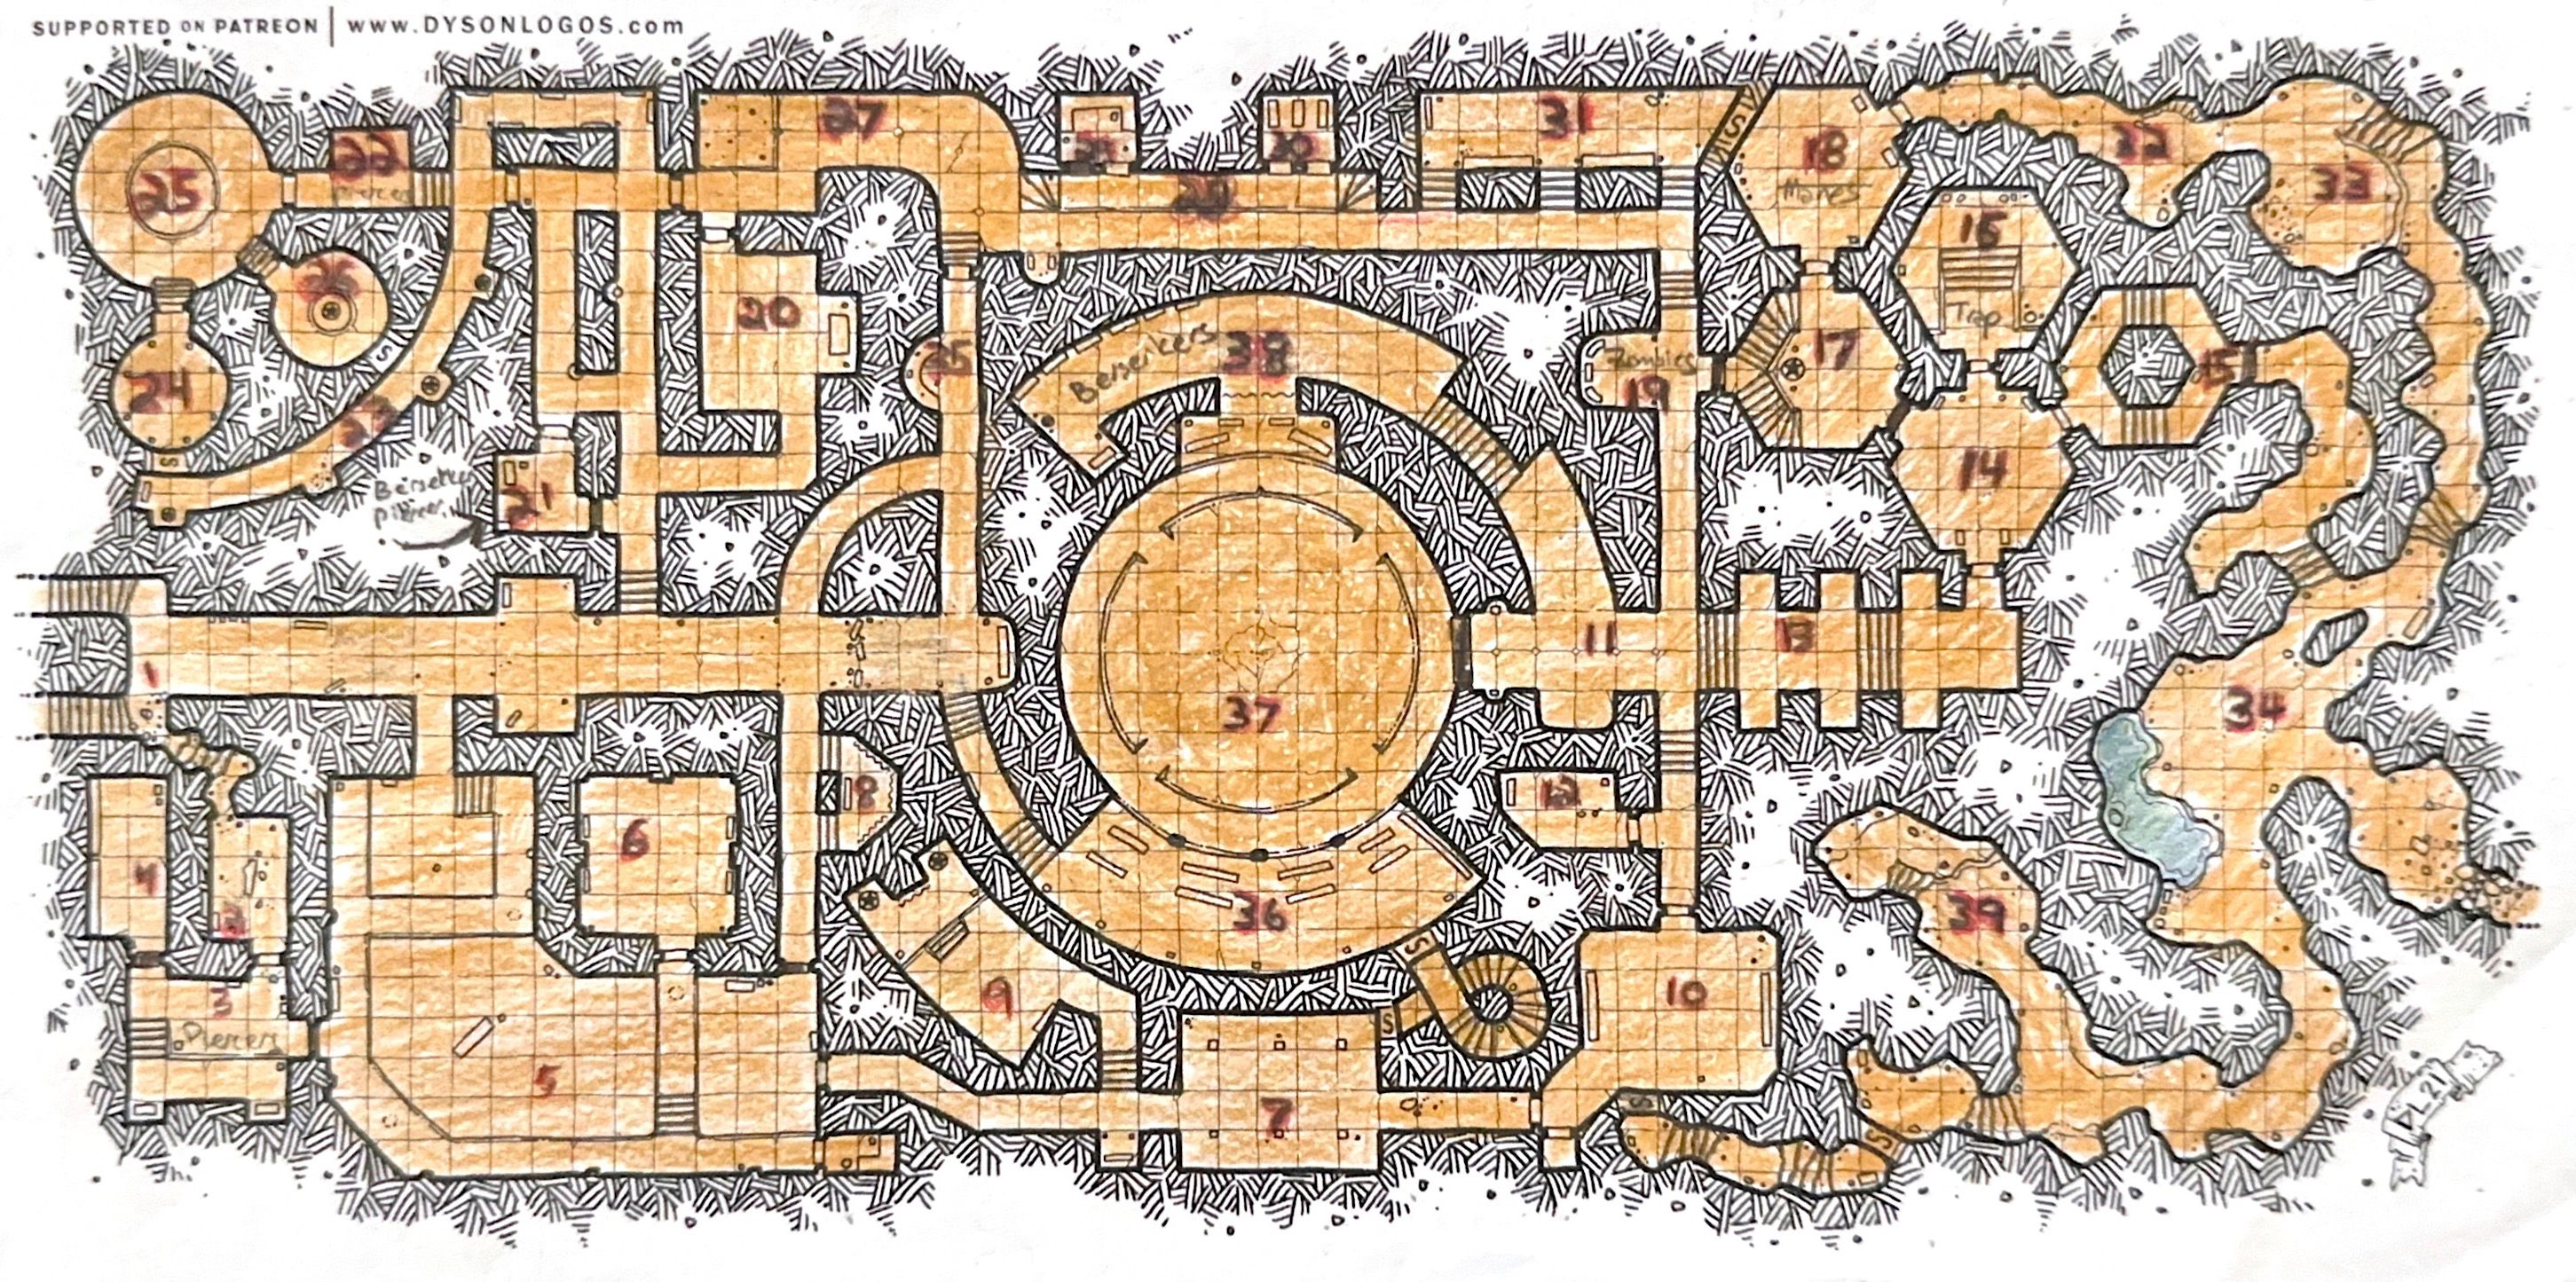 Completed map of the Cryptorum. Cartography by Dyson Logos.
Turn 1
Their planned line of exploration is to head straight down the entry hall (Room 1), then head up the steps that lead to the southern viewing gallery looking down into the arena. Depending on how that goes, they will either jump down into the arena and head further east through the double doors, or retreat and go all the way around the southern side of the dungeon to get around to the northern gallery.
Assuming they survive this and are in good fighting shape afterward, they’ll go into the caverns to look for the way down. Once they find it, they’ll pull out entirely.
So they proceed down this hall towards the former gnoll lair.
Turn 2
The adventurers reach the southern gallery, Room 36. According to Table V.5 in “Solo Dungeon Adventures” (The Strategic Review, Vol. 1, No. 1) the room contains a “monster and treasure”, so I’ll roll on the tables in S&W and get 10 giant rats, plus treasure. Down in the arena, the group can see a fight going on between 3 demons and 3 berserker humans. I decide that this makes it difficult for them to get a good look at the northern gallery for now.
But first they have to decide what to do about the rats, which are actually fleeing (positive reaction roll). The scavenger beasts are not interested in confronting more people who could threaten their nest further in.
Actually, there’s a secret door in here, so I’ll check to see if that gives either of the elves the idea that it might be here (unlikely): no, and that’s not where the rats went anyway (likely they fled down into the arena where they have small holes in the walls to escape through).
The treasure here is 6 gp, 71 cp, and magical chainmail! (Actually, it’s cursed -2 chainmail, but they don’t know that yet.) Fortunately, only one character could wear it, Yash, but he already has plate armor. They’ll have to figure out how to get it out of here, since it weighs too much to fit in a sack. But they have four porters, so I decide they can split it up between two of them (25 lbs each for Yordi and Mako). Mako also takes the coins, which weigh nearly 8 lbs and go in her backpack.
Turn 3
Meanwhile, down in the arena (Room 37), those 3 demons (manes types at 1 HD each) continue to fight the 3 berserkers (also 1 HD each). I decide it’s a 50/50 whether any of them fell in the previous round: yes, but only one side has suffered losses, the demons lost one of theirs. At this point, the adventurers should be able to see across to the northern gallery, and it appears to be empty for now.
This seems like a good opportunity to jump down and slay the demons while they have potential allies. Kang and Menat will stay in the gallery for now, which is outside dart range, while Omolora will attack from range with her shortbow and Yash jumps down. Are the demons surprised (extending their chance to 4-in-6)? Yes, definitely! That means Yash and Omolora get a free attack against them. She misses, which in hindsight is a good outcome because firing into melee could hit the wrong target. Yash, as a 2nd-level fighter, gets two attacks per round against ≤1 HD creatures. One of those polearm swings hits, which is enough to fell a second demon in concert with the berserkers’ attacks. A human falls as well, down to 2 berserkers plus Yash against 1 demon.
Quickly following this, the humans (fighting together now) take down the demon together, ending the fight.
Sweating and breathing hard, how do they react to Yash? They’re confused. He explains that he and his friends have come hunting demons (which is not entirely true but it’s what they’ve been telling other humans here). But these berserkers, corrupted by the presence of a demon lord under the Cryptorum, have unnaturally clawed hands and fanged teeth.
Realizing they’re outnumbered, they turn and run, leaping up into the northern gallery and disappearing from view.
Turn 4
Rather than pursue, the adventurers decide to have Omolora search for treasure while Yash checks the double doors. The two mages will keep an eye on the northern gallery so that the exposed party members can’t be surprised.
Omolora finds scattered coins worth a total of 7 gp and 39 cp, which are placed into Yordi’s bag, plus a magic ring! It’s a ring of mammal control, which they don’t know yet. The group is wary and decides that none of them will put it on immediately; instead, Kang puts it in his backpack. Yash can’t hear anything through the doors and of course they don’t give easily. He’s unable to force them open, even with his crowbar.
Turn 5
They can’t see the berserkers, but they can hear noise up in the northern gallery. Rather than try anything against enemies who have the high ground, they pull back around to Room 1. They’ll take the long way around on the southern side of the dungeon.
Turn 6
They head down through rooms 8 and 5, almost reaching Room 7. But they’re interrupted by an unexpected encounter: 2 dwarves without signs of demonic corruption. The pair hold back and hesitate, realizing they are outnumbered, and the party moves on, keeping an eye on them and protecting the porters as they do so.
Turn 7
As they make their way through Room 7, one of the elves notices the secret door in the northeast corner. It’s stuck, and together Omolora and Yash are able to force it open. These are just some stairs leading down to the southern gallery where they’d previously been, so it’s a shortcut. That would have been handy twenty minutes ago!
Turn 8
Similarly, one of the elves notices the secret door in Room 10! This one is less clear about where it goes, so Omolora listens and hears nothing. But they’re unable to get it open this turn.
Turn 9
Noting its location, they decide to go check out that northern gallery and come back to it later, as they suspect it may lead to the caverns. They head north through the corridor and get to the northern-most extent of Room 11.
Turn 10
Omolora attempts to hide in shadows, but I’ll wait to roll until she encounters something to see if she succeeded (because of course she is just doing her best but won’t know how effective it is). In fact, the two berserkers are here, in Room 38, hiding around the corner from the arena.
As it turns out, she was hiding successfully and doesn’t need to blow her signal whistle. But, again, the group is here to scout, not clear the place out, and she already got the treasure, so she tiptoes back to the group and they can move on.
Turn 11
As planned, they’re heading back to Room 10 to check out that secret door. This time, Yash is able to get the door open, and it leads to a small set of steps in the caverns, down to another secret door. But it’s obvious from this side how to open this one. Omolora doesn’t hear anything, and eventually Menat is able to push it open.
Turn 12
Down in Room 39 within the caverns, it’s empty with a small lower area at the back. This isn’t the main way down, though, and the cavern seems to continue on around, so they’ll keep checking.
Turn 13
Carefully, they pick their way around through the caverns to Room 34, where they find two passages that they haven’t previously checked out - as well as that small body of water that previously held skeletons. They decide to check out the eastern path first.
Turn 14
This is the way down, here in Room 40! It’s blocked by rubble, which they’ll need to bring equipment for. Objectives complete, they’ll try to head back up.
Turn 15
They check out the other passage out of Room 34, which leads up to a door to Room 15.Omolora doesn’t hear anything, but it’s stuck. Yash forces it open.
And yet, as that happens, a wandering encounter appears on the other side: 3 stirges come flying through, passing them into the caverns.
Turn 16+
From here, it’s a simple matter to exit the dungeon, and no more creatures are encountered.
Rewards
In total, they defeated 2 demons themselves for 60 XP total. They also recovered 13 gp, 110 cp, a ring of mammal control, and a cursed -2 chainmail. They also found the way down to the next level, which is a major objective, and explored the remaining 5 rooms for 30 gp each from their patron.
That means they each get 49 XP and 33.525 gp. Since no one donned the cursed chainmail, they don’t need to deal with the consequences of it and can simply discard it. The ring of mammal control is fodder for hiring a henchman or otherwise finding similar uses.
Next Time
For this dungeon level, I’ve been populating a pre-drawn map from Dyson Logos as I go. Next time I plan to use either geomorphs or otherwise randomly generate a dungeon with some other tool. I don’t expect to use “Solo Dungeon Adventures” again; it seems very limited, although of course ground-breaking in its own way and set the template for so many tools that came later.
Also, I want to review my exploration procedures, particularly in terms of how long searching and traveling between rooms should take. The binding-wounds and “turn undead/fiends” rules did not become relevant this time, so I haven’t been able to test them yet.