The Cryptorum - Session 5
Rather than (mostly) randomly stocking a dungeon as I go, this play session will involve using a randomly-generated dungeon from Donjon. While Swords & Wizardry Complete is based on OD&D, it’s damn near AD&D, so I used the AD&D Random Dungeon Generator at Donjon to create a dungeon for me to explore via solo play. I haven’t read ahead, other than to pick my entrance point and set the general parameters (level 2 dungeon, abyssal-themed).
Delve Preparation
After the previous session, no one has leveled up. They expended so few resources that, other than paying the daily wage of the four porters again and buying a few more rations, they don’t need to replenish. They won’t be getting the room bonus from their patron, but the mages in particular do hope to discover some magical resources (e.g. scrolls) for their own use.
Kang will also continue to carry the ring of mammal control to offer as magical trade fodder in case they run into anyone likely to be lured into service. I’ll try to refer back to OD&D (in the form of Fantasy Medieval Campaigns by Marcia B.) if that situation arises for guidance on how to handle it. In general, as I’ve gotten my feet back under me with S&W (after years away from it), I’m more willing to make some additional rulings or bring in other sources as needed. With that in mind, not all monsters will make a morale roll after their first loss anymore, only unintelligent beasts like rats, rather than goblins and demons.
Into the Dungeon
Having mostly pacified the first level of the Cryptorum, I’ll only roll twice for wandering encounters on the way to the caverns. Within level 2, though, those rolls will continue to occur at the end of every turn.
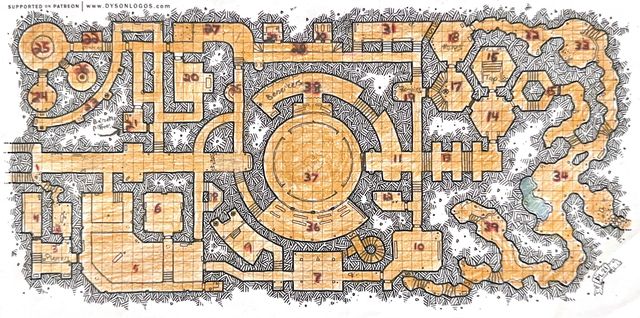
 Explored section of Cryptorum level 2. Map generated by Donjon.
The Entrance
Sure enough, early in the dungeon, they run into a single gnoll, who is as aggressive as we might expect. The encounter begins at only 10’ distance, and neither side is surprised. The fight lasts several minutes, during which time the group takes no damage. Omolora and Yash team up to kill it. As a wandering encounter, it doesn’t carry any treasure (that’s what the next level is for).
Turn 1
As noted, I picked the group’s entrance point, using the northeast corner. There are other egress points, but they all lead to lower points in the dungeon or perhaps undisclosed entries from the surface (to be determined randomly if and when they’re found.)
The first turn is spent moving to the center of Room 1. It’s quite cold down here, with shadows everywhere (witchlight every 20’) so they do not need the lanterns right now. Now I check the room key:
A shallow pit lies in the north-west corner of the room, and several iron cages are scattered throughout the room.
Turn 2
During this turn, Omolora will search the pit while Kang checks the cages, both looking for anything interesting or valuable. Yash keeps an eye out for trouble, staying near them, while Menat stays with the porters.
However, the searches don’t turn up anything. They’ll keep going west.
Turn 3
The party now enters Room 2 where there’s more happening!
A hole has been blasted into the north wall, and a pile of wax blobs lies in the north-west corner of the room.
More urgently, there are 3 zombies here, for whom I will not roll a reaction: they simply attack. Again, no one is surprised, and the encounter is at a full 60’ distance (the maximum underground).
As a 2nd-level mage, Kang has the turn undead ability (per my house rules in the previous session, specifically for this setting) but as a 1st-level cleric. This means that his powers for now do not extend to zombies (at CL 2). Additionally, they are immune to Menat’s sleep spell. The party will have to fight them.
The battle lasts for several minutes, and the other party members notice Kang’s slowness to act. After a bit, he does finally cast protection from evil which will last for 2 hours (12 turns, expiring turn 15). Even then, he waits to move into melee range, which might have ended the fight sooner and reduced the amount of damage his friends took.
When it’s over, Yash and Omolora are both at only 1 HP, while Kang and Menat (and of course the porters) are unharmed.
Turn 4
The two injured adventurers take a turn to rest and bind their wounds, spending a hit die each to recover. Yash recovers 6 hp, getting back to 7 total (of his max of 14), while Omolora recovers 3, getting back to 4 total (of her max of 10).
Menat looks around for treasure here, and finds 2000 cp (worth 20gp total) and 200 pp (worth 1000 gp total). Kang inspects the wax blobs. Perhaps they are the remnants of some lost souls, or some long-forgotten supply cache? However, 2000 cp are not worth carrying, as that would take up 200 lbs of carry weight which alone would be the majority of the porters’ total capacity. They’ll leave that for now, taking only the platinum pieces (in Yordi’s sack).
Turn 5
The group now moves further west, where they can see the cavern turns south.
However, as they reach this area, they encounter “3 x NPC and 6 x Henchmen, consumed by disease and madness” at a distance of 60’. The NPCs wait to see how the party reacts, but of course they aren’t here to fight things. No fight ensues, fortunately.
I’m curious whether these NPCs, which I’ll treat as another adventuring party, might be interested in working for the party. I roll a d3 to see their level (since they’re on a level 2 dungeon), and they’re level 3, so that wouldn’t interest them despite being a smaller party, not to mention that they are “consumed by disease and madness.”
Everyone watches each other warily as they move on.
Turn 6
The group just reaches the northern side of Room 12, where there’s a well. It’s dry, and in fact they can’t even see the bottom of it. That’s an interesting fact to note; perhaps it leads to something they could explore? But Kang throws in a small rock, and they never hear it hit the bottom.
Turn 7
Omolora explores the rest of the room:
Someone has scrawled “Death comes on silent wings” in draconic script on the west wall.
As a 3rd-level thief, she can “figure out the gist of most written languages,” but this ability is called “Read Normal Languages”. I’ll check the oracle: can she read Draconic (unlikely)? Yes, actually!
But what does this reference to silent wings mean? She discusses it with Kang and Menat and they resolve to keep an eye out for flying creatures.
Turn 8
The group reaches Room 6:
Several square holes are cut into the north and south walls, and someone has scrawled “Good spot for trap” in goblin runes on the north wall.
Omolora can definitely read goblin, and the words make her nervous.
Turn 9
She spends the whole turn inspecting the square holes, as well as every other suspicious spot on the walls, but finds no traps.
As that search wraps up, a zombie shambles up, trying to lure the party into an ambush. Since I’d previously noted that they were on extra high alert, I reduce their chance of surprise to 1-in-6, and it turns out not to matter: they see the undead creature approaching and the encounter begins at 20’.
Since Omolora was searching, she definitely was not hiding in shadows and still won’t get a chance to backstab. Menat and Kang both throw three darts each; all of Menat’s hit, and one of Kang’s, and before it even has a chance to counterattack, Omolora slices it in half and ends the threat.
Turn 10
The group can see the cavern stretching out into the distance (off the map) and decides to head further south. (Ultimately, this is me making a mistake due to a zoomed-in map.) This gets them back to Room 12.
Turn 11
The group reaches Room 13:
Someone has scrawled a fell glyph on the east wall, and a rotting odor fills the room.
Kang and Menat both inspect the glyph, but if it has any magical significance, they can’t determine it. He does copy it down, however, hoping that it may be of use in later magical research.
Turn 12
They all search the room but, other than that odor, nothing interesting is found.
Turn 13
This time they move northeast to Room 9:
A tapestry of arcane patterns hangs from the east wall, and an overwhelming stench fills the room.
This must be the source of the odor… or perhaps the 3 giant centipedes are. The centipedes pay no attention to the humanoids in their space.
Turn 14
Menat searches the room and finds 2000 cp (worth 20 gp) and a full 500 gp. As before, they’re not taking the copper, but Mako will carry the gold pieces. This fills her sack and most of her backpack.
At the same time, Omolora attempts to blend into the shadows cast by the witchlight, watching for a potential ambush, as Yash stands in the gap. Kang notes the arcane pattern from the tapestry to study later.
Turn 15
This just gets them into Room 10. (Kang’s protection from evil spell will expire here.)
A dozen brigands sit in the room, and they are surprised! The party flees to the south. (I notice here a rule I’d forgotten: “If a group is surprised, each person (or creature) in it has a 1-in-4 chance to drop one or more handheld items!” That doesn’t matter this time, as the adventurers are not sticking around.)
Turn 16
Here in Room 16, the adventurers find a circle of standing stones in front of a group of draconic faces in the east wall. Behind them, the brigands stayed in their camp rather than giving chase in such a dangerous place.
There are also 9 giant centipedes here, but like their cousins back in Room 9, they seem to pay the party no mind.
Turn 17
Yash and Menat keep a close eye on the centipedes while Kang studies the standing stones and draconic faces. Omolora searches the room, finding 2000 cp (which they’ll leave as usual) and, more importantly, a wand of negation! This doesn’t show up in the S&W Complete book, so I check Fantasy Medieval Campaigns again:
Negation negates the effects of wands or of staûs, though the latter at a 3/4 rate.
Not a full counterspell, but handy to have regardless! This is seriously valuable, and they’ll have to decide what to do with it later. For now, Kang puts it in his backpack.
Turn 18
Room 19 is so close that they can move and search in the same turn.
A set of demonic war masks hangs on the west wall, and someone has scrawled “Never trust an elf” in dwarvish runes on the west wall.
Omolora scowls at this and makes a rude gesture back at it. Are the demonic war masks worth anything (50/50)? No, not particularly. And perhaps they could invite trouble, even in demon-ruled Cinderheim.
Turn 19
Similarly, Room 22 is so close that they don’t need to spend a turn moving to it. Omolora starts to search for treasure, but the 10 giant centipedes give her pause - and this time, they seem to be watching the group. They’ll move on, as there doesn’t seem to be anything particularly worth fighting over.
Somebody else seems to disagree, as the adventuring party from before makes their way in. This time, I decide to give them a -1 to their reaction roll, due to a combination of their madness and disease as well as a competitive spirit against a slightly smaller, lower-level party: they’re cautious, waiting to see what our adventurers do.
Again, though, no fight ensues.
Turn 20
The adventurers make their way over to Room 21 with Omolora scouting ahead from the shadows.
Turn 21
This time, Menat does the treasure searching while the others keep watch.
Part of the ceiling has collapsed into the room, and a group of draconic faces have been carved into the east wall.
Nothing of value turns up. They converse quietly among themselves about the significance of the draconic faces seen in multiple places here under the Cryptorum.
Turn 22
Omolora leads them to Room 18:
The room has a high domed ceiling, and a tapping sound fills the room.
It takes a minute to identify the source of that tapping sound, which seems to come from a pair of fire beetles who are stomping around on some coins. After a few moments (because both groups are surprised), the beasts notice the party at only a 10’ distance, including Omolora, and bare their mandibles in a warning. Omolora actually drops her bastard sword.
Yash wants those coins, though, and it’s time to roll initiative! The beetles go first, and over the course of several minutes, they nearly kill Menat and Yash (who are reduced to 2 and 1 hp, respectively) - and they do kill Kang. The selfish human mage’s body is left behind as the party flees the unexpectedly ferocious creatures.
Turn 23
As with other creatures that have fled, the party will end up in a random adjacent room. Rolling randomly, I determine this is Room 12 with the warning about death on silent wings. Do fire beetles have wings? Other beetles do, and they fly as well; this must be what the warning was about. Too bad Kang paid so little attention to it.
The rest of the party pays a different sort of price, as they have to leave behind the body of their friend and the two magic items he was carrying. The two injured party members spend the turn binding their wounds and recovering. Menat recovers her full hp, but Yash only recovers 2 more, getting to 3 total. It’s too dangerous to go back for the body; likely some other adventurers will find it and recover the magic items themselves.
Checking the map, I see it’ll take them 4 turns to get back to the entrance to this level, and they’ll have to watch for wandering encounters here as well as back in level 1.
Immediately, they encounter a fire beetle. Not another one, I think; it has chased them, influenced by some evil shrine they passed on the way. This time Yash drops his polearm in surprise upon seeing the beetle 40’ away. Is this the injured one (unlikely)? Definitely not, sadly.
While the group is surprised, it scurries up to them, mandibles clicking, and with one swift bite, it kills Menat. In response, Yash misses but Omolora’s blade finds a spot in its carapace and hurts it badly. The porters turn to flee, and the adventurers follow suit, leaving another body behind.
No more encounters occur before they can reach the safety of the surface.
Rewards
Half the party has been killed, and they lost two magic items as well. The Cryptorum deserves its name, they say. Yash wonders if he might not be at fault, as he wanted the coins, but in reality, they all did. And it’s not as if Kang put himself at risk for the others, either.
But the remaining two adventurers, Omolora and Yash, split the spoils. They brought back 500 gp and 200pp, worth 1500 gp total, or 750 gp each (and XP as well). That’s more than enough for Yash to reach 3rd level, improving to 18 hp and a saving throw of 13+. Omolora is still 3rd level, but she’s quite close to 4th level at this point.
Next Steps
Oddly, this reinvigorated my enthusiasm for OD&D, as I was reminded how deadly it can be and how important it is to think through the adventurers’ approach. The dungeon contained significantly more treasure, which is largely due to the different generator but also, in my mind, fits the fiction: the upper level had been picked over countless times and thus would have had only minor scraps remaining.
That said, I think this draws a close to my time with this particular group. I’ve been playing in Cinderheim for a bit and I’m ready to try some other setting material. Not to mention, I have been making a bunch of notes about rules and mechanics I want to try, so that’s coming very soon!