The Doomed - Session 4
This is the story of how my warband came to an ignominious end.
Doom Track
Just as last time, one of the warband members has sunk into a bad mental state:
Bleak Outlook: There really doesn’t seem to be any point to all this. Any QL4+ units you hire for this battle are treated as QL5+ but cost 1 point less than normal.
This will still be Wigg, the only QL4+ unit I have.
Warband
Kullax has achieved 28 Renown to spend on gear and followers. That ends up breaking down to 10 on Followers and the rest on gear and miscellaneous upgrades.
- Kullax the Slayer (Fierce, QL3)
- Back on his feet and looking for something worth killing.
- Massacre: At the end of his turn, any allies that can see a downed enemy make a free move or fight.
- Signal: At the end of his turn, a Readied Ally he can see activates and carries out their turn [1 point]
- Fusion Gun (R3x1 - Bane: Target saves as if it had QL5) [3 points]
- Hidden Blade (M2x1 - x2 Damage when Attacking directly after Moving) [2 points, Max 1]
- Wigg the Predator (Precise, QL5) [2pts]
- Tagging along out of loyalty but without any other real purpose.
- Oblivion: Bleak Outlook (treat as QL5 but costs 1 less point)
- Shardcaster (R3x1) [2 points]
- Blade (M2x1) [1 point]
- Hodug the Oathbound (Tough, QL5) [3pts]
- Death before defeat.
- Defender: The unit makes saves at QL3 if he can see the Leader
- Impacter (M1x6 - Cannot be used on the last Action of your Turn or as a Free Action) [3 points, Max 1]
- Piercer (R1x2) [1 point]
- Jhish the Blooded (Nimble, QL5) [3pts]
- Proving herself with plenty of enthusiasm.
- Frenzy: At the end of her turn, all enemies in melee with her take 1 Damage
- Reaper Blade (M1x2 - Make a free action when she takes out an enemy with this weapon) [2 points]
- Link: An ally she can see may perform a free move [1 point]
- Piercer (R1x2) [1 point]
- Barris the Spotter (QL5) [2pts]
- Survived once and getting a taste for it.
- Sensor: At the end of the Spotter’s turn, a Readied Ally in LOS can make a free ranged attack at an enemy the Spotter can see
- Piercer (R1x2) [1 point]
Scenario Setup
I decided to roll without a Conflict this time and just use a Horror. I went with the last one listed in the book.
Technobasilisk (Tough, QL3)
- Shatterbeam (R2x2 - x2 Damage vs Exhausted targets)
- Claws (M2x3)
- Glare: After every Action performed by a Warband member, if they can draw LoS to the Technobasilisk, that unit must Roll their QL or become Exhausted.
- Petrify: At the start of a Round, Warband members that can draw LoS to the Technobasilisk only Ready themselves if they pass a QL Roll, otherwise the units remain Exhausted
This is a singular Horror, with no minions, but its Nexuses are auxiliary cybernetic eyes, scattered around the battlefield. In the end of round response, it can sometimes use them to attack its enemies.
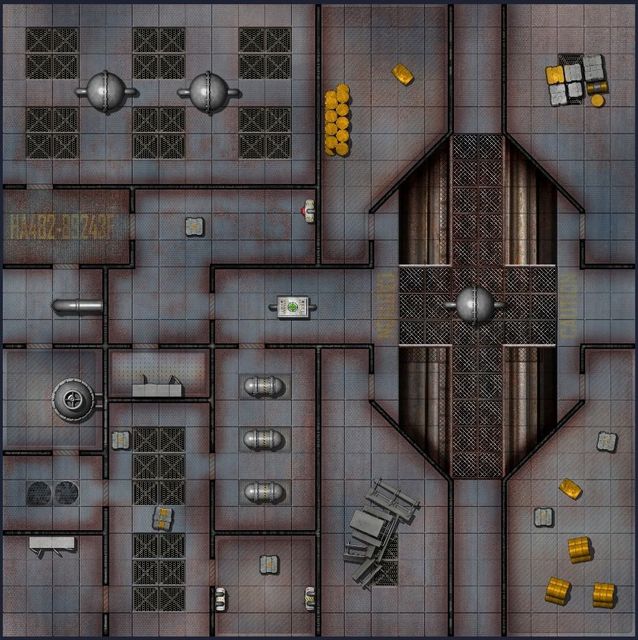
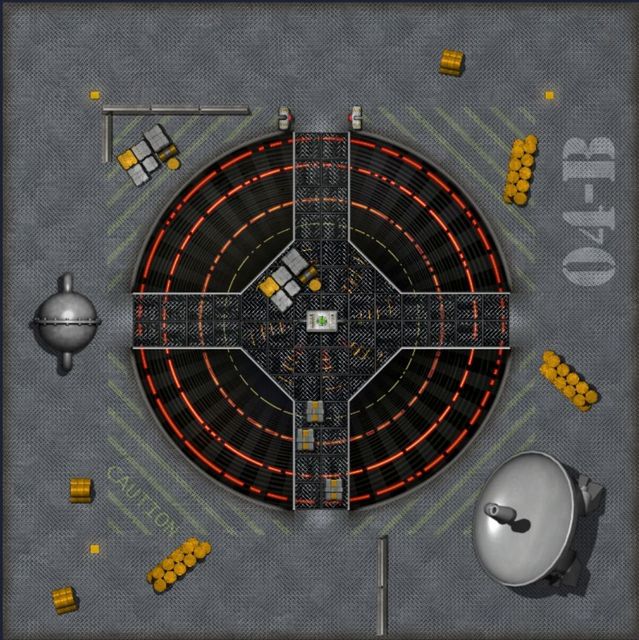
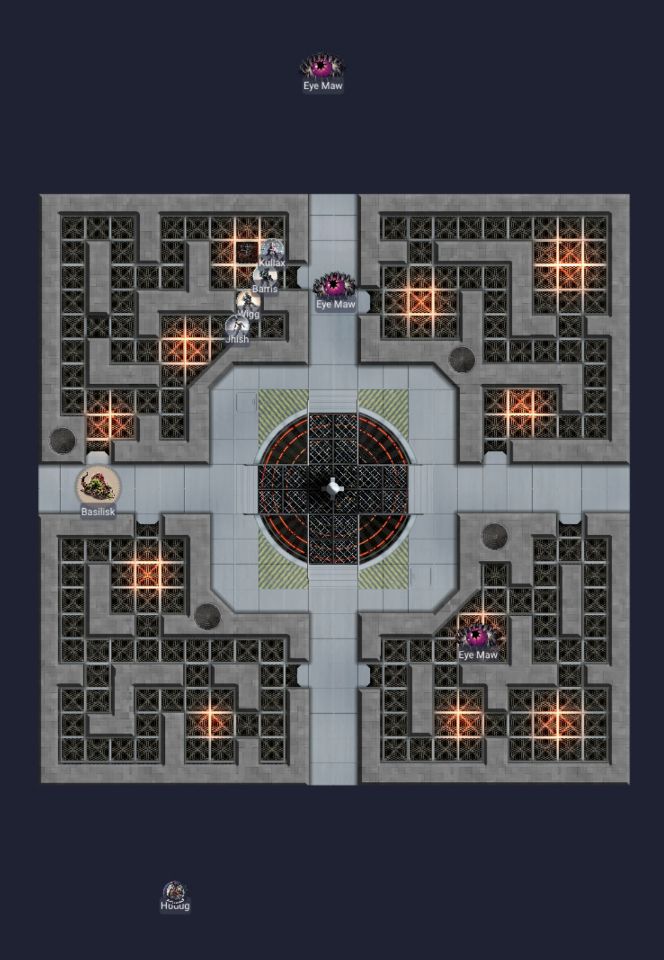
I used the Ducting Spaces map this time without any extra decor, since it has a good bit of that already. For the Technobasilisk, I had one already from Map Crow via his Patreon. And the Eye Maw (Nexus) tokens came from Caeora’s Patreon as well.
Playing the Scenario
The warband enters via the southern corridor, with the Technobasilisk in the center and the Nexuses in the northern corridor as well as ducts in the southwest and southeast.
Round 1
Petrify doesn’t apply yet as there are no enemies on the board.
Jhish enters the board and moves to a doorway, but gets caught in the glare of the horror she can see off near the central fan area.
The Technobasilisk shoots her with its Shatterbeam, hitting her through partial concealment and throwing her back into the ducting. It plods along slowly towards her.
Wigg follows behind but also loses themselves in the Technobasilisk’s glare.
Kullax moves more carefully, avoiding the glare, getting past Jhish before then helping her back up on her feet.
Hodug doesn’t get caught in the glare either, but is moving somewhat slowly as a consequence.
Barris rushes past the others into the ducting, looking for the auxiliary eyes known to be in this area.
At the end of the round, the warband isn’t in sight of any of the Nexuses, so the Technobasilisk can’t shoot through any of them.
Round 2
Wigg is still caught by the Petrify from the Technobasilisk, so they can’t Ready themselves.
Kullax falls back a bit to Wigg, trying to pull them out from the horror’s glare, but fails to do so ((I had them roll a QL check.))
The Technobasilisk uses this opportunity to fire a Shatterbeam at Wigg, taking them down but with no further effect, then advances slowly.
Jhish activates her Link to give Kullax a free move, allowing him to move past Barris (and, more importantly, away from the monster). She pulls back further into the ducting herself.
Hodug ducks past the Technobasilisk and gets Wigg back on their feet before moving on. It’s important not to let that thing get a second shot on someone.
Barris comes around a corner, finds the Nexus, and takes it out with his Piercer. The Technobasilisk loses its Glare ability for the rest of the round, but that’s over now anyway.
At the end of the round, neither of the remaining Nexuses can see a warband member so they cannot fire on them.
Round 3
No warband member can see the horror, so Petrify will not apply.
Wigg moves slowly, getting further into this southwestern area seeking cover from the monster. But their slowness, perhaps influenced by that bleak outlook, keeps them from getting as deep as they need to.
So the Technobasilisk is able to get into the southern corridor and take Wigg down again with the Shatterbeam. But because they weren’t down at the time, they survive with no shock effect.
Kullax pulls Wigg back to their feet quickly, avoiding the horror’s Glare while they do so. This time I remember to use the Massacre ability, giving Wigg a free Move that they’re unable to take advantage of. ((I forget to have Hodug do so, though.))
Hodug now shoots the basilisk with his Piercer, taking it down and throwing it against the doorway behind it. He takes advantage of the momentary lack of a glare and advances past Barris. Jhish catches up to Hodug and the spotter before Barris moves into the northwestern ducting looking for another Nexus.
At the end of the round, the Technobasilisk gets a free move and attack, but since it’s down, it can do neither.
Round 4
Again, the fact that the monster is wounded prevents Petrify from applying to anyone.
Wigg moves past a couple of warband members, headed north.
At this point, the Technobasilisk struggles back to its feet, recovering successfully, and firing its Shatterbeam at Kullax (who is able to avoid taking any damage). It can’t fit into the ducting to pursue, however.
Kullax fires his Fusion Gun at the approaching monster and misses, then pulls back and out of sight. Hodug follows, as does Jhish who makes it into the next sector.
The warband has managed to stay out of sight of the auxiliary eyes and thus take no attacks from them at the end of the round.
Round 5
Since the horror can’t see any enemies, Petrify does not apply.
Wigg moves to the north but isn’t able to get eyes on the Nexus (pun intended).
The Technobasilisk moves back towards the center area, tracking towards Kullax. It gets a bead on Hodug, taking him down with its Shatterbeam, before advancing on the Oathbound and his leader.
Kullax strikes at the basilisk with his Hidden Blade (M2x1), hitting it for enough damage to wound it temporarily. But in doing so, the monster lashes out and rakes Hodug with its massive Claws (M2x3), taking him out of the fight for good. Shouting in pain, he retreats, pulling Barris along with him. Jhish and Barris move further into the ducting, working their way around.
This time at the end of the round, the Technobasilisk performs an additional Turn as if it had not yet activated. It snarls as it stands back up and chases Kullax before hitting the leader with its Shatterbeam and knocking him down. As a shock effect, Kullax gives a free move to an ally. Thus, Barris moves up to get line-of-sight on the northern Nexus.
Round 6
Despite the monster’s attempt to Petrify him, Kullax saves himself from its effect and does not stay Exhausted.
Kullax then pulls himself back on his feet, avoiding the basilisk’s glare, and advancing past the Spotter. Here, he gives Barris the signal, allowing him to take his turn immediately. He takes a shot on the Nexus, misses, and ducks back around a corner.
The Technobasilisk again moves back to center, tracking Jhish.
Wigg comes around from the ducting and fires their Shardcaster at the Nexus but is unable to destroy it. Jhish runs past and attacks unsuccessfully with her Reaper Blade before entering a Frenzy to Take Out the Nexus. In a rage, the horror looks around to do damage to any enemies it can see, but there are none. Jhish’s Reaper Blade gives her a free action now and she moves into the northeastern section of ducting.
The remaining Nexus has no LOS to an enemy unit, so it cannot use a Shatterbeam on anyone.
((At this point, I am feeling pretty confident about how the scenario is going!))
Round 7
The warband has hidden itself well enough at the moment that the Technobasilisk cannot Petrify any of them.
Jhish nimbly weaves through the ducting, advancing around several corners.
The Technobasilisk scurries into the northern corridor, finding its prey. Its Shatterbeam hits Wigg, who gets a stray shot off before being Taken Out.
Kullax storms through the horror’s glare as he pulls a Hidden Blade, stabbing it several times but unable to damage its tough hide. Barris comes around a corner ((and does an unnecessary Recovery on Kullax for some reason)) before missing the basilisk with his Piercer.
But in response as the round ends, the Technobasilisk gets a chance to take an action, which it uses to fire its Shatterbeam once more at Kullax, knocking him off his feet. The warband leader is able to crawl out of sight from the basilisk before collapsing.
Round 8
Barris is Petrified this round by the Technobasilisk and remains Exhausted.
Kullax recovers from the hit he took in the last round and rushes back in to fight the monster, but his blade still cannot succeed in damaging it.
The Technobasilisk slashes Kullax with Claws, causing the leader to bleed out for the rest of the battle. It then looks up and wounds Barris with its Shatterbeam (R2x4), knocking him down.
Jhish is moving more slowly now, having difficulty picking her way forward through the ducting.
At the end of the round, the Technobasilisk can once more take an additional Turn as if it had not yet activated, taking Barris out completely with a powerful Shatterbeam.
Round 9
Since Jhish is hidden, she can’t be Petrified. She runs across the eastern corridor, just barely making it into the ducting entrance.
The Technobasilisk smells victory and rushes forward, flashing its Shatterbeam and knocking Jhish off her feet. As the round ends, the horror gets another move and attack, which it uses to advance implacably and take out another victim with its Claws.
Casualties
This one is bad.
- Kullax is MIA (missing in action) once again.
- Barris comes to his senses later, lost and not knowing where he is.
- Wigg and Hodug both are dead, gone forever from this plane of existence.
- Jhish is further scarred, perhaps mentally, from the slaughter of her friends.
Narratively, this feels like the right place to end the campaign. The warband has been decimated, with only Jhish left to tell the tale.
That said, I enjoyed this a great deal! The actual hardcover hasn’t arrived yet; once it does, I would like to give this a spin again with a new warband. I might play with paper minis and terrain, or continue with a virtual tabletop, but I look forward to exploring The Doomed more in the future.