5 Parsecs From Home - Campaign Turn 20
All of their preparations and searching have come down to this moment. This is the culmination of a quest that started back on Campaign Turn 15. The crew of the Acidic Angel is attempting to smuggle - one might say rescue - a genetically-engineered creature that has become intelligent on behalf of the scientist who originally uplifted the creature. Affectionaly called “the Funky Lil Guy” (FLG) by the crew, it’s time to get it where it belongs.
Travel Steps
The crew is leaving Mackensen III to a secret, undeveloped world where the FLG can safely live out its existence. Officially called Maude VI, the planet has no significant settlements there by humans or other intelligent species, whether or not they’re affiliated with Unity.
Travel costs 5 credits for fuel, additional charts, and other supplies. With this being such an out-of-the-way fringe world, the crew has a lot of time to play cards and clean their guns. They’re able to repair one damaged item, which is a Grapple Launcher they got so long ago. The world lacks starship repair facilities; hopefully nothing damages the ship too much, or we could be here a whole. The crew had two rivals on the previous world: some raiders and another group that had gotten into a fight with Reyna Crowder. Scans show that those raiders have followed the Acidic Angel here; we’ll have to take steps to ensure they don’t interfere with this mission.
World Steps
Here on Maude VI, they’ll spend 1 credit on upkeep for food and whatnot at the primitive spaceport. Before getting to trading, then, the crew is at 20 credits.
They have a few sets of trade goods; one turns out to have become damaged in transit and is now worthless, but the other is worth 3 credits. Surprisingly, one of the personal trinkets they’d found on a battlefield belongs to a working-class local who is grateful enough give them Valuable Materials worth 5 credits in exchange. Finally, the cargo hold on the Acidic Angel carries a shipment from the previous world worth 2 credits, leaving the crew at 30 credits total.
Crew Tasks
There isn’t really much to do here, but there are some necessary things to be handled.
- Ellen Swales: Decoy
- Having dealt with them before, Swales spends some time and effort ensuring the raiders can’t find them.
- Reyna Crowder: Explore
- Her favorite thing to do is get out and see the sights of whatever world they visit.
- She makes a useful contact that gives us a bonus next campaign turn to Recruit, Find a Patron, or Track a Rival. This won’t matter much mechanically, since I do not plan to have another turn for this campaign.
- Shurl Reeves: Trade
- As always, she takes care of most of their merchant work.
- Once all the wheeling and dealing is copmplete, she ends up with a lot of blinking lights in the form of… another Grapple Launcher.
- We don’t need that, so instead she keeps working the local market but this just ends up as a useless trinket. This wasn’t the best outcome she’s had.
- Thornton Darby: Trade
- Somebody ends up giving Darby a copy of that same damn useless trinket.
- Saige Alden: Train
- She’ll spend some time with her weaponry (+1 XP).
- Robert Shelby: Train
- The rookie continues to hit the gym (+1 XP).
Battle
Since this quest uses the Expanded Quest Progression options from the Freelancer’s Handbook, I went back to review what it says about Quest Conclusions on p. 36:
This final battle is always a Straight Up Fight with no special conditions.
You must add +1 to the number of enemies encountered (plus any modifications from the Quest Progression table above), and the enemy is always accompanied by a Unique Individual. They will not test Morale during this battle — every opponent is here to fight to the death.
There are some other notes about rewards, but that’s getting ahead of myself.
As per my narrative for this quest, it’s a Deliver mission for the Funky Lil Guy.
- Deployment Conditions: Toxic environment: whenever a combatant is Stunned, roll 1d6+Savvy (0 for enemies). On a 3-, they become a casualty.
- Notable Sights: Curious item: there’s something worth 2 credits located 6” southeast of the center of the battlefield.
- Objective: Deliver: a crew member (Swales, in this case) is carrying a package (the FLG). The package must be delivered to the exact center of the battlefield, which will require an action. If we drive off all enemies, we win if the package is undamaged.
- Enemies: Hired Muscle
- As expected, our enemies have spent lots of credits on sending people to stop us. They’re good at what they do, and thus we’re at -1 to seize the initiative.
- War Bots: The CIM model War Bot, nicknamed ‘The Demon’, is a mainstay of high-tech, mech-infantry forces.
- Fearless: Never subject to Morale tests.
- Armored Shell: 5+ Saving Throw
- Following Fire: When firing weapons with 1 shot per round, if the initial shot hits but fails to knock out the target, the War Bot immediately fires again at the same target (only once).
- We’ll face a total of 8 War Bot enemies: 6 based on Strength-adjusted Enemies, plus 1 for the enemy type, plus 1 from the Quest Progression.
- The Unique Individual is that Hakshan Investigator! (The dice did this, I swear, no story points or fudging involved!)
- But he’s leveled up now: He’s Driven (if the Notable Sight is unclaimed on the table, he gets a +1 to shooting and brawling rolls), and he’s got an Armored Suit (not affected by the toxic environment and all weapons count as Damage +0 against the suit).
- Maybe he’s been tracking this creature for its usefulness to his species.
- Enemy AI: Aggressive for the War Bots, Defensive for the Hakshan Investigator.
- Aggressive Base Condition: If able to engage an opponent in brawling combat this round, advance to do so.
- Defensive Base condition: If in Cover and opponents in the open are visible, remain in position and fire.
- Profiles: 1 Captain, 1 Lieutenant, 2 Specialists, 4 Basic Bots, and the Hakshan Investigator.
- Captain: Speed 4”, Combat +2, Toughness 5, Saving Throw 4+, Infantry Laser, Ripper Sword
- Lieutenant: Speed 4”, Combat +2, Toughness 4, Saving Throw 4+, Infantry Laser, Blade
- Specialist: Speed 4”, Combat +1, Toughness 4, Saving Throw 5+, Plasma Rifle, Blade
- Basic Bot: Speed 4”, Combat +1, Toughness 4, Saving Throw 5+, Infantry Laser, Blade
- Hakshan Investigator: Speed 5”, Combat +1 (Driven), Toughness 4 (Armored Suit), Luck 1, Plasma Rifle, Blade
- Weapons:
- Blade: Damage +1, Melee
- Infantry Laser: Range 30”, Shots 1, Damage +0, Snap Shot
- Plasma Rifle: Range 20”, Shots 2, Damage +1 Focused, Piercing, Overheat
- Ripper Sword: Damage +2, Melee
As this is the finale, I’m definitely using a map, and doing something way different: using Gabriel Pickard’s Quick Encounters: Jungle 2 (specifically the Jungle Sparse Clearing map). I’ll add the Notable Sight to the map, as well as a stone marker for the package’s destination. I’m defining it as a 36” x 36” map to give us lots of room to play. Clusters of foliage count as Areas, meaning they block light of sight, and are designated as Difficult Terrain. Escarpments are 2” high.
The crew will deploy from the south edge of the map (towards the southwest corner), so the bots and the alien will come in from the north.
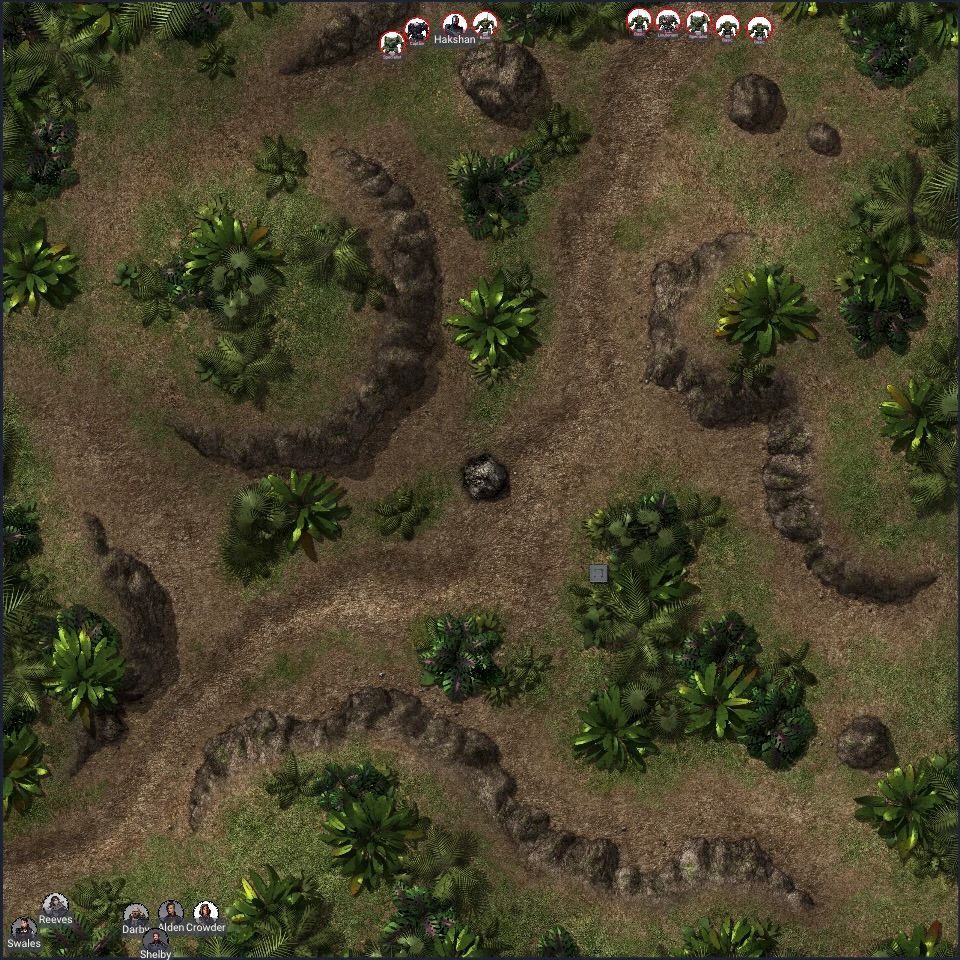
The crew will attempt to seize the initiative, rolling 2d6 +3 (Savvy) -1 (Hired Muscle) +1 (Scanner bot) = 12, success! Swales anticipates trouble, and when Crowder gives her the heads-up that they have contacts from the scanner bot, she gets everybody on their toes. They’ll get a free move action before the battle begins, and the enemy will not get to deploy into a better tactical position.
Round 1
As the round begins, Crowder reacts first and dashes up next to a small escarpment on the west half of the map. If the crew can get the high ground, the enemy should know not to try anything.
The War Bots are not so easily dissuaded, and they’ll respond aggressively. The western squad will stay within cover, but at this range that’s easy enough. The eastern squad will dash towards Crowder by the fastest route available. The Hakshan Investigator will advance, staying in cover.
Time for the rest of the crew to get moving. Shelby will stay on the southern rise, ready for the enemy to come into view. (I decide that the bots are not tall enough to be visible past the 2” escarpments). Alden follows Crowder closely, hoping to intercept the Hakshan. Darby will advance under Shelby’s covering view. Reeves will cut through the foliage on the west, which will be slow moving but keep her out of sight of the enemy. Swales moves onto the same southern rise as Shelby; when it’s clear enough, she’ll dash to the center of the battlefield to deliver the package, but that’s too risky just yet.
Round 2
Before the enemy gets moving, Crowder moves up onto the northwest rise. She’s behind a cluster of foliage, so she should stay hidden for now from ranged attacks. Shelby will hold his activation, waiting for the enemy to come into view.
The Hakshan Investigator will advance to the next cover position; it’s a good thing nobody broke for the center because he’s got a clear shot of that area. The western squad of War Bots (a Specialist, Basic Bot, and the Captain) are trying to advance to a clear shot on Crowder and move up onto the same rise. The larger eastern squad (Lieutenant, Specialist, and 3 Basic Bots) just advance to the next forward cover.
Reeves keeps creeping forward and stays just inside the foliage. Alden climbs up on the rise near Crowder, with Darby watching her back. Swales carries the package further into the foliage on the south side.
Things look like they’re about to get sparky!
Round 3
Darby is watching carefully to fire at any enemy that comes into view.
That western set of War Bots can’t quite get to melee with anyone because of the difficult terrain, so they’re moving through the foliage as fast as they can, hoping for a firing angle. The Basic Bot in that side moves into Darby’s line of sight and he lets fly with his Needle Rifle, taking the bot out of the fight. First kill of the fight! At that, though, the Hakshan Investigator comes through some foliage and takes a shot at Darby with their Plasma Rifle but only vaporizes some plants. The eastern squad of War Bots continues to dash towards the nearest enemy, which is Darby, getting them more or less along that rise or at least the base of it.
Crowder moves up to the nearby Specialist bot and engages it in melee with her Dueling Pistol, rolling 1d6+1(Pistol)+3(Combat) = 1+4 = 5 (meaning she’ll definitely suffer a hit) versus 1d6+2(Blade)+1(Combat) = 6+3 = 9, so she takes a total of three hits! That’s really bad; her Combat Armor doesn’t absorb any of it, and the enemy takes her out. I’ll have her use the last stim-pack to stay up, however; while this leaves her stunned, because of using the consumable, I decide the toxic environment doesn’t take her out. Alden comes crashing through the brush, taking a Rage Out pill as she does so, and engages the Specialist bot in a brawl, rolling 1d6+2(Ripper Sword)+3(Combat)+1(Rage Out) = 6+6 = 12 (getting two hits in due to the natural 6) versus 1d6+2(Blade)+1(Combat) = 3+3 = 6, so the bot takes three hits as well. The armored shell absorbs one of them, but that’s not enough and it is shredded to
bits by her Ripper Sword’s energized serrations. Reeves fires from cover across the way at one of the Basic Bots that has gotten up on the ridge near Darby, and she scores another kill for the crew. Shelby can see another Specialist, and one of his Auto Rifle shots hits, stunning the bot (which manages to resist the toxic environment’s effects). Swales slides down the southern rise but remains concealed behind a cluster of trees.
The bots lost 3 of their number but they’re not programmed for fear.
Round 4
Everybody in the crew except Captain Swales is going in the Quick Actions phase! Crowder clears one of her two stuns and falls back a bit into the foliage. Alden is still under the effects of Rage-Out, so she’s taking on the enemy captain directly in a brawl. That’s 1d6+2(Ripper Sword)+3(Combat)+1(Rage-Out) = 4+6 = 10 against 1d6+2(Ripper Sword)+2(Combat) = 6+2 = 8, so they both take a hit. Alden is only stunned and saves against the toxic environment, while the captain’s armored shell keeps it up - until that toxic atmosphere gets into its innards and it shuts down! Darby fires again at the Hakshan and would take them down, except for that Luck they have - they dodges 2” to the southeast, but that just exposes them to Darby’s second shot with the Needle Rifle, which finishes the job. Shelby fires another volley with his Auto Rifle at the Specialist, and that finishes it off.
Reeves will hold her action, hoping a bot comes out into the open.
That really shredded the enemy, and they only have a Lieutenant and two Basic Bots left. Things are looking good at this point. One of the Basic Bots advances to fire on Darby, the nearest enemy, but it misses. Similarly the Lieutenant moves through the foliage to fire at Darby, missing due to cover. The other Basic Bot stays out of Darby’s sight (and Reeves’ as well) by moving along the base of the rise.
Swales isn’t taking a chance with the package so she moves into full concealment within the nearest cluster of foliage.
Round 5
Darby suddenly remembers that he has a bunch of grenades on him — and the Lieutenant and a Basic Bot are just inside throwing range! He tosses a Frakk grenade at them, but it lands a bit short and they don’t take any damage from it. Alden edges up a bit and takes a snap shot with her Infantry Laser at the Lieutenant, and I spend a story point to reroll her miss into a hit! Might have been a waste, since it only ends up stunned despite the toxic environment. Crowder shakes off the last of her stun and moves into the foliage in front of her, towards the Lieutenant.
One of the Basic Bots on the ridge can get into melee with Alden and does just that, causing her to pop the other Rage-Out. So the bot rolls 1d6+2(Blade)+1(Combat) = 6+3 = 9 (definitely inflicting at least 1 hit) and she rolls 1d6+2(Ripper Sword)+3(Combat)+1(Rage-Out) = 6+6 = 12 (inflicting 2 hits). Alden goes down, and while her Ripper Sword only slices open the bot’s armor, that’s enough for the corrosion to sink in and deactivate it. The Lieutenant tries to get into a brawl with Crowder, but the stun it took from Alden’s shot keeps it from getting all the way there. The other Basic Bot fires at Shelby and misses.
Shelby returns fire at the bot and destroys it. That opens the way for Swales to make a run for the delivery point, spending her action to get the FLG set up for its new life. Reeves dashes off the rise and into the open.
Round 6
During this Quick Actions phase, Darby charges to the Lieutenant with his Boarding Saber drawn. That’s 1d6+2(Boarding Saber)+4(Combat) = 2+6 = 8 versus 1d6+2(Blade)+2(Combat) = 5+4 = 9, but his weapon is Elegant and he can reroll. That ends up being worse, and he takes two hits, one of which takes him down. The only other crew member anywhere near this final bot is Crowder, who rolls out into the open but flanking the bot and comes up firing. She puts two Needle Rifle shots into the enemy, during which I spend a story point to reroll one of them, so this way they both hit. Its armor saves it from one, and it ends up with two stuns - one of which opens it up to the toxic environment.
The crew wins, albeit at quite a cost. The Funky Lil Guy is safe, and it crawls off into the foliage after a long look back at the crew who have sacrificed so much for it.
Post-Battle Sequence
I’m going slightly out of order because I want to check the injuries first. The nano-doc saves Alden from having to roll; she will be fine. Darby, in turn, does have his armor damaged but will otherwise be fine. No deaths or long-term effects.
Back to the proper order of operations: these War Bots do not become rivals. Instead, the crew earns the maximum 8 credits for the battle, plus a story point for finishing the quest. They also get a bonus 2 credits for the shiny bits (Notable Sight) and find another of those personal trinkets on the battlefield, perhaps a memento in the possession of that Hakshan.
We get a total of five rolls on the Loot Table, keeping four:
- Stim-pack (2)
Dueling Pistol- Ship Parts (worth 5 credits)
- Camo Cloak (a screen helping provide cover)
- Glare Sword (effectively a lightsaber)
I decide to pass on the Dueling Pistol, and so the crew now has 40 credits and plenty of equipment in the stash. The XP awards break down like this:
- Swales: 3 (survived and won) + 1 (final stage of quest) = 4
- Crowder: 3 (survived and won) + 1 (final stage of quest) = 4
- Reeves: 3 (survived and won) + 1 (final stage of quest) = 4
- Darby: 1 (casualty) + 1 (first kill) + 1 (killed unique individual) + 1 (final stage of quest) = 4
- Alden: 1 (casualty) + 1 (final stage of quest) = 2
- Shelby: 3 (survived and won) + 1 (final stage of quest) = 4
Based on this, Crowder takes +1 Combat, Darby takes +1 Savvy, and Shelby takes +1 Reactions.
They’re not spending any credits on equipment right now as they’ve got plenty of stuff, and in any case this campaign is drawing to a close.
Before it does, though, somebody somewhere is very upset about what has happened, and the crew gets a new rival here on Maude VI. Shelby thinks about where he’s ended up on his desire for fame, realizing that perhaps this isn’t getting him where he wants, and sinks into melancholy.
Epilogue
As this is the end of this campaign, I’m thinking about what happens to each of the crew, including those who left in prior campaign turns.
Ellen Swales retires from the freelancer life, returning to her homeworld and getting into politics as a decorated veteran and experienced pilot.
Reyna Crowder takes over the Acidic Angel, becoming a captain in her own right and heading further out into Fringe space.
Shurl Reeves retires from flying around, becoming a station trader and putting her merchant license to full use.
Thornton Darby retires as well, becoming a writer and philosopher on the effects of violence upon civilization and the individual.
Saige Alden retires from this sort of freelancing. Instead, she goes back to Stroud Ogden and the two of them work together as information brokers, although their romantic partnership ends amicably.
Robert Shelby becomes a wandering gun-for-hire, eventually finding himself starting a mercenary company that becomes known for only taking the flashiest jobs.
Mark Notley retired already, but he ends up rejoining Swales and becomes her chief of staff in whatever offices she holds.
Final Thoughts
Once I got the hang of 5 Parsecs From Home, I enjoyed it quite a bit. It feels broadly similar to Traveller (the first RPG I really loved) in many aspects, but with a solid wargame basis and less emphasis on detailed world-building. I intentionally wrote the epilogues in such a way as to leave open some continuity when I return to this game shortly.
Before that, I’ll play a few other things, but I expect to pick this back up in March - not that long away!