5 Parsecs From Home - Campaign Turn 8
Things are getting a bit hot here, but the crew will try to keep pulling in credits while they can.
World Steps
Important but boring bits: crew upkeep is 1 credit total, and we have no debt or repairs to pay for right now. Reeves spends a turn in Sick Bay plus uses a Med-patch to reduce that to zero remaining turns, so she’s ready to go, albeit with permanent injuries reducing her speed.
Crew Tasks
No need to find a patron as we have a pending job from one.
- Ellen Swales: Repair
- She attempts to fix the Duplicator, but fails and in fact uses up some Spare Parts in the attempt (down to 1).
- Reyna Crowder: Trade
- Quality food and booze. Can be used to recruit a new character to the crew (single use).
- Shurl Reeves: Trade
- Medical pack. Get another Med-patch, replacing the one she used.
- Thornton Darby: Explore
- Completely lost again! Finds his way back again, too, though.
- Finds a possible bargain. Give up a weapon of choice (Ogden’s old Colony Rifle) for a broken Flex-Armor and a broken Time Distorter.
- Mark Notley: Decoy
- -1 to Rivals roll
- Saige Alden: Decoy
- -1 to Rivals roll
Job Offers
The other corporation, Apex Electronics, still offers 3 credits in Danger Pay but the job can’t wait past this campaign turn. We need to secure a particular location against pirates; clearly, these space raiders want some valuable tech and we need to make sure they don’t get it.
Equipment
The new equipment isn’t usable yet. Crowder’s left with just a handgun. Reviewing old notes, we have a Needle Rifle from the job against the Fire Sharks, though, so she’ll take that. It “uses magnetism to launch a hail of razor-sharp needles at a target.” This weapon has 2 Shots (attack dice) and inflicts 2 hits if the roll is a natural 6.
Battle Setup
The combined efforts of Notley and Alden keep our rivals off our backs for now and we can do the patron job. There’s no chance of invasion, either, fortunately.
- Deployment Conditions: none
- Notable Sights: Peculiar Item (+2 XP)
- Objective: Secure
- Must end 2 consecutive rounds with crew within 2” of the center
- Crew with an enemy within 6” does not count
- Holding the Field also counts (since we can complete at our leisure)
- Enemy: Criminal Elements
- Extra bounty of 1 credit for holding the field
- Pirates: Space-faring looters who descend on colonies to raid, pillage, and enslave.
- Loot: Gain an extra Loot roll if Holding the Field
- Panic 1-3, Speed 5”, Combat +0, Toughness 4, AI Aggressive
- 1 Specialist with Power Claw
- 1 Lieutenant and 4 Pirates with Infantry Lasers
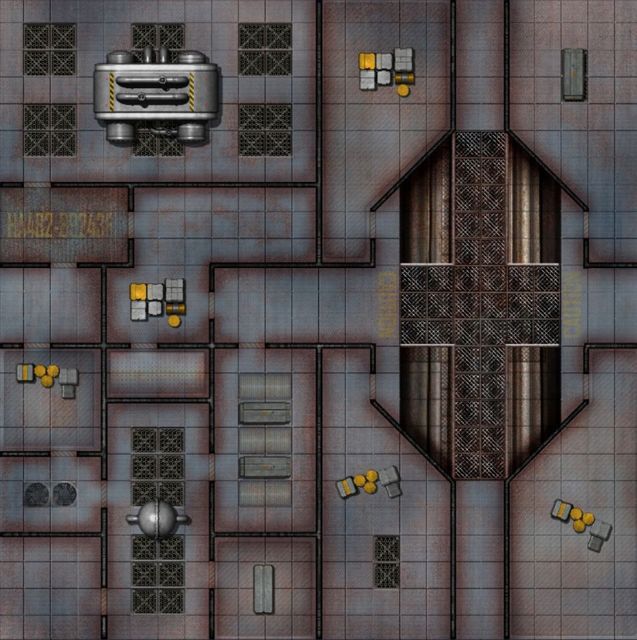
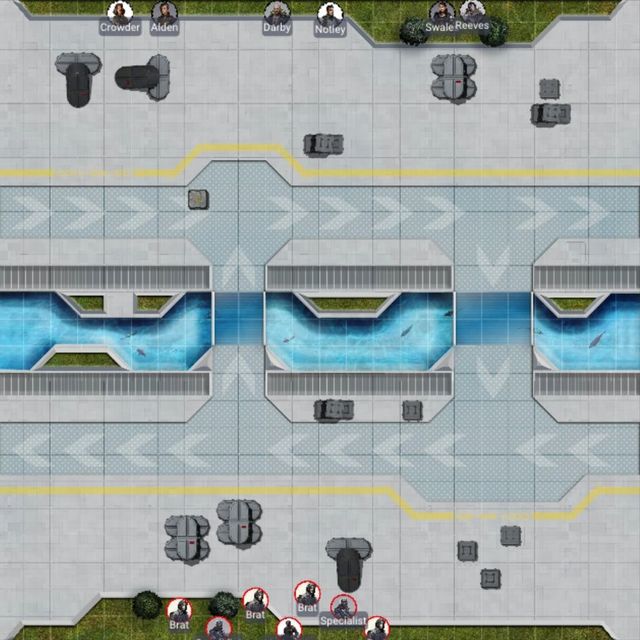
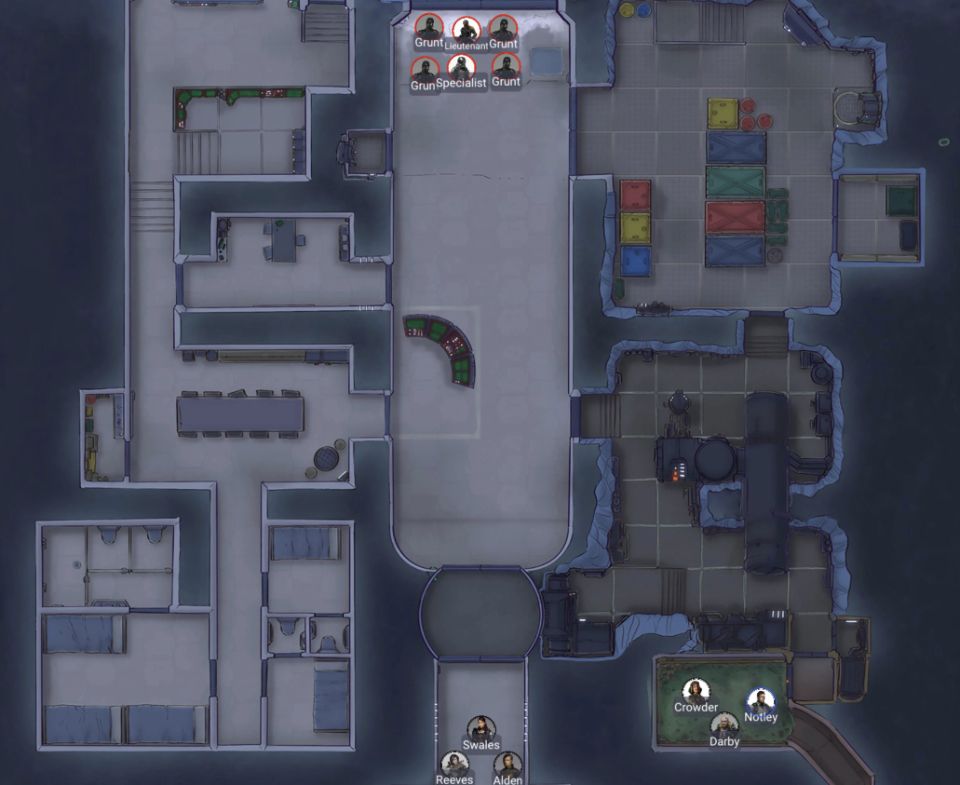
I decide to use a map originally intended as part of an Ice World Prison, but treating it as an industrial facility and increasing the “size” so that it’s large enough for a decent fight, although that means some of the decor and cover elements will be slightly larger compared to the tokens I’m using for the figures.
The crew needs to secure the control panel in the center of the map, which can only be entered from the north or south. The pirates will come in from the north, which means directly into that central corridor, and our crew will deploy from the south.
In fact, I’m going to deploy the three armored crew members (Crowder, Darby, and Notley) in the waste area on the right, while the others will deploy into the central corridor behind the airlock. With luck, the armored crew (who are also the fastest, generally speaking) can flank the enemy.
Rules of Engagement
- All Laser, Beam, or Blast weapons are -1 to Hit at ranges exceeding 9”.
- Aggressive enemies set up in one cluster with 1” between each figure.
- Aggressive enemies will not Aim.
- Aggressive enemies with opponents in sight will advance at least half a move towards them, attempting to remain in Cover if possible.
- Enemies that are unable to see any opposition, or which are within 12”, will advance as fast as possible towards the nearest opponent, attempting to enter into a Brawl.
- They will not enter a Brawl with an opponent that has higher Combat Skill.
- I decide to exclude the Specialist here, otherwise they can do nothing.
Round 1
To start us off, Notley activates in the Quick Actions phase and dashes out of this industrial waste area into a sort of workshop.
In the Enemy Actions phase, all the Pirates rush down the central corridor towards the crew waiting on the other side of an airlock.
The rest of the crew activates now. Crowder and Darby also leave that smelly area, following Crowder (although he’s faster and they’re still behind him somewhat.) Reeves and Alden spread out slightly in the corridor while Swales moves up to the airlock door on this side, ready to open it at an advantageous moment.
Round 2
Most of the crew could activate in this Quick Actions phase. Notley dashes around to get cover behind some machinery for when the enemy comes through the nearest door. Crowder takes up a position next to the door with a bit of cover, while Darby covers her. The others will hold their actions until the Slow Phase.
The enemy hears movement and splits up, with the first Grunt running to the industrial door and using an action to open it. He’s got line of sight to the three flankers now. The Specialist follows, moving in front of the door to a position where only Notley can see him (reducing his exposure). One more Grunt moves in that direction, standing against a wall, but unable to reach the action. The other two Grunts and the Lieutenant move down the corridor, but they’re staying just out of LOS of any of the crew.
Our corridor squad is still safely behind two airlock doors, so they hold their actions. As it stands right now, it would take a third of the enemy squad an action to open the doors, which would give the crew the chance to shoot first, and we want to preserve that advantage.
Round 3
Only one crew member can activate in the Quick Actions phase, and Notley takes the opportunity to shoot at the Specialist. Blast Rifle takes him down, no worries about Power Claw.
The pirates want to open up the opportunity for their own to get in a shot, so one Grunt moves to stand over the Specialist’s body and fire his Infantry Laser at Notley, hitting him once - but the Combat Armor takes most of the hit, and Notley is only stunned. Another Grunt moves to stand in the door and take another snap shot at Notley, which would take him down. However, our man activates a Stim-pack, leaving him only stunned and otherwise still in the fight. The other two Grunts and the Lieutenant dash to the airlock but don’t have an opportunity to open it yet.
Again, Swales, Reeves, and Alden hold their actions; this should pay off in the next round when the pirates open the doors. Crowder crosses the doorway to open up firing lanes for herself and Darby; one of her Needle Rifle’s shots takes down a Grunt, while Darby maneuvers a bit and takes out the other pirate in the doorway.
At the end of the round, one of the remaining pirate grunts panics and runs away, while the other two pirates stick around despite what is very clearly a losing situation for them.
Round 4
Two crew members go this round. Darby moves to secure the objective, then turns and fires at one of the pirates at the airlock, taking down the last Grunt. Crowder moves into the doorway where a pile of bodies is starting to accumulate, firing at the Lieutenant from cover and taking him down.
Swales, Reeves, and Alden never had to fight beyond drawing attention to themselves; this is almost as unqualified a victory as we can get (barring spending a Stim-pack on Notley, but that’s why we have it).
Post-Battle Sequence
Fortunately, these criminals recognize how overmatched they are and don’t become Rivals (we have enough of those already). We get a total of 7 credits from the job, including the Danger Pay, plus another 1 credit from bounties on these pirates. The crew finds an extra Starship Part on the battlefield, probably from whatever craft the pirates used to get here; that will come in handy as we’re trying to get an improved Medical Bay on the Acidic Angel. They also find a Grapple Launcher and a Hot Shot Pack, both of which are damaged and will need repairs before they can be used.
Pirates are not a real invasion threat and we didn’t have any injuries this time, thanks to the Stim-pack. Everyone gets 4 XP, and Notley gets an extra 1 XP for being the first to take down an enemy. Crowder and Reeves both spend XP on +1 Reactions, while Darby improves his Speed by 1 and both Notley & Alden get an extra point of Toughness. (Swales is saving hers up.)
Swales can almost but not quite afford the new Medical Bay; one more job should do it, hopefully.
Unfortunately, our reputation took a bit of a hit when we grabbed that starship part, and Apex won’t be working with us anymore. Perhaps it was actually their equipment? Too bad; Weyland-Yutani seem to be better partners anyway, or at least they have a better benefit. Finally, while doing some maintenance, Darby finds that his Blast Rifle was damaged in that fight and will need repair before it can be used again. This probably means we’ll need to do another equipment review in the next campaign turn, because I need to ensure everybody has a decent ranged weapon.