5 Parsecs From Home - Campaign Turn 7
Elyria has a beautiful façade but in fact conceals darkness, as the crew has been learning. That will only continue here.
World Steps
Upkeep is still at the minimum 1 credit, and we no longer have any outstanding debts. The accounts don’t have enough left to speed up Shurl’s recovery, sadly so we’ll have to wait another couple of turns.
Crew Tasks
- Ellen Swales: Explore
- She deserves a chance to see things a bit, and maybe work on this “quest”.
- While talking to possible informants and other people of interest, she gets offered a small job. During this campaign turn’s mission, one of the enemies will be worth a 2 credit bounty if we kill them.
- Reyna Crowder: Trade
- On the black market, she gets a deal on some contraband, netting us 6 more credits but another rival. Never figured Crowder for a smuggler!
- Shurl Reeves: Sick Bay
- Two more turns to go after this one.
- Thornton Darby: Explore
- Unfortunately, he gets completely lost here in the floating city.
- Fortunately, he finds his way back in time.
- During his wanderings, he meets an information broker who offers to sell him some Quest Rumors, but we can’t afford them right now.
- Mark Notley: Decoy
- He’s not going on whatever mission we take next, so he’s going to try to keep us from getting in an unexpected shootout again.
- Saige Alden: Trade
- She gets a good deal on a luxury trinket.
- That trinket then gets traded on for some medical reserves, and the Acidic Angel now has 2 Stim-packs and 2 Med-patches in its hold.
Narrative Threads
Before moving further in this process, I want to spend a bit of time on the loose threads from the prior campaign turn.
Ellen Swales has been gathering rumors about prison breaks, monsters, and other oddities. Her search for the “truth” got her into adventuring in the first place. Trying to figure out what this might be, I roll on the Action Meaning Tables from Mythic GME and get “Celebrate Success”; this gives me the idea that somebody accomplished some great feat and is being celebrated for it, but she wants to know the real deal. That could be related to her background on a peaceful high-tech colony, or her previous service on another ship.
Putting those together, she might have been part of a crew that did something that didn’t really seem amazing but were lauded for it anyway. I decide this means they transported something and she wants to understand what it was, because she has suspicions about it. But somebody in Weyland-Yutani knows about this, and knows she’s looking into it; that’s why they gave her this data file that will help her find out more. They’re connected to another corporation as well, perhaps as a double agent. Ooh, corporate espionage!
Checking with Mythic GME again, this time regarding the Peculiar Item that Crowder found, the Objects Meaning Table says “Moving”, and the Descriptors Meaning Tables say “Aggressively Mysterious”. I decide to interpret the first one as something emotional; it’s a twirling holographic piece of jewelry with a design unlike anything she can find in the ship’s databanks. Is is related to the Vent Crawlers?
Job Offers
Weyland-Yutani has a job that will pay 1 credit in Danger Pay, but it needs to be done this campaign turn. As usual, they’ll send a security team to help deal with our rivals if we succeed. They want us to fight off somebody else’s Hired Muscle, another Corporate Security team.
The other corporation is offering 3 credits in Danger Pay for a job that can be done this campaign turn or the next, based on our existing reputation here on Elyria. There’s a a point of interest they’d like us to secure for them against a group of pirates. (They’re also connected somehow to the rumors Ellen’s been hearing, but we don’t know what that means yet.)
Obviously, it makes the most sense to take the job that needs to be done this turn, so The Weekenders will be fighting off some Hired Muscle for Weyland-Yutani.
Equipment
Darby will wear the combat armor that Notley doesn’t need right now. Crowder will use Reeves’ modded Colony Rifle with the Bipod as well as Notley’s Boarding Saber. Everybody else is good to go.
Battle Setup
Despite Notley’s best efforts and the reduction of rivals by a Weyland-Yutani security team, we’re still going to be interrupted by rivals during this mission that chased us down after Crowder’s contraband deal.
- Deployment Condition: Small encounter (reduced crew and enemy numbers)
- Notable Sights: Curious Item (can be sold for 1 Credit)
- Attack Type: Brought friends (1 additional enemy)
- Enemy Type: Criminal Elements
- Gene Renegades: Devotees of post-growth genetic reconfiguration, they can take the form of everything from a woman with blue skin to cat-bear-people.
- Extra bounty of 3 credits if we hold the field after the battle.
- Panic 1-2, Speed 5”, Combat +0, Toughness 4, AI Cautious, Weapons 1B
- Numbers: 4 (1 Lieutenant, 1 Specialist, 2 Regulars)
- Regulars and Lieutenant: Scrap Pistol + Blade
- Specialist: Marksman’s Rifle
- No unique individuals
Additionally, we’ll be caught without Darby; the crew in the fight will only include Swales, Crowder, and Alden.
So these Gene Renegades are mad about the contraband that Crowder was involved in; perhaps they consider it a threat to their own business.
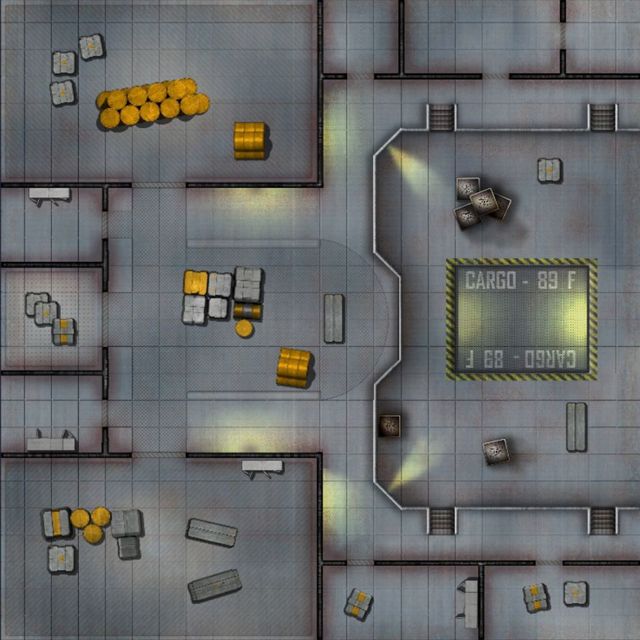
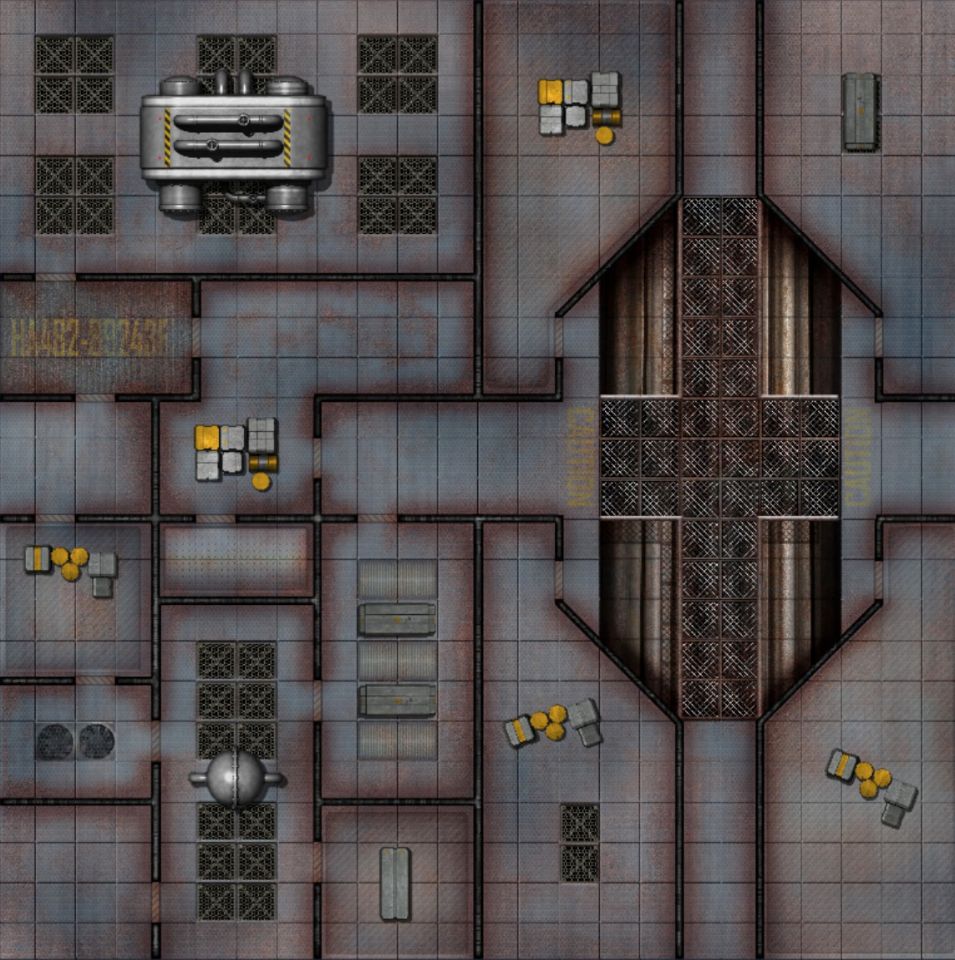
As we’re still on a floating city, I want another urban or industrial map, and this time I don’t want to add a bunch of decor to it. In fact, I’m going to re-use the Industrial map from The Doomed - Session 3 as I think it will work fine for this purpose. That will still require a bit of decor to add more cover elements, but I’ll keep it simpler this time around. I haven’t rolled yet for deployment edges, so this mostly just means adding some crates and a few bits of industrial machinery to some of the larger spaces.
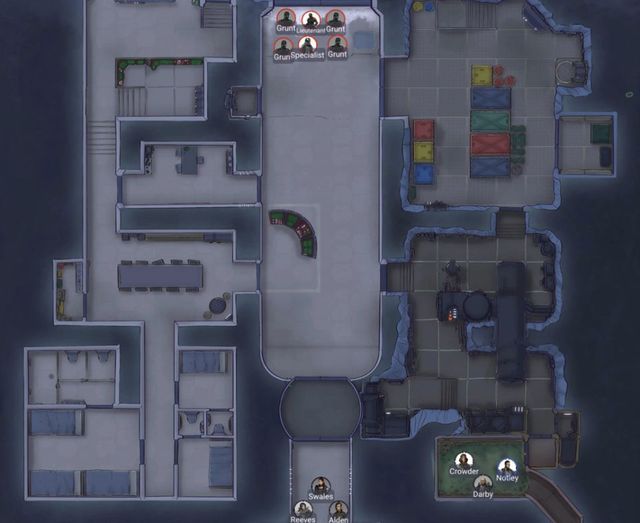
The crew will deploy from the southern edge, meaning the Gene Renegades will be coming from the north. Cautious enemies are set up in two groups 6” apart.
Battle music engaged!
Rules of Engagement
- All Laser, Beam, or Blast weapons are -1 to Hit at ranges exceeding 9”.
- Cautious enemies will attempt to stay in Cover whenever possible and will try to Aim when shooting from Cover.
- Figures with an opponent in sight and range will remain where they are and take Aimed shots. Otherwise, they will advance in or behind terrain features, trying to establish Line of Sight to opposing figures.
- They will attempt to engage targets at as close to maximum range as possible, and will not advance voluntarily within 12” of opposition.
- As a general rule, they will not enter Brawling combat.
Round 1
Just for my own sake, I intentionally set up in a different room than before so we don’t get stuck in the same chokepoint as last time.
Swales and Alden get to activate in the Quick Actions Phase, and they just dash north.
During the Enemy Actions phase, the Regular and Specialist in the more central area move to have LOS on the door into their room, while the other Regular and Lieutenant dash towards the exit from their larger room on the northwest.
Crowder activates in the Slow Actions Phase and follows the others.
Round 2
All the crew can go in the Quick Actions Phase, and they all continue to move out of the room where they deployed.
The Lieutenant and Regular in the northwest move to another room but stop, since they don’t want to get too close to the crew. The other two do not move as they know the crew are within 12” already.
I decide not to roll on the Battle Events table this time.
Round 3
None of the crew can go in the Quick Actions Phase, so the Gene Renegades get to go first. But due to their cautious nature, they only set up with LOS to their doors.
Similarly, Swales, Crowder, and Alden all move to the door of the room where a Specialist and Regular are waiting.
Round 4
Swales gets to go in the Quick Actions phase and enters the room, but stays back in a corner where the non-Specialist can’t see her. She then fires her Fury Rifle at the Specialist, knocking them back with two stuns. (It occurs to me that I didn’t have them particularly well-positioned, unintentionally.)
In the Enemy Actions phase, the Specialist recovers from one stun and moves behind cover. The Regular moves behind cover as well (where they should have been in the first place) and fires a Scrap Pistol at Swales, but misses. The other two Gene Renegades don’t move, continuing to watch the door.
Alden acts next, entering the room and flanking the Specialist before letting loose with a Shotgun, which puts two more stuns on them and thus taking them down when they reach their maximum 3 Stuns. Crowder enters finally and pulls back next to Swales so as not to block the captain for the next round, then takes a quick shot with her Colony Rifle that hits the crates in front of the enemy.
(I forgot to roll for panic.)
Round 5
Only one of the crew can go in the Quick Actions phase, so Alden runs up with a Shotgun and flanks the Regular from around cover, taking them down immediately.
The other two enemies don’t advance.
Now in the Slow Actions phase, Alden and Swales leave the room and head west. We need to hold the field.
This time I remember to roll for panic, but neither of the enemies bail.
Round 6
Swales and Alden go before the enemies again; the captain gets to a new room but stays behind cover, while Alden just gets back to the door of the room they’re currently in, trying to stay with the group.
The remaining two enemies fall back a bit, trying to set up a crossfire.
Crowder follows the captain.
Round 7
The dice favor the crew, allowing them all to activate in the Quick Actions phase. Swales moves next to the door, where she’ll have cover but can still see the Lieutenant, then fires her Fury Rifle which tears through the Gene Renegade and takes them down. Crowder advances to flank the other side of the same door, but that does not give her a shot on the remaining enemy. There’s a back way to the room where the Gene Renegade is holed up, and Alden will attempt to flank them from there. It’ll be a few rounds before she gets there, though, and hopefully the fight will be over by then.
In fact, the cautious Regular falls back in that direction, taking cover from the advancing pair. They don’t panic, though.
Round 8
Alden activates in the Quick Actions phase, dashing south to get behind the enemy if needed.
That Gene Renegade doesn’t move, keeping their Scrap Pistol trained on the door in front of them. They can hear Alden coming but they know they have a bit before they have to deal with that.
Swales advances to the next door, ensuring she stays out of the line of fire from the enemy, and Crowder follows her to cover the other side of the door.
Round 9
None of the crew goes first this time, so the Gene Renegade gets to act. They’re in as good a position as they can be, as they know they’re about to be flanked but Alden won’t be there until the next round.
Of course, Alden gets close but doesn’t want to run into an exposed position, so she gets as close as she can, intending to run in shooting in the next round if needed. Swales runs around a corner, still out of sight but covering the door. Crowder takes a deep breath, checks her combat armor, and runs around to where she can see the enemy. She’s out in the open, but she’s got a good shot. If she misses, she’s in trouble (albeit armored), and in fact that happens. The shot hits the crates in front of them.
Round 10
The Gene Renegade goes first. No matter what, Alden will come up behind them this time but they have a clear shot at Crowder. They hit her with a Scrap Pistol, center mass, but the armor takes the brunt of it and she’s only stunned.
That’s Alden’s cue, and she comes around with her Shotgun at the ready (after a moment in which she considered pulling out the Ripper Sword instead) and fires, nailing the enemy. They’re down, and the fight is over.
Post-Battle Sequence
These Gene Renegades are still angry, and perhaps this has angered them further. They are not done with us. (Our job from Weyland-Yutani is no longer available, unfortunately). I decide that the crew can’t get the bounty for the “smaller job” offered to Swales, as this was a rival showdown that could not have been what the offer was about, narratively.
In any case, between bounties and salvage, the Weekenders will earn 7 Credits from this fight plus an additional 3 for holding the field. They also find a Curious Item, which we can sell for 1 Credit, another Stim-pack, and one more set of Combat Armor. Alden already has a Deflector Field, so Crowder will take the armor and give Notley his back (assuming he’s going to want it still).
Nobody was injured and these enemies were not an invasion threat. All three of the participants get 4 XP, with Alden getting 1 more for being the first to inflict a casualty. She spends that right away on an extra inch of Speed, while Swales takes +1 Combat.
They’re doing a bit better financially, but Swales is saving up for a ship upgrade for the Sick Bay.
When they return to the ship, Notley and Darby are besides themselves. Reports of war are coming closer, and they’re worried it will be here soon. (We’re now at +4 to an invasion roll for Elyria.) Reyna hears something useful, though, while out drinking, and picks up another Quest Rumor.
This brings up an interesting mechanic from my perspective: if the crew never fights an invasion threat themselves, then no invasion happens, as I understand it. Of course, now that we’re at +4 for that, if we do fight such a threat, it’s highly likely things will come to a head (as we’d just need to roll 5+ on 2D6 plus whatever modifiers from that fight).
Hopefully next time nothing like that happens.